How to Set up a Virtual Machine Using Microsoft Virtual PC
Microsoft Virtual PC 2007 SP1 provides you with a platform to create and run more than one virtual machine (desktop or server). Each virtual machine runs with its own operating system. Microsoft Virtual PC 2007 SP1 now supports Windows Server 2008, Windows XP SP3 and Vista SP1 operating systems, as well as all other operating system.
Installation of virtual machines using Microsoft Virtual PC consists of the following steps:
- Creating a new virtual server/desktop disk
- Creating a new virtual server/desktop machine
- Configuring virtual server/desktop environment
- Mount of the image file (ISO, VHD)
- Installation of operating system
Step 1: Creating a New Virtual Server/Desktop Disk
The first step to create a virtual machine is to create a new virtual disk for it. Each virtual machine creation will require a separate creation of virtual disk. Virtual disks have a file extension of .VHD file. While creating a virtual disk file, it is possible to provide an option to dynamically expand the disk size based on usage.
To create the virtual disk, follow these steps:
1. Start the Microsoft Virtual PC shortcut. Start -> Programs -> Microsoft Virtual PC
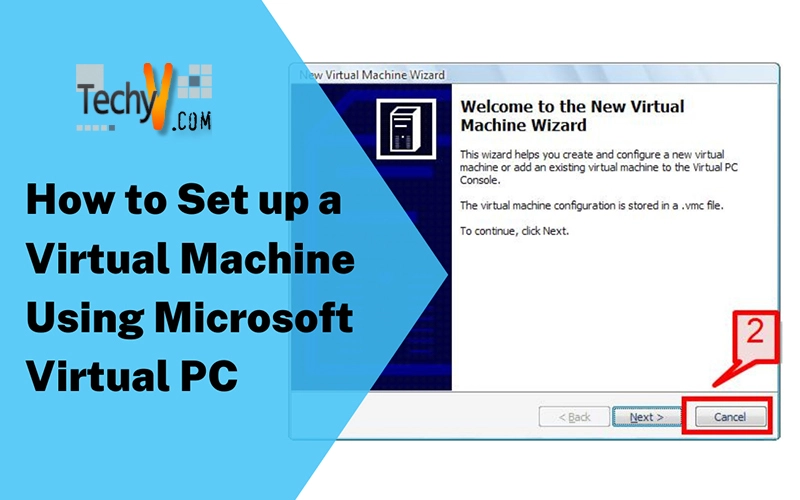
2. The next screen to appear will be a welcome screen for creating a new virtual machine. Click cancel.
Using Microsoft Virtual PC to Create a Virtual Machine
Microsoft Virtual PC 2007 SP1 provides you with a platform to create and run more than one virtual machine (desktop or server). Each virtual machine runs with its own operating system. Microsoft Virtual PC 2007 SP1 now supports Windows Server 2008, Windows XP SP3 and Vista SP1 operating systems, as well as all other operating system.
Installation of virtual machines using Microsoft Virtual PC consists of these following steps:
- Creating a new virtual server/desktop disk
- Creating a new virtual server/desktop machine
- Configuring virtual server/desktop environment
- Mount of the image file (ISO, VHD)
- Installation of operating system
- Creating a New Virtual Server/Desktop Disk
The first step to create a virtual machine is to create a new virtual disk for it. Each virtual machine creation will require a separate creation of virtual disk. Virtual disks have a file extension of .VHD file. While creating a virtual disk file, it is possible to provide an option to dynamically expand the disk size based on usage.
To create the virtual disk, follow these steps:
1. Start the Microsoft Virtual PC shortcut. Start -> Programs -> Microsoft Virtual PC
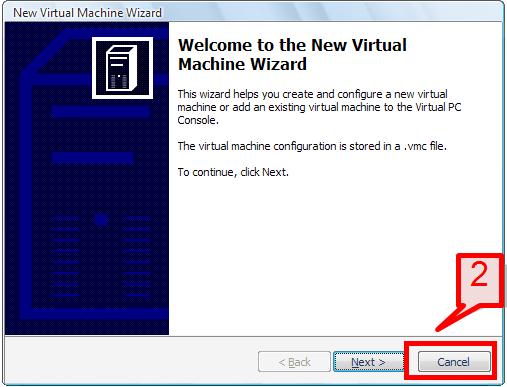
2. The next screen to appear will be a welcome screen for creating a new virtual machine. Click cancel.
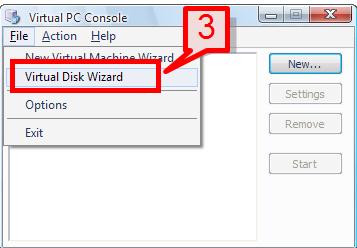
3. On the virtual PC console window, select file -> New Virtual Disk Wizard.
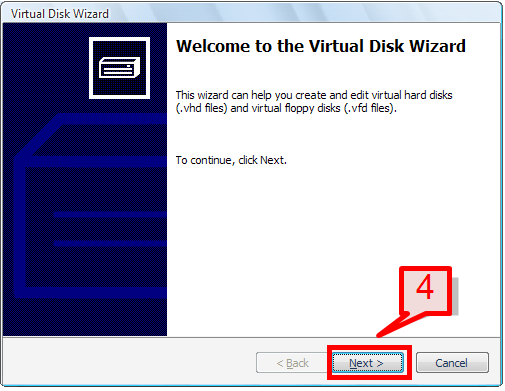
4. Click next to continue on to the welcome screen wizard.
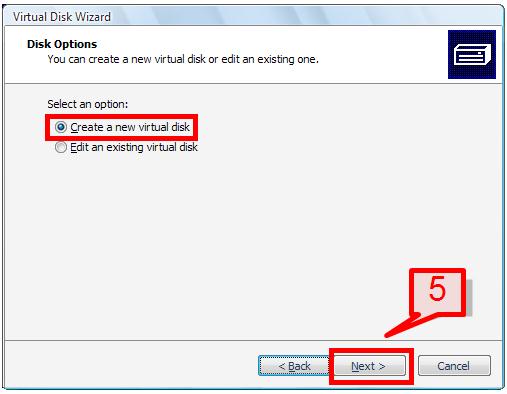
5. Select the first option ‘Create a new virtual disk’ and click next.
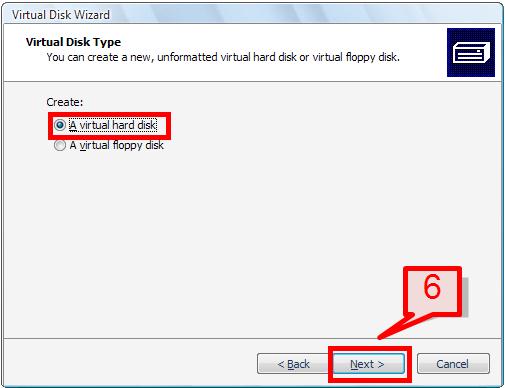
6. On disk type window, select ‘A virtual hard disk’ option and click next.
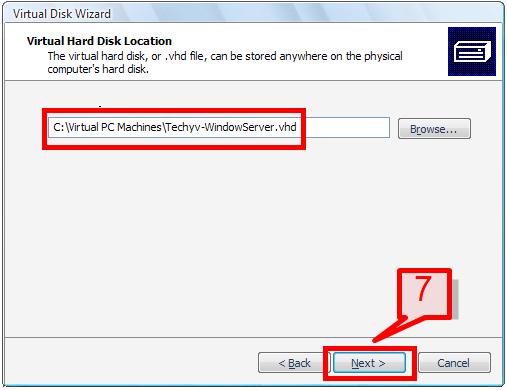
7. On the next screen, provide the disk location and disk name where you wish to copy the virtual disk files. After providing the path click next.
8. Select the first option ‘Dynamically expanding’, and click next.
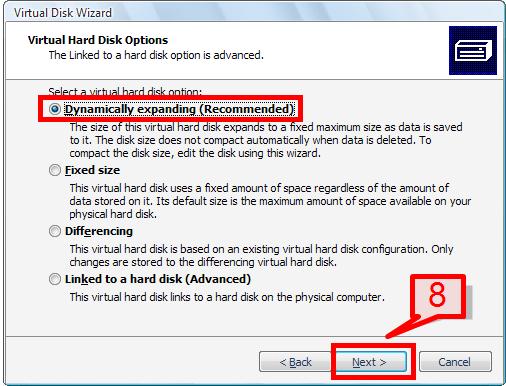
Note: The ‘dynamically expanding’ option lets you minimize the disk size after you have deleted data from the virtual machine. This results in maximum utilization of virtual hard disk space.
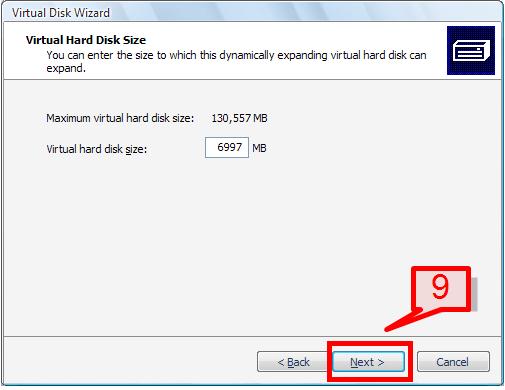
9. Provide a size for the hard disk drive and click next.
10. Click finish to complete the virtual disk wizard.
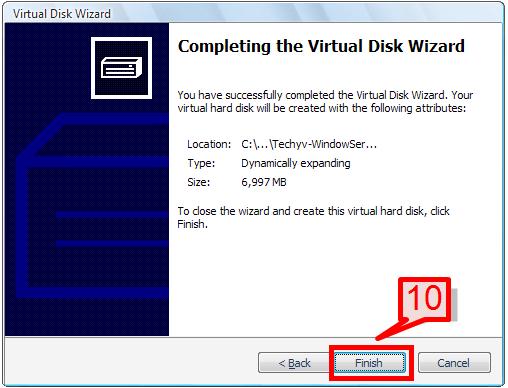
11. The virtual hard disk is then created on the specified location mentioned above. The size of the disk is few KB in size initially, but will go on increasing as we install the operating system to it.

Creating a New Virtual Server/Desktop Machine
The next step is to create the virtual machine. Follow the below steps:
1. Start the Microsoft Virtual PC shortcut. Start -> Programs -> Microsoft Virtual PC
2. The next screen that appears will be a welcome screen for creating a new virtual machine. Click cancel.
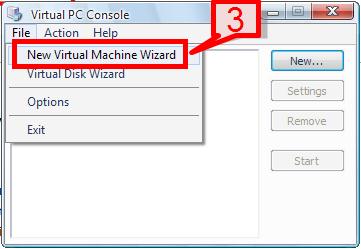
3. On the virtual PC console, select File -> New Virtual Machine Wizard.
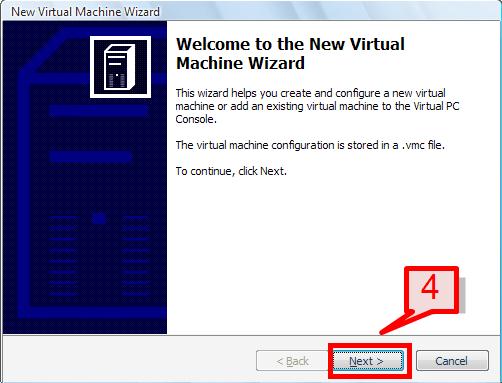
4. Click next to start the virtual machine wizard.
5. Select the first option ‘Create a new virtual machine’ and click next.
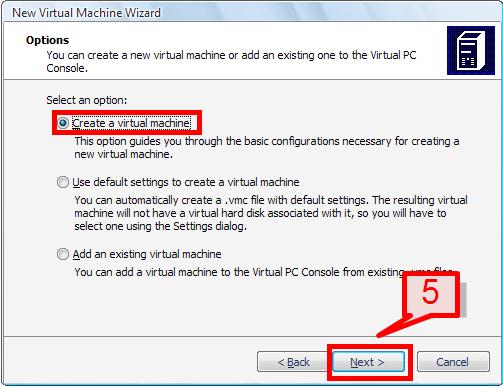
6. On next window, provide the location and name of the virtual machine and click next.
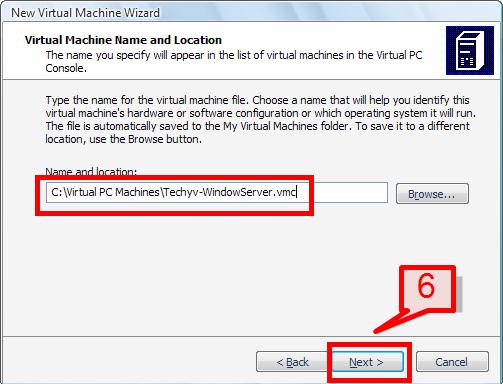
Note: The virtual machine file name will have the file extension of .VMC file.
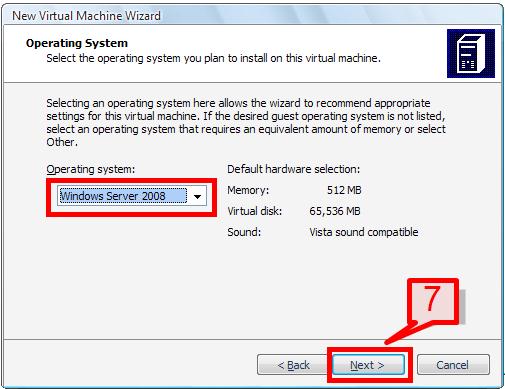
7. From the operating system drop down menu, select an operating system that will be installed to this virtual machine, then click next to continue.
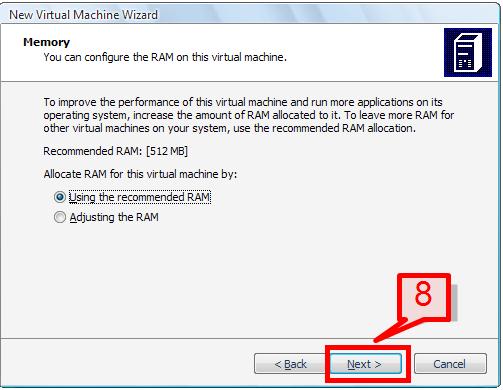
8. On the RAM configuring page, select the default option to use the recommended RAM or select adjusting the RAM option to select RAM as per your requirement. The RAM option you choose depends upon how the virtual machine will be used after it’s built, and what application will be installed there.
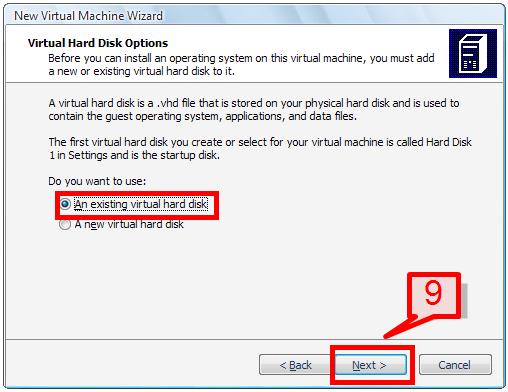
9. Select ‘An existing virtual hard disk’ option and click next.
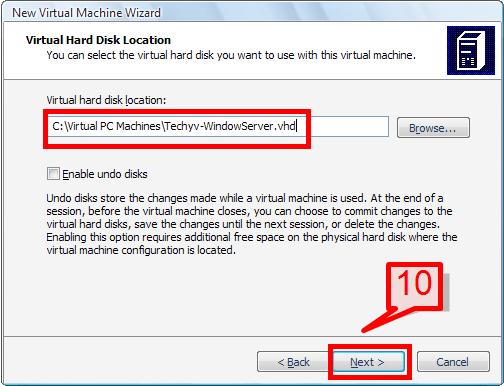
10. In the disk location window, browse for the VHD file that was created in first section and click next to continue.
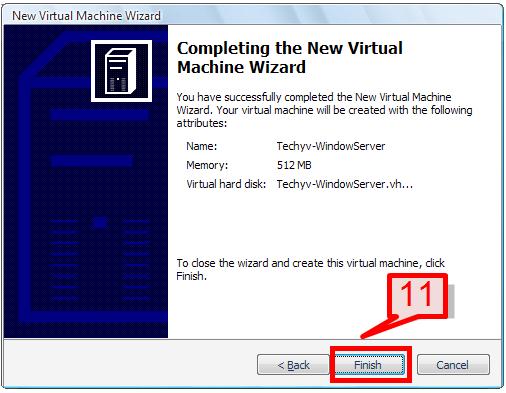
11. Click finish to complete virtual machine wizard.
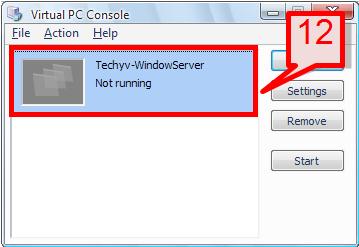
12. The virtual machine will now appear on the virtual PC console. The status will show as not running, as the virtual machine has not been started yet and the image file still needs to be installed and mounted.
Configuring Virtual Server Environment
We have created the virtual disk and virtual machine. The next step is to configure or customize the server.
1. Start Microsoft Virtual PC shortcut. Start -> Programs -> Microsoft Virtual PC
2. Select the virtual machine and click settings.
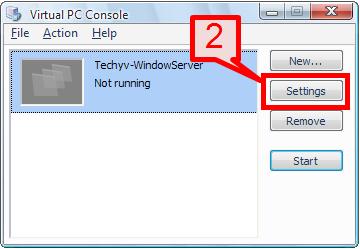
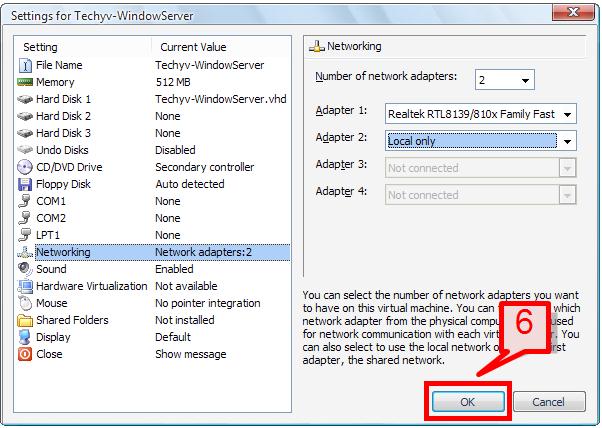
3. On the setting window, there are different options to customize the virtual machine environment. You can change the machine name, increase or decrease RAM size etc. Also, if you are planning to set up multiple machines in a network environment, the networking option lets you perform this task.
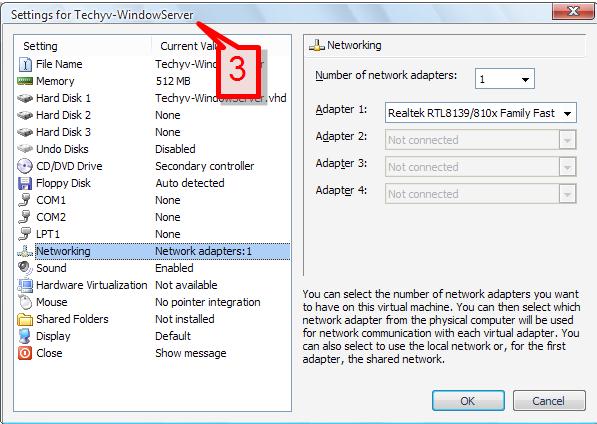
4. Select the networking option, and then on the right hand pane, select the number of network adapters as 2 or more.
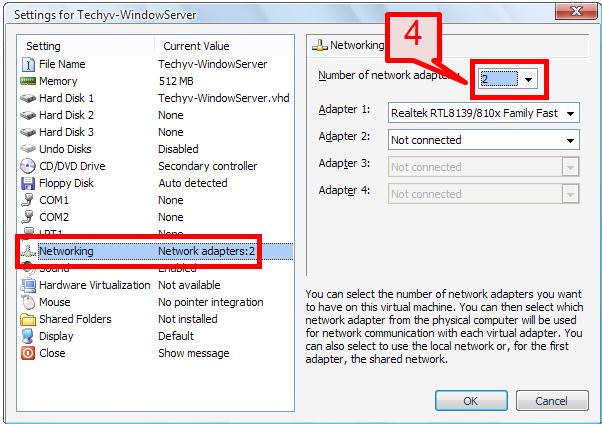
5. For adapter 1 leave the default option as it is. For adapter 2, choose the local only option from the drop list.
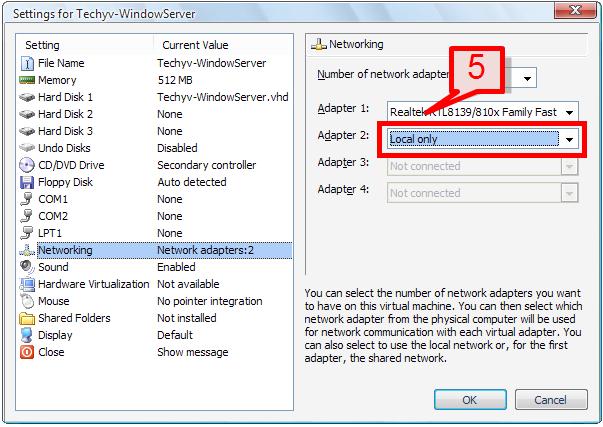
6. Click ok to save the changes. This setting enables you to make connections with other virtual machines and to the physical host machine so that they can communicate with each other.
Mounting the Image file (ISO, VHD)
We will now mount the image file to start installing operating system to the virtual machine.
1. Start Microsoft Virtual PC shortcut. Start -> Programs -> Microsoft Virtual PC
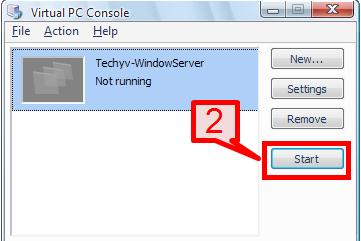
2. Select the virtual machine and click Start.
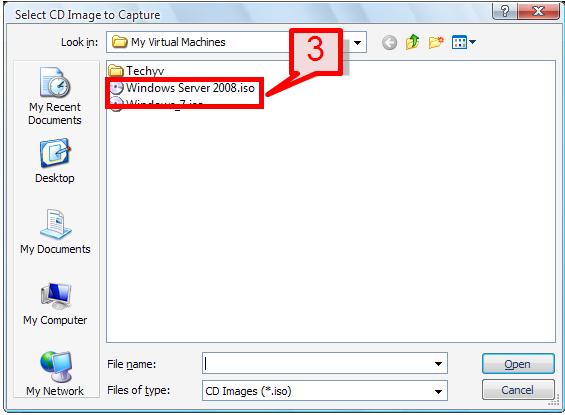
3. On the virtual PC console, select the CD tab. Then select ‘Capture ISO Image’ option. Browse for the ISO image file and select it.
Restart the virtual machine so that next time on start, it will pick the ISO image. Select the Action tab from the virtual PC console and click on Ctrl + Alt + Del to restart the server. The Virtual PC console will then start loading the operating system files.
Installation of the Operating System
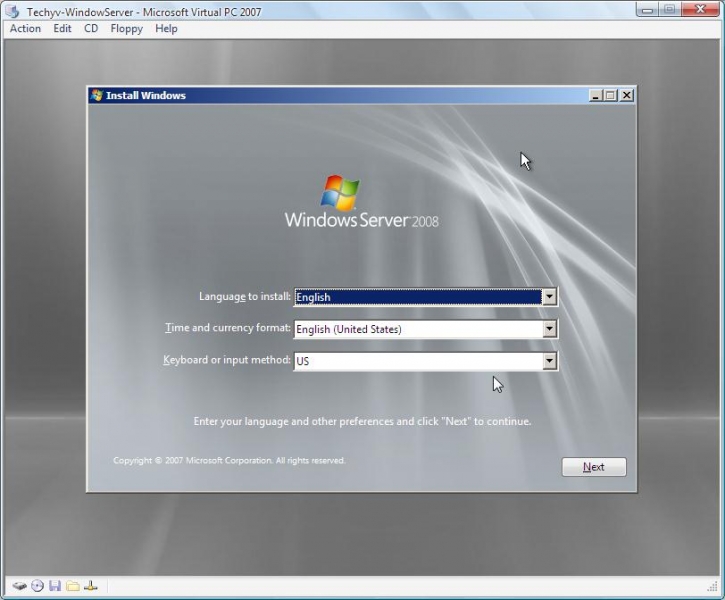
Once the operating system files get loaded, you can follow the normal installation of an operating system on the virtual machine as it’s done for the installation of an OS on a physical machine.
After the installation of the operating system, you can go back to the virtual PC console to check for other options. Lastly, pause the virtual machine and remove the machine from console list.
