STEP BY STEP INSTALLATION OF IBM LOTUS DOMINO 8.5
Lotus Domino is an IBM Server application program that is commonly used for enterprise e-mailing, scheduling, collaboration and messaging that can be deployed in a company as a core e-mail server which will be very helpful for them to enhance the productivity of their people. It works as a backbone of a simple and real-time work environment. Previously, Lotus Domino was named as Lotus Notes Server and it was the server component of Lotus Corporation’s client-server messaging technology in the beginning.
Lotus Domino renders the complete substructure required to create, test, deploy and manage distributed applications. Other functionalities of Lotus Domino includes directory structure, database, centralized administration, security rich messaging, Web services, e-mail server, calendaring engine and so on, all in one platform.

Before you start the installation procedure and setting up of IBM Lotus Domino server, it is important for you to plan the server organization specific naming and security. In addition to this, you must have a complete understanding of your existing network configuration and how Lotus Domino Server can fit into your network. The default installation directory of IBM Lotus Domino on your Windows 2003 Enterprise Server is “C:Program FilesIBMLotusDomino”, unless you intentionally planned to install the program files to a different location.
Another important thing to keep in mind while installing Lotus Domino is that once you start unpacking the installation package, do not extract the files (executables), to the same directory on which you are planning to install the Domino application.
Before running the package file of Lotus Domino, do check the following things which are very important so that it may not cause any problem in the middle of installation.
- Keep in mind that the mandatory hardware and pre-required software are already installed and working properly.
- Go through the Installation Guides and Manuals for that specific operating system on which you are going to install the Domino Server.
- Disable any active screen savers and disable virus detecting software.
- Reboot the machine if there is any pending reboots required caused by installing of other software.
- It is important to keep in mind that no other application is running. This may cause the corruption of files in other applications and the installation application might not work properly.
In this article we will follow the procedure mentioned below, to install IBM Lotus Domino on a Microsoft Windows Server machine.
1. To start the installation, insert IBM Lotus Domino setup disk into the CD/DVD drive of your server machine and execute the package file. It will ask for the location to save the setup files. I mentioned a different location from the location where I planned to install the software.

Figure 1 Location to Save Files
Click on the Next button to continue. It will start reading contents of the package and extract the setup files to “F:Sharath”.

Figure 2 Extracting Files
2. Now the executable files have been extracted to folder F:Sharath. Go to that folder and run the installer executable ( Setup.exe ), After invoking the setup.exe file to launch the Domino 8 installation setup, the Java™ based InstallShield Wizard box opens, as shown in Figure below:

Figure 3 Domino Java-Based Installer
3. After the JVM installation is completed, a new welcome note will be shown. Read the screen and click Next.

Figure 4 Welcome Screen for Lotus Domino
4. Then read the License Agreement from Software License Agreement screen and click radio button “I accept the terms in the license agreement”. Click Next.

Figure 5 Software License Agreement
5. Browse for the directory where you want to install the program and select the option “Install Domino Partitioned Servers” if you want to install partitioned servers. Click Next.
Note: If you select “Install Domino Partitioned Servers”, then you need to add all data directories to the existing list. If you didn’t add them in list, they cannot be installed.

Figure 6 Select folder for Domino’s executable file
6. Now browse for the location where you want your Domino’s data files (software) to be copied. In the previous step, if you planned to install a partitioned server, then you need to specify the data directory for each partition.
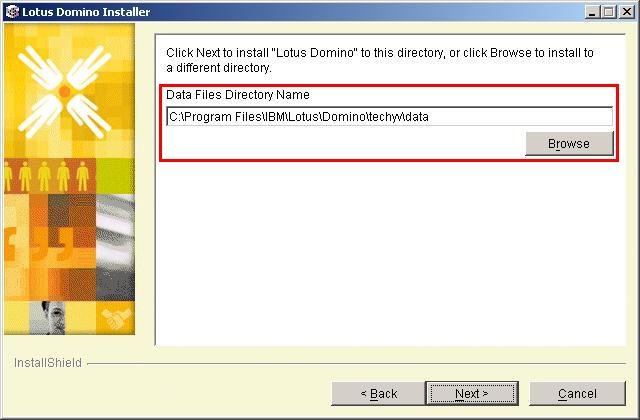
Figure 7 Select folder for Domino’s data files
7. In this step, select the type of your server or application you acquired. The details of each option is mentioned below. Select the option according to your environment.
- Domino Utility Server:Select this option if you want to avail application services only, with the support of Domino clusters. Keep in mind that it doesn’t have the support for messaging services.
- Domino Messaging Server:Installing a Domino Messaging Server will provide messaging services. It doesn’t have the support of application services or Domino clusters.
- Domino Enterprise Server: Selecting a Domino Enterprise server will provide both application and messaging services that is with support for Domino clusters.
- Customize Domino Server:This option permits you to install the specific features you wish to install.

Figure 8 Available choices during Domino Installation/Upgrade
8. Read the concise information regarding the options you chose and the paths you selected for installation. After reading, click Next to start the installation.

Figure 9 Verify Installation Settings
9. Once you click the next button, the installation process will begin and will show you the status of completed installation in percentage as shown in the figure below:

Figure 10 Installing IBM Lotus Domino Server
10. After the installation is 100% completed, a new screen will appear, showing successful completion of Lotus Domino Installation. Click the Finish button to accomplish the installation program.

Figure 11 Final Windows Installation Panel
11. Now go to Start menu or use the executable icon on your Desktop to initialize the setup program.This asks you whether you are setting up your first stand alone Domino Server or the additional server to the existing server. Click Next.

Figure 12 First of Additional Server
12. Now provide a Server Name and the title of the server from which the function of the server can be identified. Click Next.

Figure 13 Server and Title Name
13. Type your company name in the Organization Name text box and your organization’s certifier password. Click Next

Figure 14 Organizational Information
14. Choose your Domino Domain Name. Click Next

Figure 15 Domain Name Information
15. The next screen will show you the information that is related to your Domino’s server administration. Enter the information mentioned in the screen below and click Next.

Figure 16 Administrator Information
16. Select the Internet services from the list that your Domino Server will provide you. Although basic Notes and Domino services are configured by default but these are some important and critical services that need to be authorized by the Domino Administrator. You can also change the options later after the installation. Click Next.

Figure 17 Internet Services for Domino
17. Now the Network Settings screen will be shown on the screen. Your setup will automatically detect your server’s network ports and will show them on the screen. Click customize to change your network settings and enter a Fully Qualified Domain Name (FQDN). Click Next.

Figure 18 Network Settings
18. Read the security features of your Domino Server. Select the options according to your company environment. Click Next

Figure 19 Security Options
19. This is the final screen before your setup start installing the features you have selected. Review the summary information just to make sure that you have entered everything right and click the Setup button

Figure 20 Summary
20. The server setup will be started and this includes adding the domain name to the Domino directory, creating mail files and configuring Domino’s default Access Control Lists (ACLs) of all the databases.

Figure 21 Installation Process
21. After this you will see a Congratulations message showing the successful completion of your Domino Installation. Click Finish.

Figure 22 Final Screen
22. After the setup has finished, the required services will automatically be started and you can view the console to start Domino Administration.


