Delivering Content using Amazon S3
Elastic Cloud Front Cloud front provide service to serve content on a worldwide network very efficient way. Elastic Cloud front send content to its nearest site to cache the copies of the content where user stay, and through that location user receives that content doing this process Elastic Cloud Front make sure that content is secure, reliable.

The original data stored at that location it is called as the origin server. It may be Amazon S3 or our own location i. e. Custom origin. If we use AmazonS3 as an origin server then to store content which want to deliver first create bucket and store content in the object .And here bucket given same functionality as in AmazonS3 provide but you need to pay for this. One point also note that as this is origin server content is not changed and secure when it is deliver. Now if we want to use Custom origin then it is server or instance of EC2.here It is required to know the process how cloud front use it. It is work as request and response type.
The geographical site when cloud front caches copies of the content is call Edge location.
Now as we create origin server, the next thing to do is how to distribute it. For this, Cloud Front creates a link between the content from an origin server and the domain name assigned by Cloud Front. Supposedly, your content stored in the bucket name is techno the http://techno.S3.amazon.com/image1.jpg can be given as http://anydomainname.cloudfront.net/image1.jpg. Now, you cannot change it but you can create alias of the domain name which Cloud Front assigns. You cannot change it, but you can create an alias of that, which is called CNAME. Supposedly, here http://myfirstimage.cloudfront.net/image1.jpg . There are many types of distributions to serve content using cloud front. First is basic distribution. Basic distribution serves image file, css file, http file etc. using an HTTP connection.
Basic distribution feature is to create a name and , give public The contents are all seen and given private access, wherein only you can see the content of the origin server and Cloud Front, , provides you an access log in which you get information about user who accessed content and custom origin. Second is RTMP streaming .RTMP steaming is basically used to give video or media access. It also gives similar feature as basic distribution except for the origin server. Distribution serves many actions like get distribution, post distribution, configure distribution, list out distribution etc.
The distribution part may be provided by you or Cloud Front. If you provide the path, there are three things you need to specify, the Amazon origin, the custom server and the , caller reference and , whether distribution should be enabled or disabled upon creation. If you provide the distribution part, then Cloud Front provides the following information such as the distribution id, domain name, distribution current status, when the distribution was last modified and the list of active trusted signs.
Here Cloud Front uses two types of line. First, is basic and second is signed link. A basic link uses this type of format: http://<domain name>/<object name in Amazon S3 Origin>.
For example Amazon S3 have a bucket name, techno and an object name image1.jpg store which is publicly readable. The cloud front returns 4545hg56.cloudfront.net as domain name and 12341234qwe as distribution id. The URL is like this http://456hg56.cloudfront.net/image1.jpg. Now, when you want to go to this URL, this image, when clicked, will redirect you to Cloud Front edge location. If it is not in Cloud Front edge location, it will cache from origin server to you. On the other hand, signed link is used when URL is signed and is used in private content distribution.
The content in edge location stays for only 24 hours, after the said duration, the content will be removed. So next time, when a user wants the content, the edge location caches it from origin server, which is called Object Eviction.
Now lets us see how Amazon Cloud Front delivers content using Amazon S3.
Step 1. Sign up the Amazon Cloud Front. Here if you do not have an AWS account, it is mandatory to sign up in Amazon Cloud front. Go to https://aws.amazon.com/ then sign in as shown in figure.
Image 1: First page, AWS.
Click it, the next page will open, which will give information about charges to use cloud front.
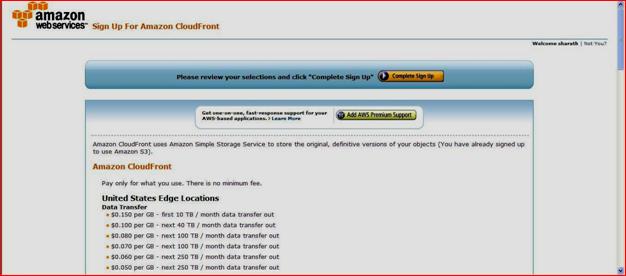
Image 2: Sign up process page.
Click button upon completion of sign up.
Click Next page, for email subscription and click on AWS management console to work on Cloud Front.
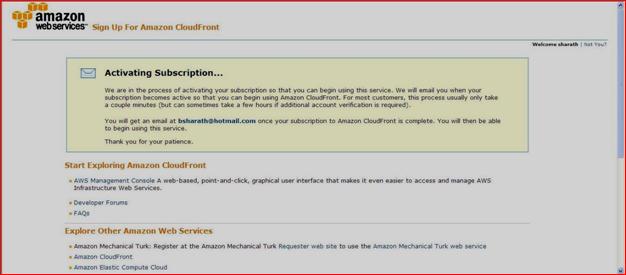
Image 3: Subscription Cloud Front.
Step 2. Now, on the Main Window of Cloud Front will open. Here you will see the options to create distribution, click your option
Image 4: Main page Cloud Front
Step 3.
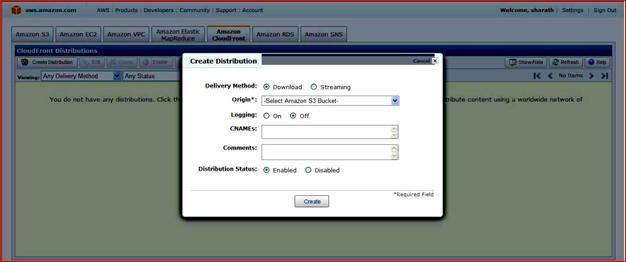
Image 4: create distribution window.
As you can see, above the figure shows the window for creating distribution will appear. It has many options
First one is the delivery method. Select either download or streaming, according to your requirement. Second is the origin. This is where you store your content. Here,we take Amazon S3 and the bucket name is Techno, which we created in Amazon S3. You can choose custom server, as well. Third one is log in on or off.
Fourth one is CNAME, an example of alias name of the domain name. Here we given “techno cyclopedia”
Give any comment. Lastly, select distribution status. Enable if you want to start distributing after the content is created and disable if you want to start distribution later.
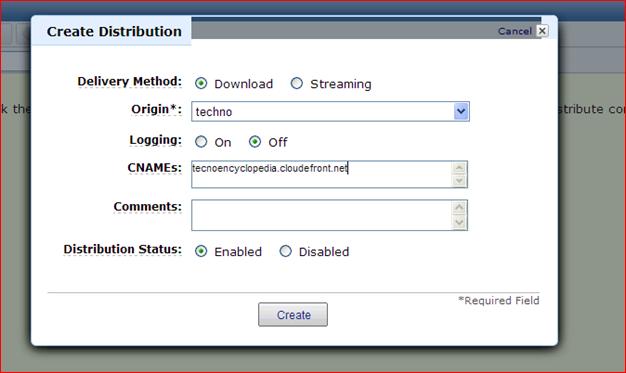
Image 5: create distribution
Now, after filling up the form appropriately, click on create.
Step 4 Now as you can see below figure, we have created one distribution. With this, you can see that it is in process and its status will be enabled when you are ready to deploy, you can deliver your content.
Now when you select this check box it will show its property like this.
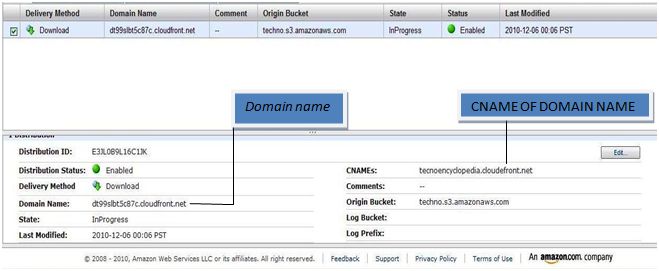
Here we see Domain name which is dt99btc87.cloudfront.net and alias name which we given at the time of distribution creation is tecnoencyclopedia.cloudfront.net. This CNAME and domain name is important to download content.
Step 6 Now if we want to download content from this then
http://<domainname>/<originserver> should be written like this
http://technoencyclopedia.cloudfront.net/techno/sunset.jpg.
Here we add a techno because content store is in this bucket. It will show the image which we stored the content.
Similarly, we can deliver media file but using RTMP connection.
Now Amazon takes charge if we use Amazon S3 as origin server, then charges to transfer content from origin server to edge location and charges to deliver content from edge location to user. For the first month, the first 1000 requests will not be charged but succeeding requests will be charged according to geographical area.
Using Amazon Cloud Front, we can reduce the routing of the content as it selects which path it has to go to minimize path, thus, the price is also reduced to serve content. It gives security and reliability to data, thus it is more preferable to use.


