Learning SQL 2005 with SQL management studio
Introduction:
SQL server 2005 is a very flexible and handy tool for DB administrator and developers. Nowadays it is not just that you can create databases with SQL server but there are several other programming tasks, administrative tasks and maintenance tasks that you can perform with SQL server 2005.

The most common tasks related to databases include database creation, DB backups, Restoration and replication. In this article we will be covering the following topics related to SQL server 2005:
- Creating a new Database along with tables.
- Taking backup of an existing Database.
- Restoring the old Database from backup file.
- Database replication.
Demo Names used
Databases: techno, technoencyclopedia
Tables: techno
Publication: Test
Login ID: sa, Password: 123456789
Dummy names: Vihaan reddy, John Lewis, Jennifer Thomas, Andrew Bishop
Creating a new Database and Table:
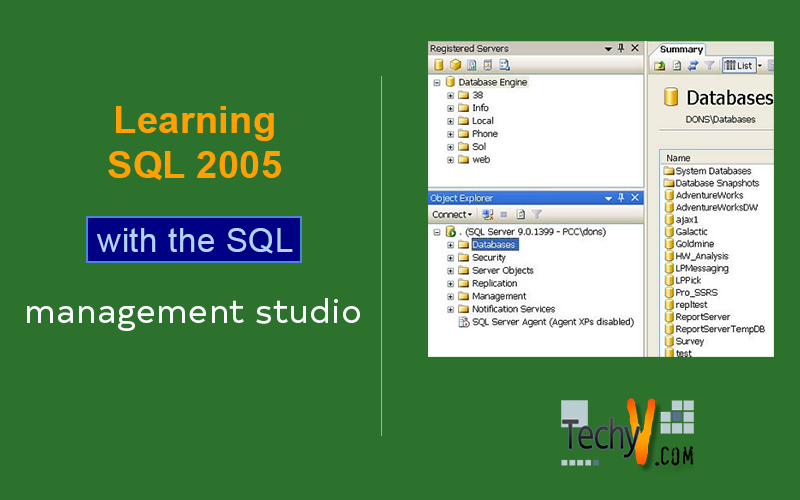
Creating a database and its tables has never been as easy as it has become with SQL server management studio. Management studio is a tool or utility that provides user interface to SQL server suite.
Before creating a database we must have a solid understanding that for what we are going to create a database, what type of data we will be using , how many entities we have, what is our domain of work etc.
While designing a database we need to ensure that we build correct relationship between the entities and avoid data redundancy. The data redundancy is the repetition of data which is not feasible for our application as well as our database. To avoid replication we should first normalize our database and then design it in the form of tables.
Once we are done with the process of table designing and normalization we are ready for hands on experience. Following are the steps required to create a new Database and a simple table in SQL server 2005:
- Open SQL server management studio.
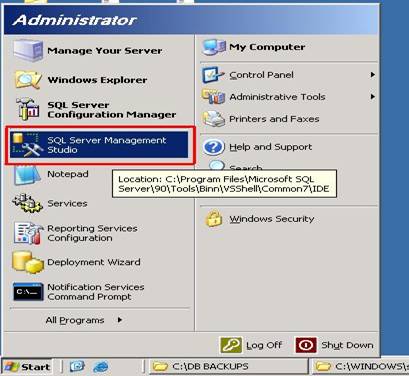 –
–
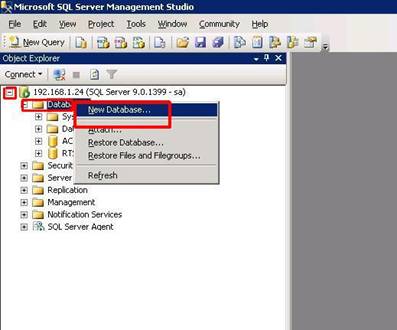
Connect to SQL Server (can be your local machine or any other machine on remote location).
Right click the database folder and select “New Database” as shown in the figure.
A new window will appear that specify the DB name in the Database name Text box. You will notice that logical name will change automatically as you enter the name Specify the DB path by clicking on the browse button at the corner of the path field and then press OK button.
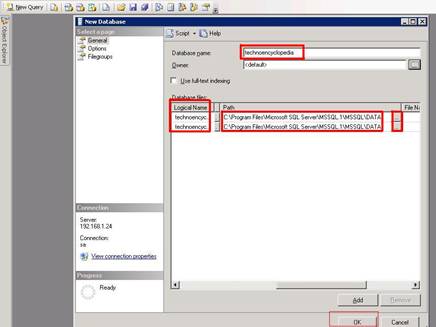
Here I have given the name technoencyclopedia to the DB. You can see in the object explorer that a new DB “technoencyclopedia” is created.
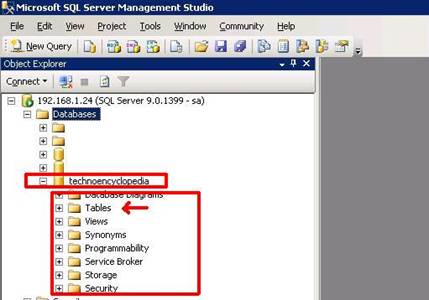
Now at this point our database has been created. Just drill down the technoencyclopedia DB folder and you will see that there are some default folders that are automatically created; these include the Tables folder as well.
All these folders are created by default for different purposes. The Programmability folder contains system stored procedures and custom build stored procedures as well, Stored procedure is a simple program with a set of instructions that we need to perform on our database, since it’s not in the scope of our article so for now we’ll not go into much detail.
Right click the table folder and select new table. Following window will appear:
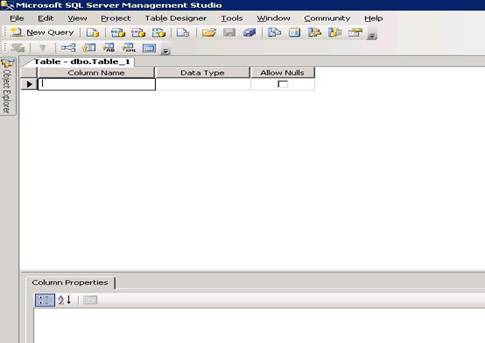
Once you have opened the table you can see a grid containing 3 columns:
- Column Name: specifies the name of your field
- Data Type: Defines the data type of your field
- Allow Null: Defines whether you want the field to contain NULL values or not.
(Don’t enable this check box if you are creating a primary key)
- Now create fields one by one as shown in the figure below:
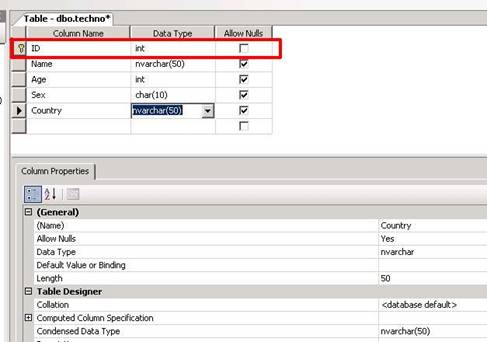
Date Type column contains dropdown values from which you can select the desired data type. At the bottom there is a property window through which you can set different properties of the field. Remember to create a primary key for you table; it is used to build relationship with other tables. Primary key cannot duplicate, plus it cannot contain a NULL value.
- When done close the window and you’ll get a prompt “do you want to save Table_1” click yes.
- Now a dialog box will appear asking the name of the table, type the name and click OK button.
At this point we have successfully created our Database and a table in it. Here I have taken the ID column as a primary key. Each database can contain several tables with their primary keys and foreign keys building relationship with each other.
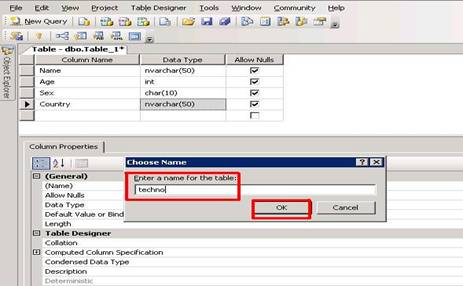
- Here I have given the name techno to the table. Refresh the object explorer and notice the table is created under the DB technoencyclopedia in object explorer.
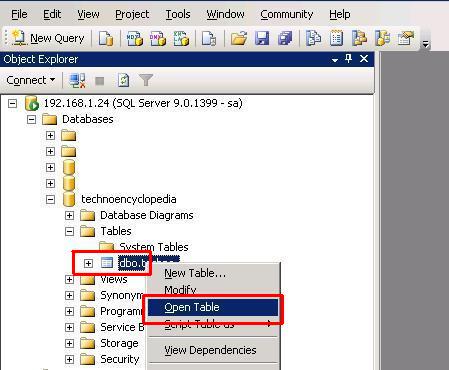
Right click on the table and select open table.
A grid will be opened containing the columns that we described while table creation (see the below figure)

Now there are several ways of entering the data you can do it with the help of a SQL query, you can design a program with GUI for that however here we will enter the data directly in the table. You can enter data in each field and move on the next one to enter the data. One easy way is that you can compile a data in an excel Sheet and then copy paste all the data at once. Moving in the next row will commit the data in the previous row i.e. once you have entered the data in a row and you move to the next row the previous row data will automatically be saved.
In this way we can create as many tables as required in our DataBase.
Taking Backup of an existing Database:
In large organizations the back of a database is very important as they can’t afford to lose their data in any sort of disaster at any cost. Disaster recovery is a whole new topic itself and there are several hundred ways of planning a disaster recovery mechanism. However the basic rule is always the same that you need to have a backup of everything preferably at some different location.
There are several ways through which we can automate the backup process, through backup agents, backup utilities, backup services etc. But here we will learn about how we can take a backup of a database manually through SQL server management studio.
- Now let’s see how a backup can be taken of the DB we just created.
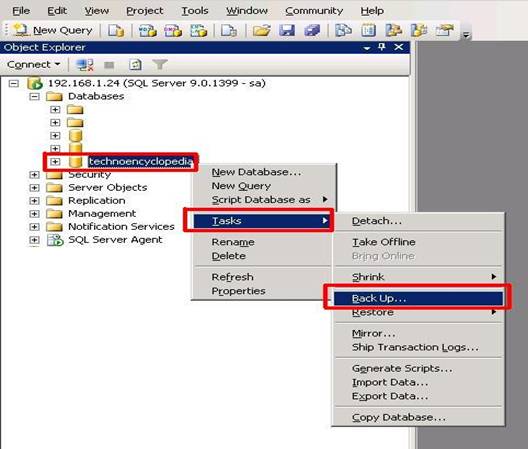
- In the object explorer right click the DB select Tasks and then select Backup as shown in the figure below:
- Backup Database- technoencyclopedia window will appear.
- In this window select the DB from dropdown of which you want to take the backup.
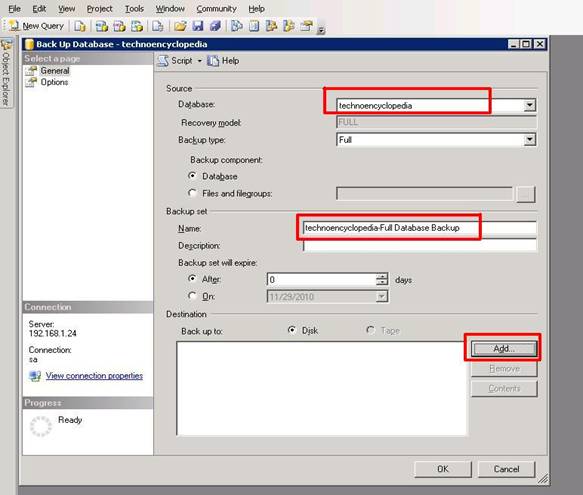
In the backup set give a name to the backup file. If you want to give any description about the backup write it in the Description text box.
- Click Add button to select the destination where back up file needs to be saved.
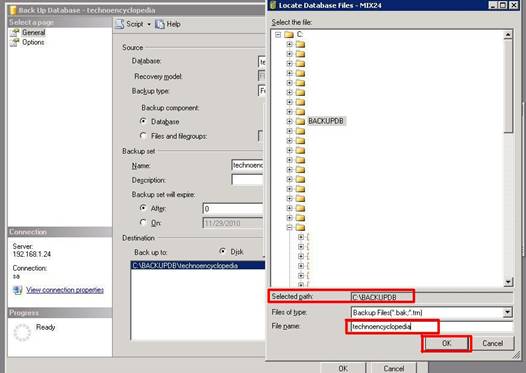
On clicking the Add button you can access the location where you want to place you DB backup, select the location and give a name o the backup file and then press OK button.
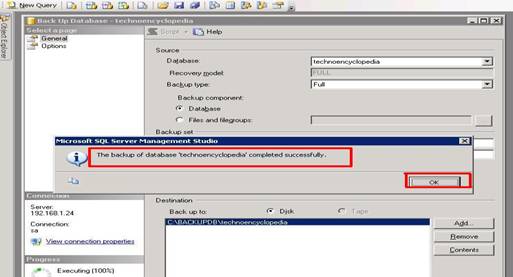
- A prompt will appear that the backup is completed successfully.
Restoring the old Database from backup file:
Now then our backup process is running fine we are taking daily backups of our database but some day our server crashes and we could not save our database, so now what are we going to do? The answer is simple here our backup will come into play and we can get back our database by a process known as data restoration.
Here again there are traditional ways of restoring database through SQL commands and queries but we will learn that how can we restore a database using SQL server management studio.
Now let suppose we need to restore an old DB backup file, let’s take the one we took the backup of.
- Right click on the Database folder in object explorer and select restore Database.
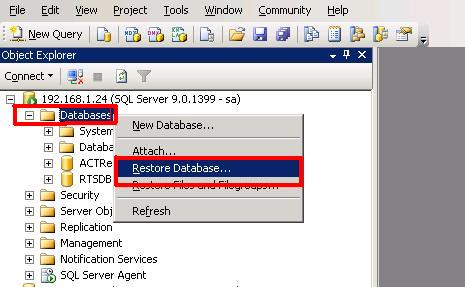
This option initiates the request to perform restoration process. A restore window will appear as follows:
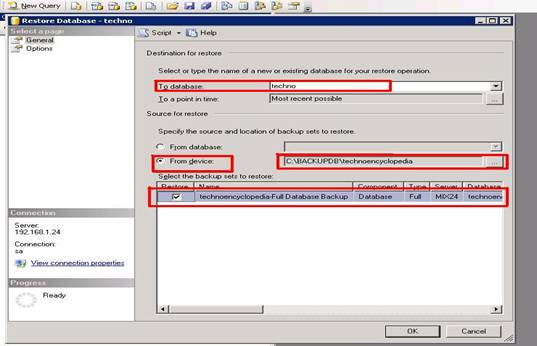
Type the name of the Database on which you want to restore the Backup (it can be a new DB or an existing one can be selected from dropdown).
Click ‘From device’ radio button and select the location where backup file resides. Since we save our Backup on a storage device that is why we will select from device option.
Check on the restore box and click OK button.
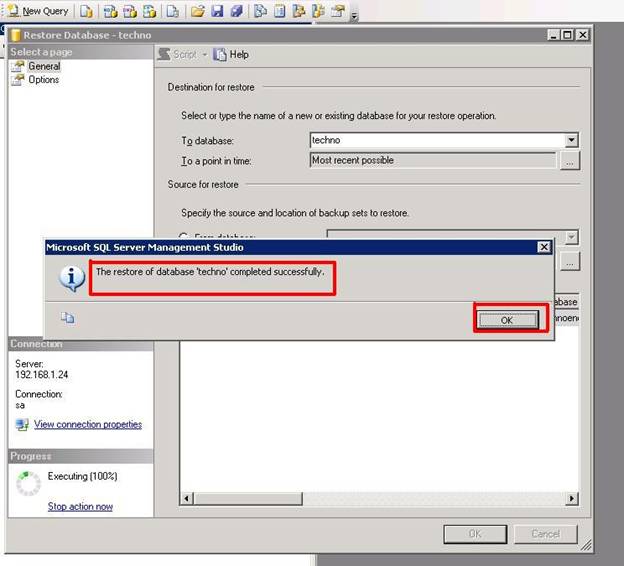
- A prompt will appear that the database has been restored successfully.
Now you can see in the object explorer, we have a new DB “techno” with same table as we had for technoencyclopedia, the one we took backup of.
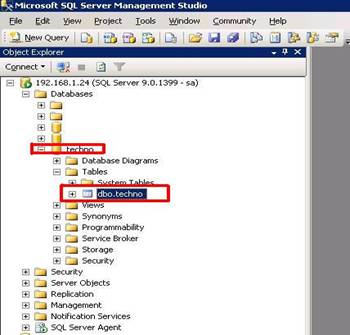
This is the simplest way of restoring a database in SQL using SQL management studio.
Database replication:
For larger databases and enormous amount of data we can’t rely on a single database. We need to have our information stored on different locations to ensure the safety and availability of our data. For this purpose one of the processes used is called replication.
Replication id a type of backup that allow a transactional change to occur simultaneously on another database which is happening on our actual database in other words we can say that it is the creation and maintenance of multiple copies of the same database.
Now we have two databases techno and technoencyclopedia.
Let suppose we need to replicate every change that occurs in technoencyclopedia to techno database.
- To enable replication we need to create following things:
- Distributor (stores every transaction)
- Publisher (Source Database)
- Subscriber (Target Database)
There are many types of replication in SQL server 2005, Snapshot replication, merge replication, transactional replication etc. In this article we will discuss the transaction replication.
Transaction replication ensures database integrity and transactional consistency between the databases. All data-changing operations that are replicated are considered to be “transactions,” even though they might not correspond to an actual transaction in the primary database.
Let’s see how we can implement a transactional replication in SQL server 2005.
- In the object explorer right click the replication folder and select configure distributor.
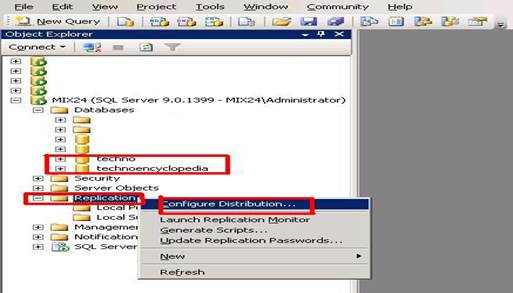
- A new window will appear:
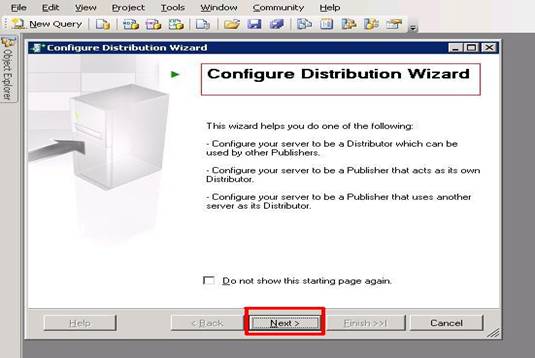
- Click next
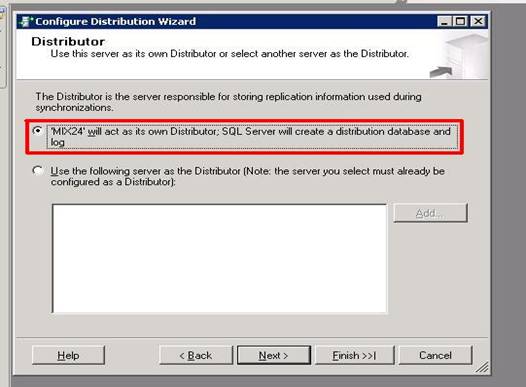
Here you need to select the SQL server on which you want to create the distributor (remember that distributor, publisher and subscriber all three can be on different servers, but here for demo I have configured on the same server).
- Click the next button and the window will appear as follows:
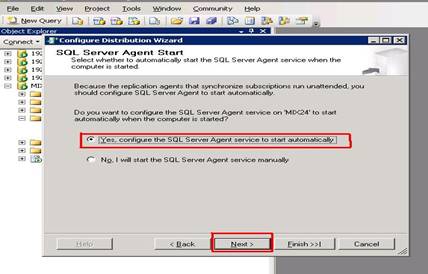
- Here you need to specify if you want to start SQL server agent automatically or manually. I prefer to start it automatically. Click next button to move on.
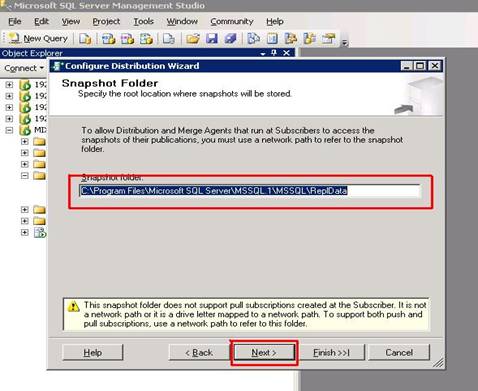
- Here you need to specify the location where the snap shot of publisher that SQL server agent will take at the start will be stored. Click Next to continue.
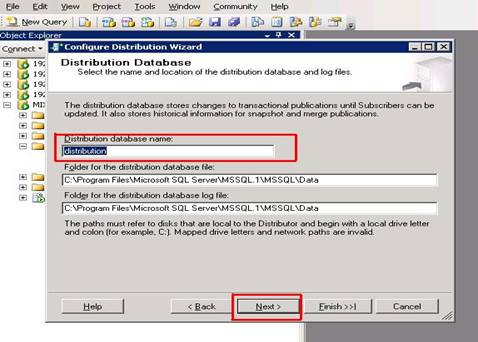
- At this step you need to specify the name of distribution database that will temporarily store the data published by the publisher plus you can also specify its location and location of the log file. Click next to continue.
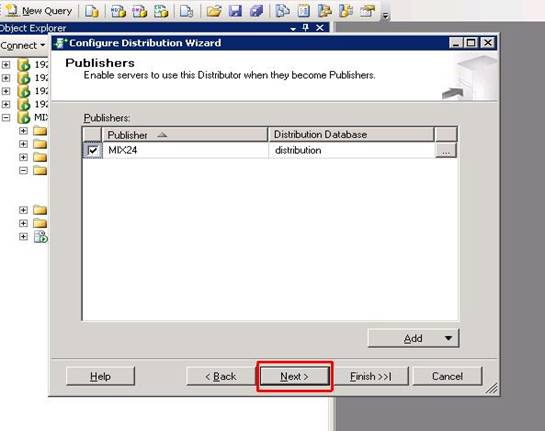
- Now here you need to specify the server that you will use this distributor. Click next to continue.
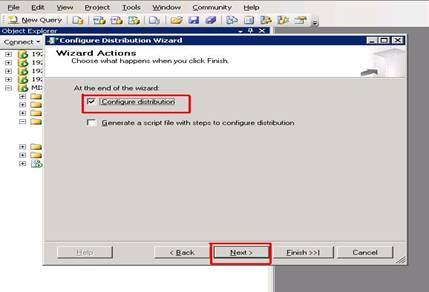
- Now our distributor is ready to get configured. Click Next to proceed.
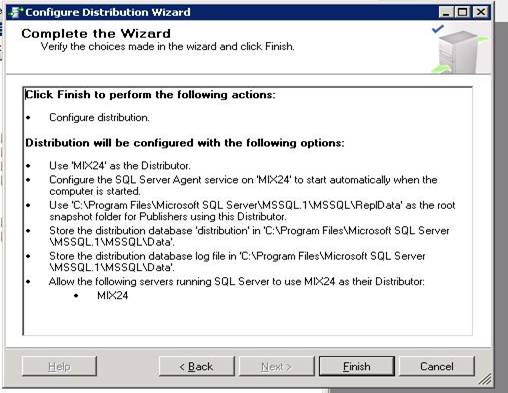
- Click the finish button
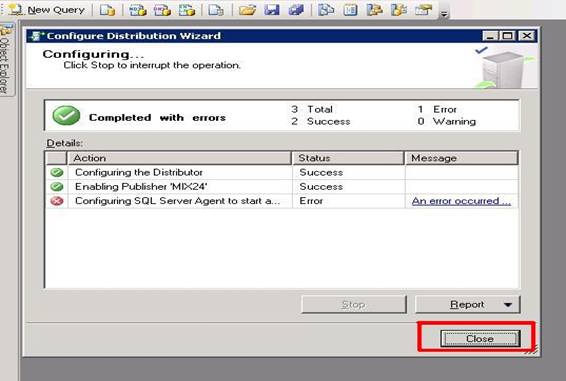
At this point we have completed configuring our distributor. In the above window an error has occurred as we are configuring distributor on the same SQL server agent where the DB resides, but this does not make any difference click the close button.
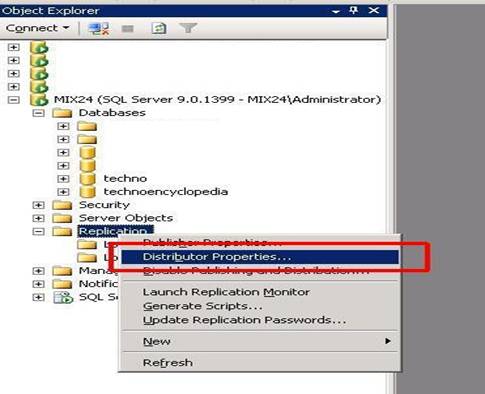
Now in the object explorer window right click on the replication folder, here you will see a new item saying “Distributor Properties” which shows that your distributor has been successfully configured.
Ok it’s time to create our publisher. Right click on the sub folder under Replication called local publications and select New Publication.
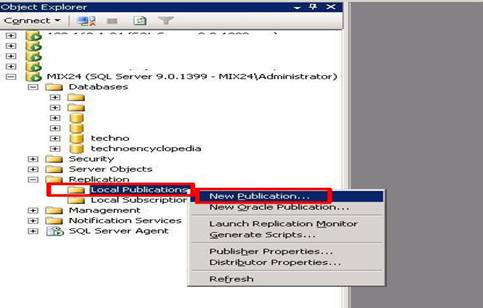
- A new window will appear as follows:
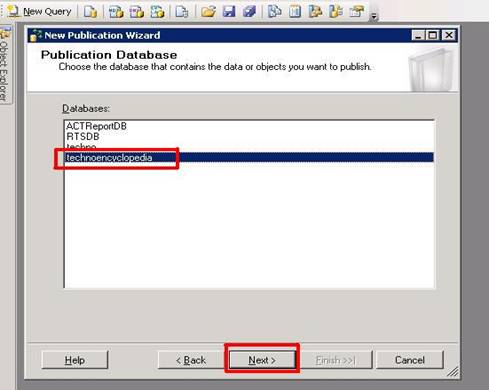
From here you need to select the source DB from the list and click next.
- In the next widow select the publication type or you can call it replication type, here we will select transactional publication as shown in the figure:
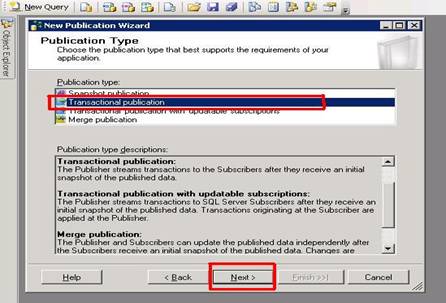
- Click next to continue
In the next window you need to select Articles or you can say the tables that need to be replicated.
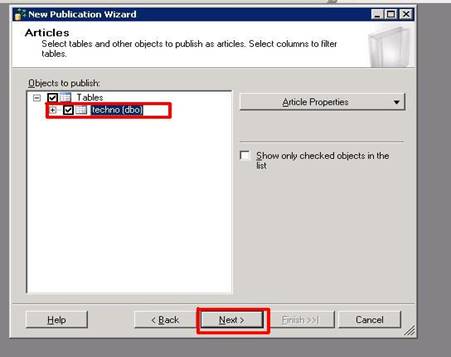
- Click next button
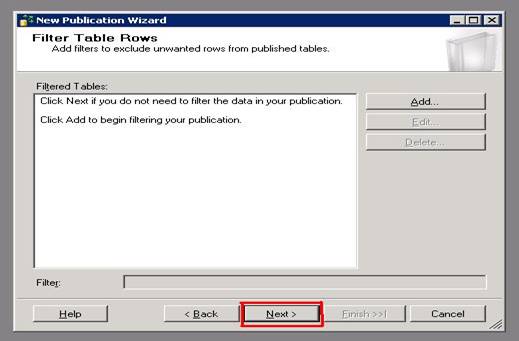
- Here you can add filter if you want to alter publications data. I don’t want any so click next to move further.
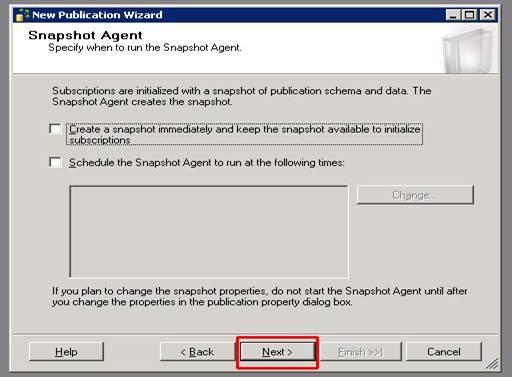
- You can specify or schedule the snapshots along with the transactional replication if you want to. For now we don’t require it so click next to continue.
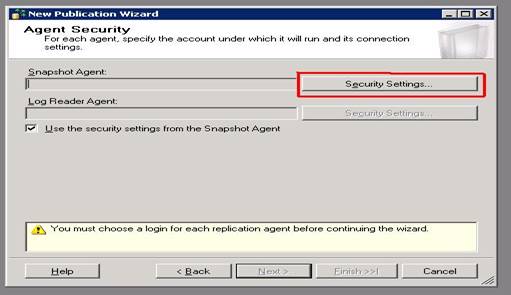
In the above widow you need to provide security setting for SQL server agent so click on the security setting button and the following window will appear:
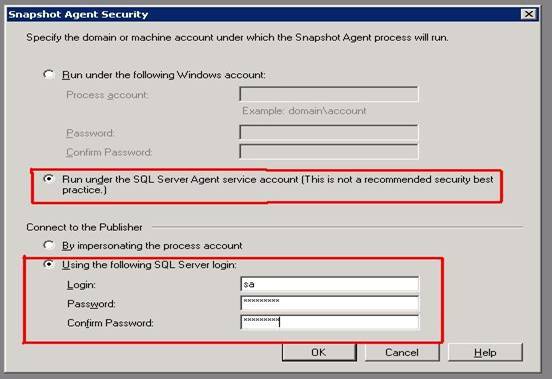
- I want the process to run under SQL server agents account so have selected it and provide the login ID and password for the publisher’s connection. Click ok and then next.
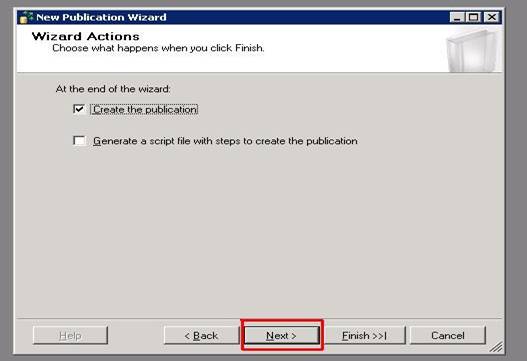
- Now then our publication is ready to be created. Click next
- Finally in the next window give a name to you publication and click finish button

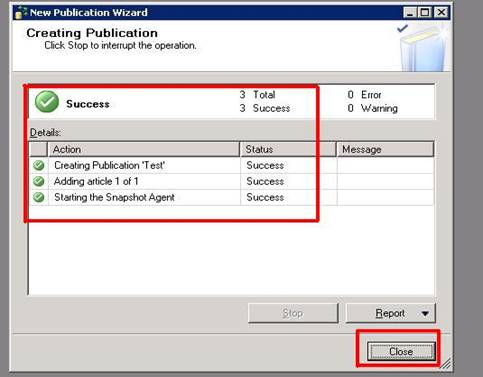
On clicking the finish button another window will appear confirming a successful creation of publication.
- Now in the object explorer underneath the local publication folder the publication we created is visible.
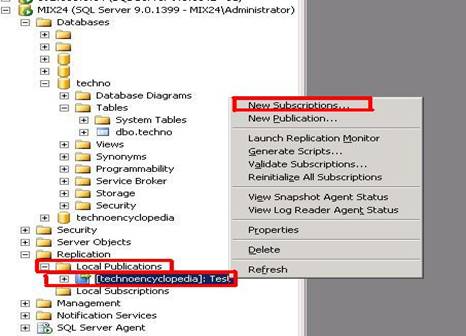
As we have completed the creation of our source DB it’s time to create the destination DB or subscriber. For that right click on the publication (named: TEST) and select New subscriptions, as shown in the figure above.
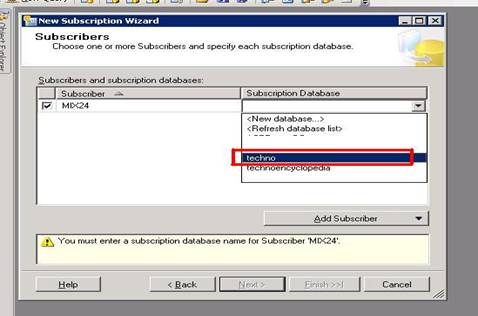
- A new window appears containing two columns: Subscriber and subscription Database.
- Subscriber defines the server where our subscriber will reside while subscriber database defines the target DB that will be affected by the change in source DB.
- Select the DB from dropdown list and click next button.
- The next window can be used to set security password for subscriber
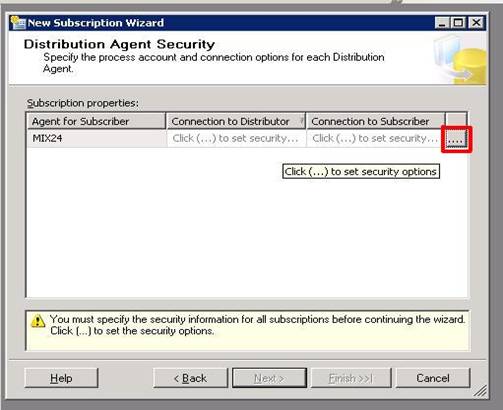
- Click the browser button on the right corner to set the password. Another window will appear as follows:
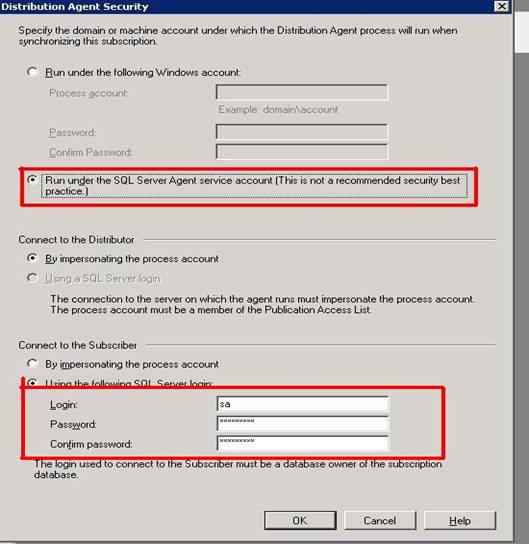
Select the run under SQL server agent radio button and provide the SQL server login id and password as shown above.
- Click ok button and then Next.
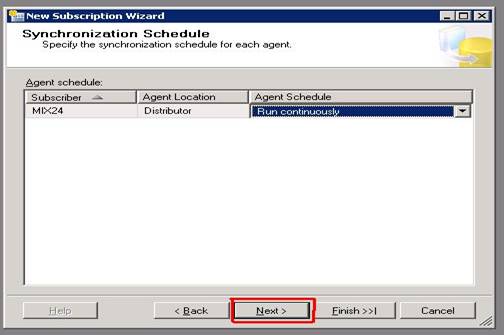
- Here you can specify the synchronization schedule; I prefer to make it run continuously. Click next to continue.
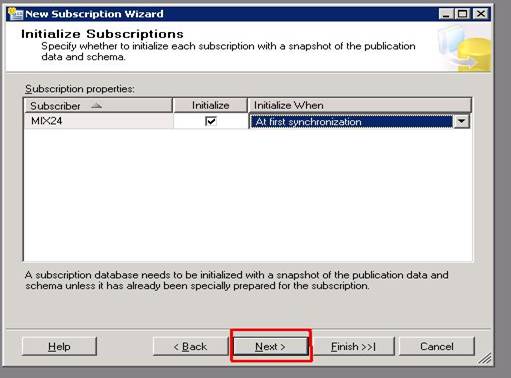
- There you can specify when to take snapshot at subscriber’s initialization. I’ve kept it once at the beginning. Click next to continue.
Finally our subscriber is ready to be created. Click next
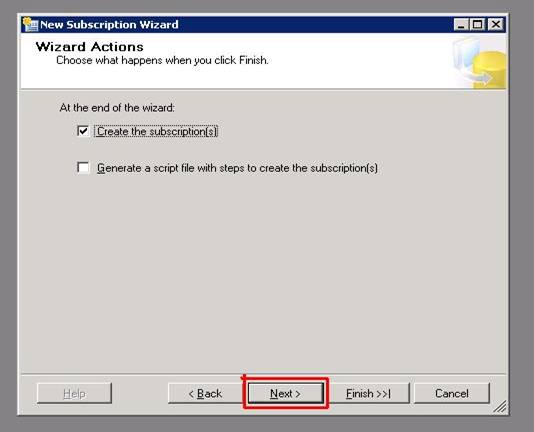
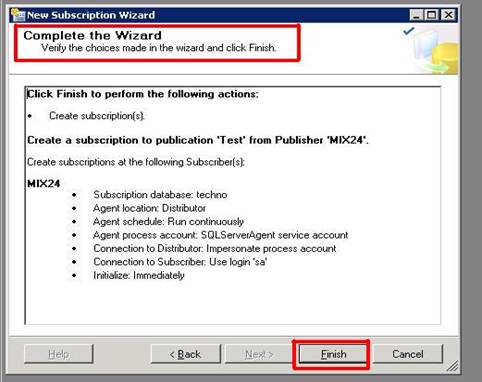
- Complete the subscriber wizard by clicking the finish button.
- Next window confirms the successful creation of the subscriber.
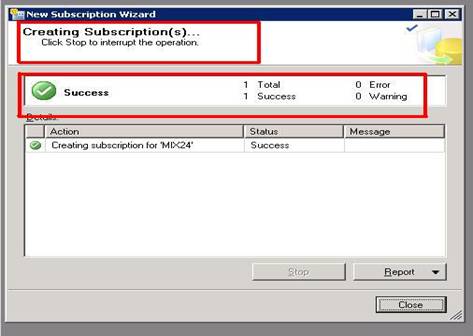
Now that we are done with all the three steps, our replication is complete and it’s time to test our replication. You need to remember one thing here, every table that we are replicating must possess a primary key otherwise the replication wizard won’t allow it to be replicated.
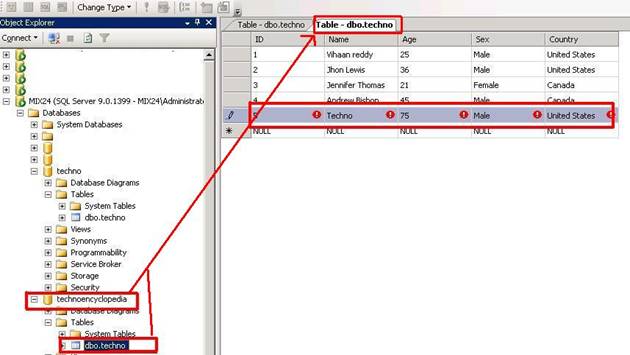
- Enter a new record in techno table of the DB technoencyclopedia as shown below:
- Open the techno table in the DB named techno:
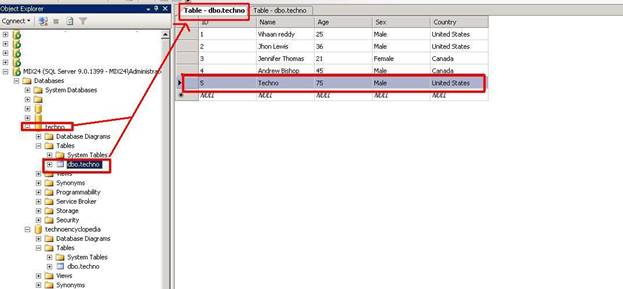
The above two figures clearly show the record entered in source DB was automatically entered in the target DB, which means the replication is a success.
All the processes that are explained in this article are the basics that any DB administrator must be aware of. SQL server 2005 has minimized the efforts and time used to carry out these processes, However technology is still growing fast and there is a lot to come in the coming days.
CONCLUSION:
The above article we have covered in detail the scenarios of DB creation, Table creation, DB backup, DB restoration and Replication using SQL server management studio 2005. Above article demonstrates the following:
- The creation of a new database with Tables
- How to take database backups.
- How to restore a backup database.
- Database transactional replication.
A practical visual demonstration is given at each and every step which will help the user a lot in understanding and carrying our each process easily.


