Microsoft Outlook Calendar 3 Versions
Microsoft Outlook has several tools that assist the users in the most convenient way. Microsoft Outlook Calendar is one of them. It allows users to make their calendar and set reminders for personal of official meetings and appointments. It also gives its users the liberty to share it with other users. Sharing option is only available for Microsoft Exchange users.
Sharing Calendar in Microsoft Outlook 2003
Microsoft Outlook 2003 Calendar can be shared for the users and organizations having Microsoft Exchange Server. It is to note that this version only allows users to share calendar within the company i.e. also known as internal sharing. The procedure of sharing Microsoft Outlook Calendar is given below in very simple steps.
Step 1
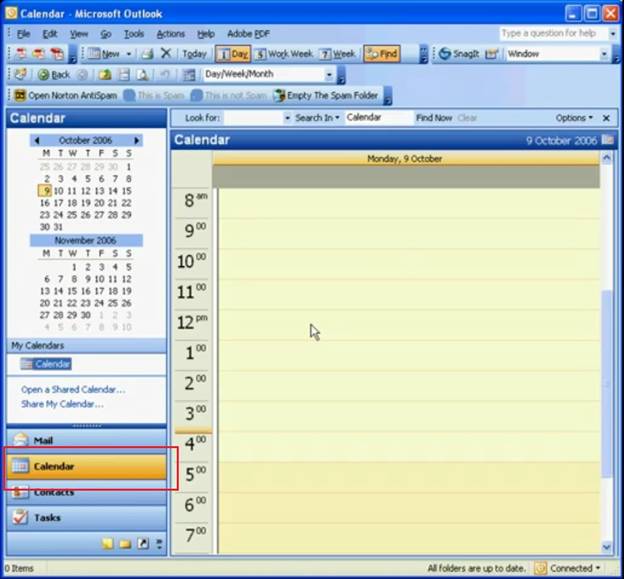
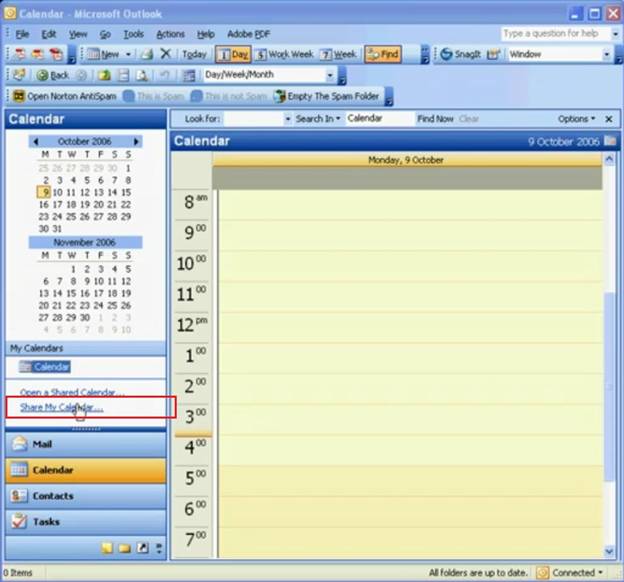
Once MS. Outlook 2003 is opened the calendar can be accessed through Calendar button on the left bar as depicted in the screen shot below.
Step 2
The next step is to click “Share My Calendar” as depicted in the screen shot.
Step 3
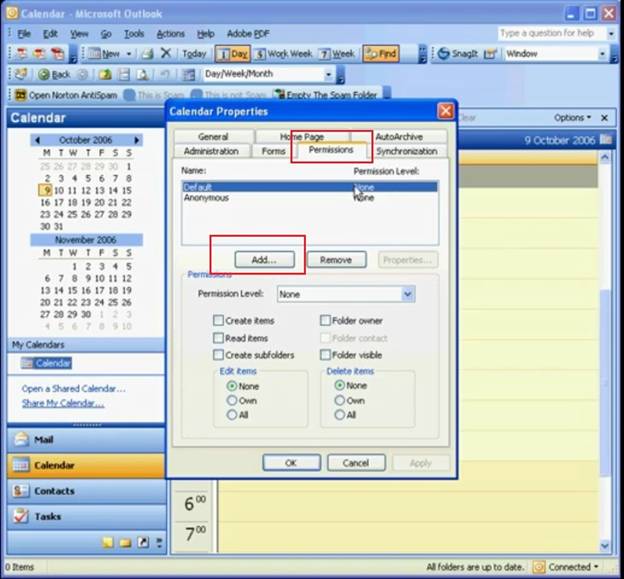
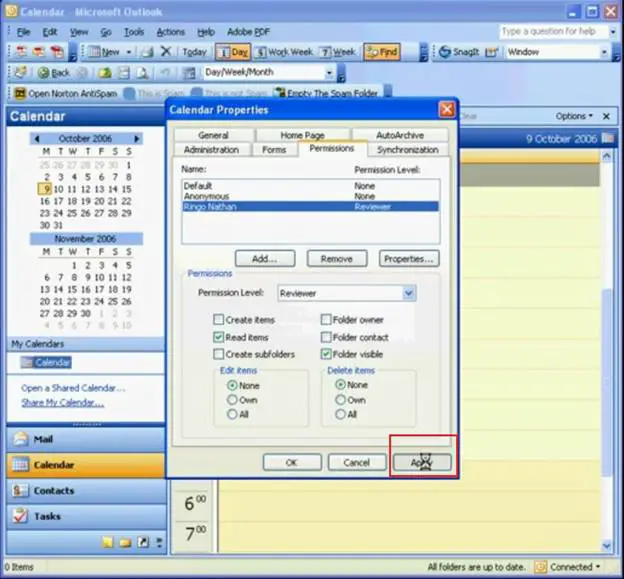
Go to the “Permissions” tab in Share Calendar window popped up in the result of step 2. Click the “Add” button in order to add the desired user from your Global Address Book.
Step 4
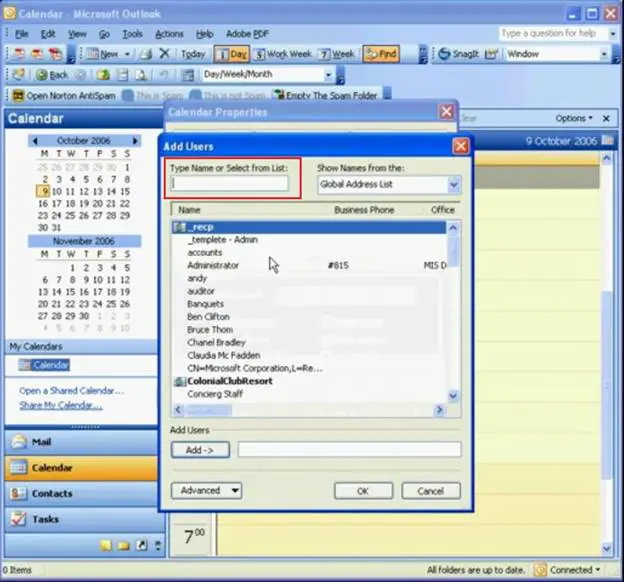
Choose the name of the user(s) you want to share your calendar with. Click “OK” to proceed.
Step 5
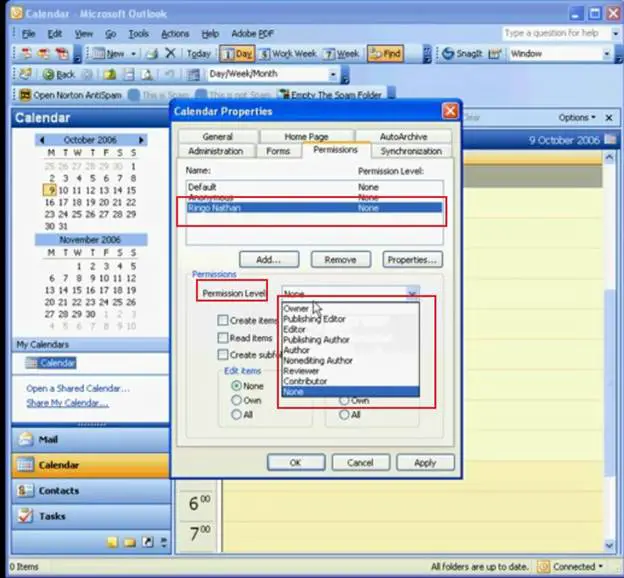
Choose the desired permissions from permission level menu as highlighted below. Reviewer and Editor are the two types of permission levels used mostly in the organizations while sharing calendars.
Step 6
You may check or uncheck further options to modify your permission level as per your requirement. Click “Apply” and you have shared your calendar successfully using Microsoft Outlook Calendar 2003. Repeat the procedure in order to add more users.
Sharing Calendar in Microsoft Outlook 2007
Microsoft Outlook 2007 brought many new features to the users and Calendar is one the tools that was improved in this version. Despite that the users can share their calendar to Exchange Server. They can now share their calendars outside the company as well with Publish and Email features added in this version.
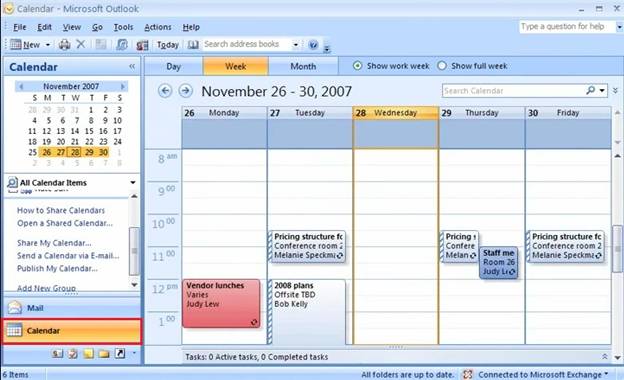
Click on “Calendar” on the left pane in MS. Outlook 2007 as highlighted in the picture to access detailed Calendar options.
Internal Sharing
Microsoft Outlook 2007 allows users to share calendar within the company as in the earlier versions. The procedure is further elaborated in the following steps.
Step 1
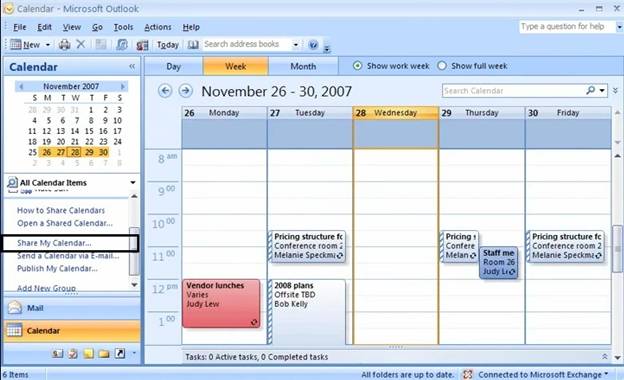
Click on “Share My Calendar” to share the calendar with internal users residing in your Exchange Server.
Step 2
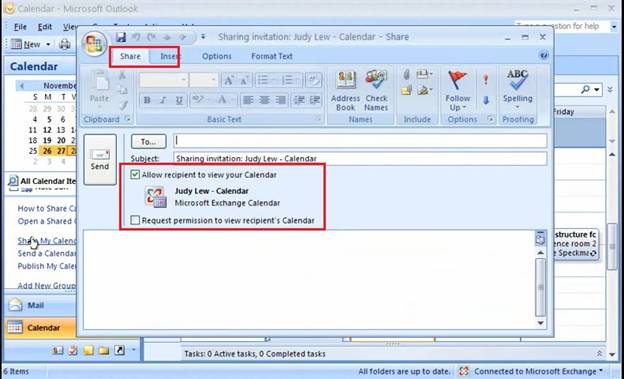
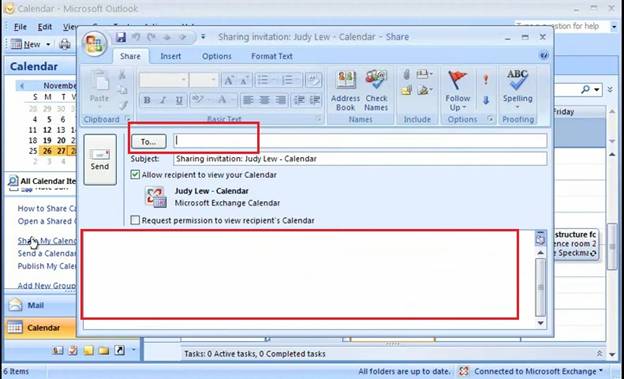
A sharing invitation window would pop up that has your calendar as an attachment. You may send request to view the recipient’s calendar by checking the very option.
Step 3
Enter your desired user(s) email ID and add the text just like an email if anything needs to be explained or elaborated. Click “Send” to proceed further.
Step 4
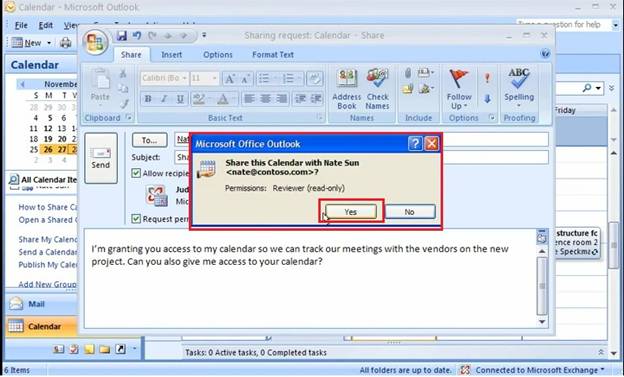
Confirmation window would pop up to confirm if you want to share your calendar to the selected users. Click “Yes” to proceed with sharing your calendar.
Step 5
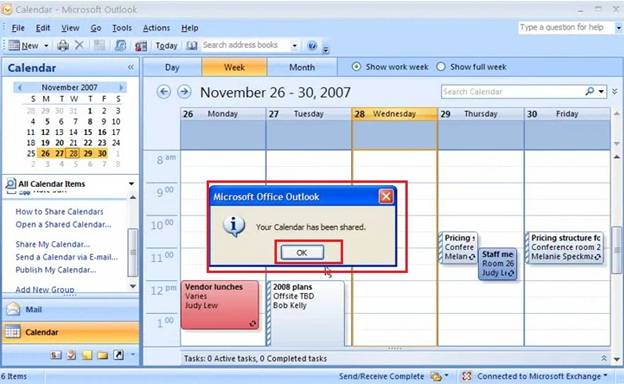
Upon successful sharing the user is confirmed through a pop up window to inform the same.
Sharing through Email
Microsoft Outlook 2007 allows users to send calendar through email over the internet. This is the new feature and users can share their calendars to their vendors etc. in order to correspond to any appointment or a meeting.
Step 1
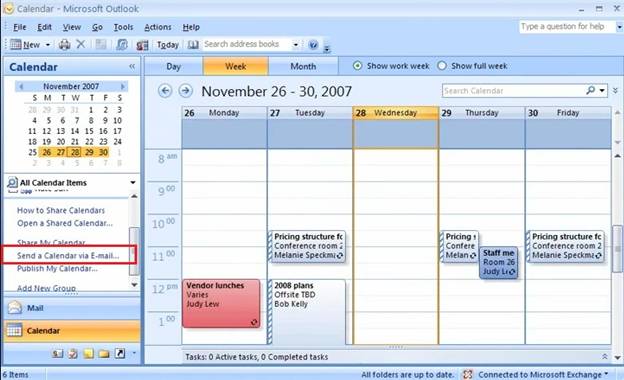
First step is to click “Send a Calendar via Email” in Calendar pane on the left side as depicted in the screen shot.
Step 2
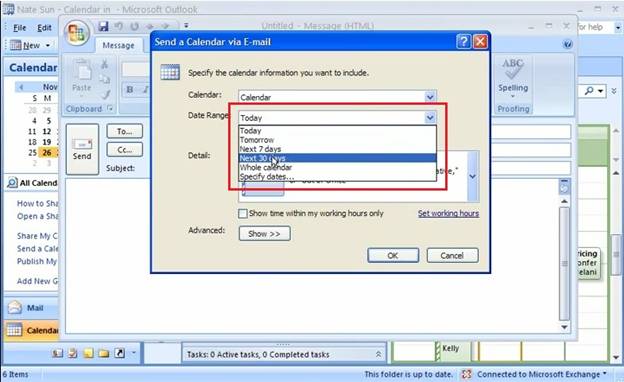
User is prompted to specify the desired calendar information. Specify the “Date Range” and proceed.
Step 3
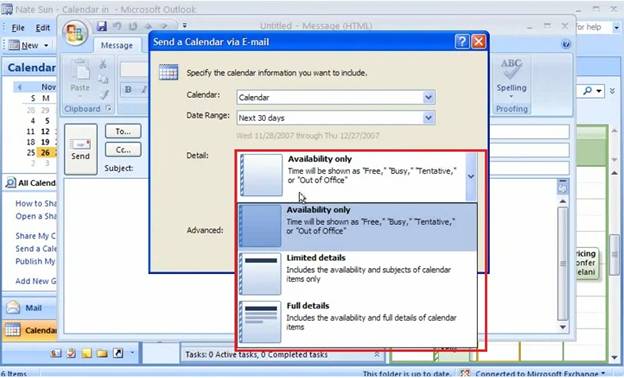
User is further needs to select the appropriate detail from the available options as shown below. Click “OK” to move further.
Step 4
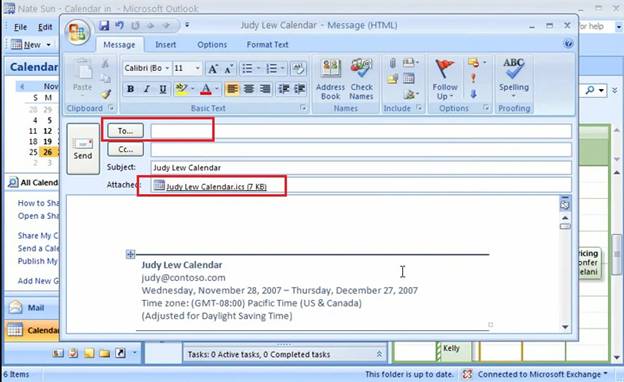
Email window is opened and user may select the desired Email ID or the recipient. The Calendar that is shared is sent as an .ics file that is accessible in MS. Outlook 2007 or the later versions. The calendar is also given in the email body incase the recipient is not using MS. Outlook 2007 or later. Click send and your calendar has successfully been shared with the desired user through email.
Sharing through Publish
Microsoft Outlook 2007 has also added an option to publish the calendar over the internet on office.com and the users may access the calendar by logging into their office.com user account. Publishing procedure is given in the simple steps below.
Step 1
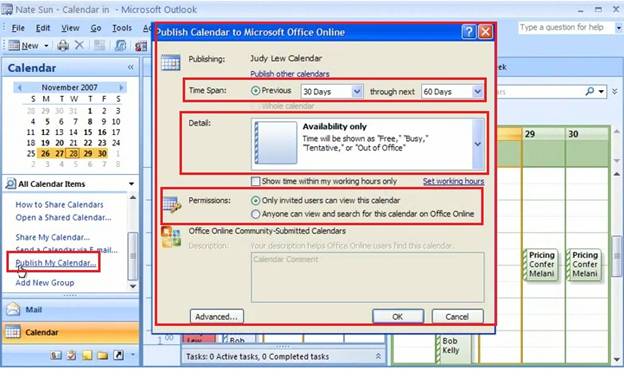
The calendar can be published on office.com by clicking on “Publish My Calendar” in the calendar pane. Select the time span, details and permissions to proceed further.
Step 2
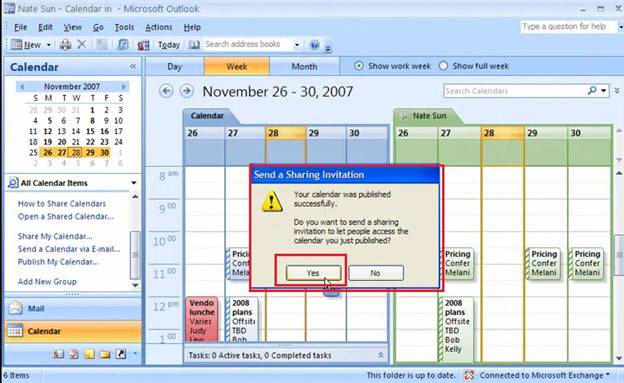
You are prompted if you need to send sharing invitation to the users. Click “Yes” to notify the expected recipients that the calendar has been published.
Step 3
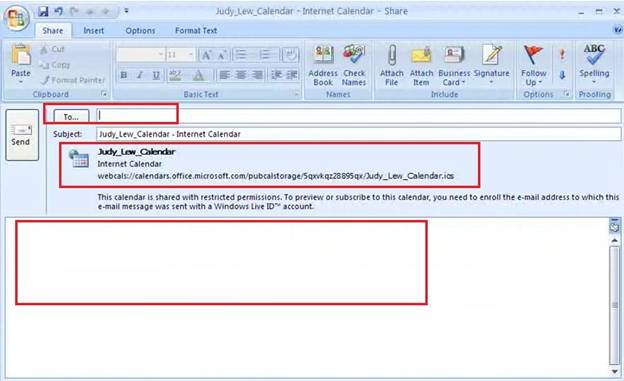
Email like window pops up with URL details. Write the desired text in the email body in order to invite the recipients. Enter the recipient’s mailing address and your calendar is successfully published and shared.
Sharing Calendar in Microsoft Outlook 2010
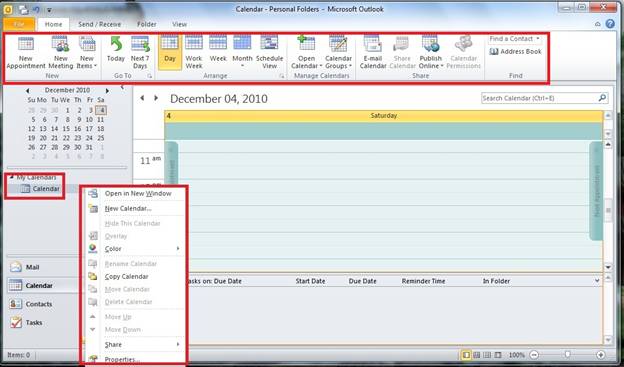
Microsoft has launched its latest version Microsoft Office 2010 that has many improvements from the previous versions in it different tools including Microsoft Outlook 2010. With the new look and multi calendar options the user can use Microsoft Outlook 2010 and its calendar in more convenient and efficient way. Users can now access Calendar options both by right click menu and main menu bar as shown in the screen shot below.
Internal Sharing
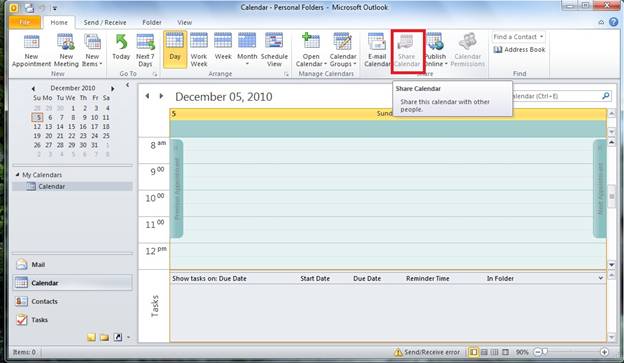
Users can share calendar to local Exchange Server users within the company as it could be shared in the earlier versions. Users need to select permissions, details and time span to share their calendar.
Sharing through Email
Microsoft Outlook 2010 also allows sharing calendar through email like Microsoft Outlook 2007. The procedure is further elaborated in simple steps below.
Step 1
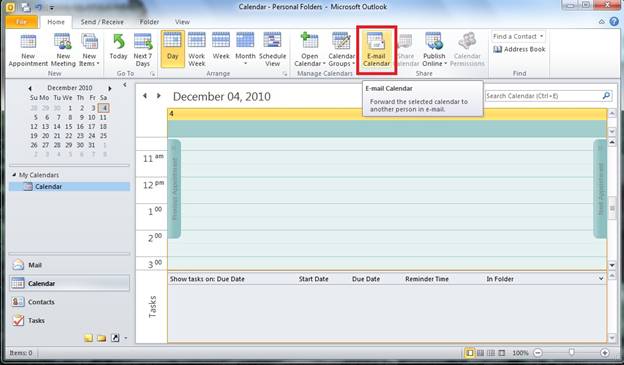
Click on “Email Calendar” from the menu bar or select the very option from right click menu of calendar.
Step 2
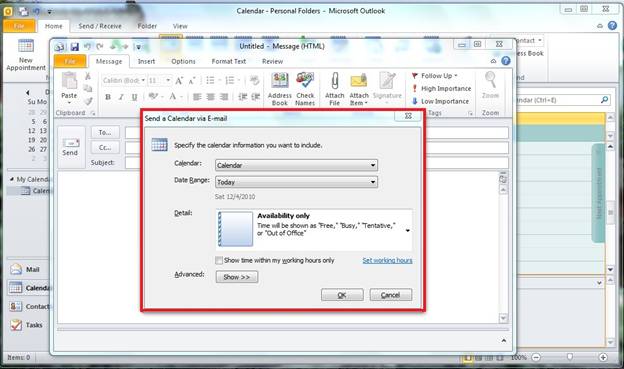
Specify details, time span and calendar from the available options. Click “OK” to proceed.
Step 3
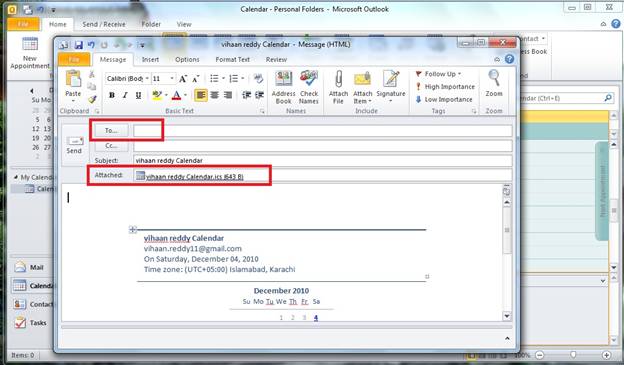
Calendar is attached as .ics file and in the email body as shown below. Enter the desired email address and click “Send”.
Sharing through Publish on Office.com
Microsoft Outlook 2010 has improved the publish mode and now users need to log into Microsoft Outlook Calendar Sharing Service in order to publish their calendar on office.com website. Step by step elaboration is given as follows.
Step 1
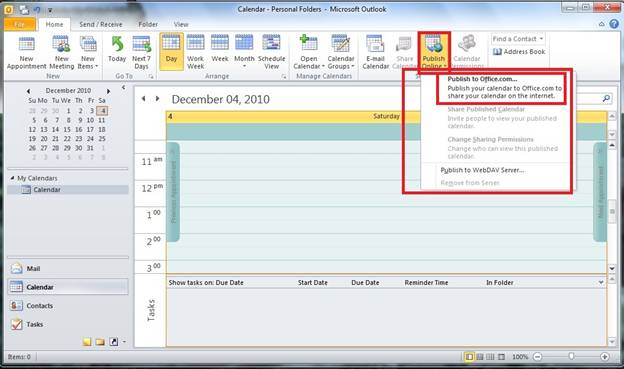
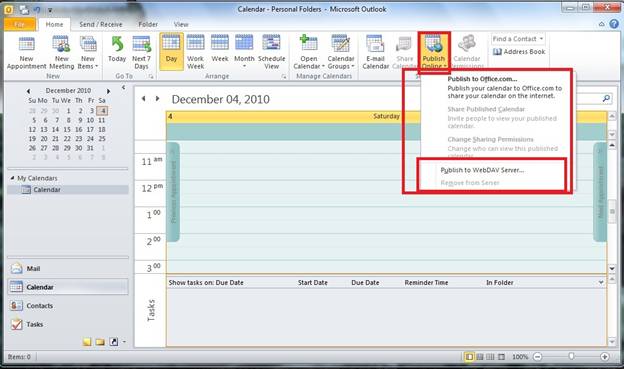
Click on the Publish Options menu button and select Publish to Office.com as shown below.
Step 2
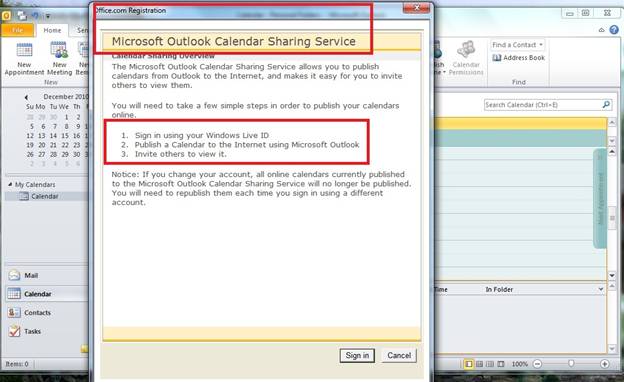
“Microsoft Outlook Calendar Sharing Service” window pops up and gives you the details regarding publishing options. Click “Sign in” to proceed.
Step 3
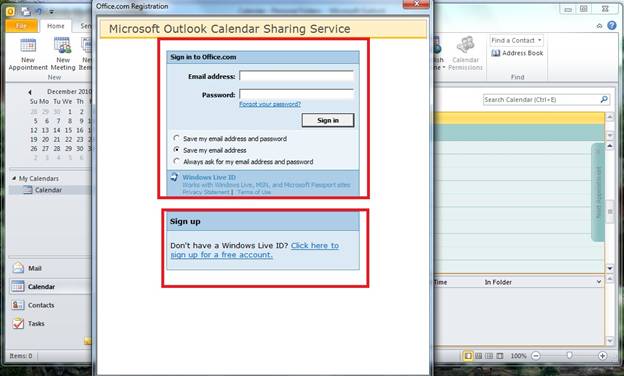
You would be led to signing in window where you need to enter your Windows Live email address and password. Click “Sign in” and proceed to publish your calendar.
Sharing through Publish on WebDAV
Microsoft Outlook 2010 has brought new publishing feature for users in this version. The option is said to be WebDAV publishing. This option is available for the companies and organizations that have WebDAV enabled servers and their ISP allows this feature. WebDAV stands for Web-based Distributed Authoring and Versioning. It enables users to use internet for writing and reading both modes. User s can manage and edit documents and files stored on the internet servers.
This feature has enabled more convenience for the companies and they can now publish their calendar on their own servers rather than on office.com website. Further details are elaborated below.
Step 1
Click on “Publish Options” in the menu bar and select “Publish to WebDAV Server”. Users may remove calendars from the custom servers as well as shown in the menu below.
Step 2
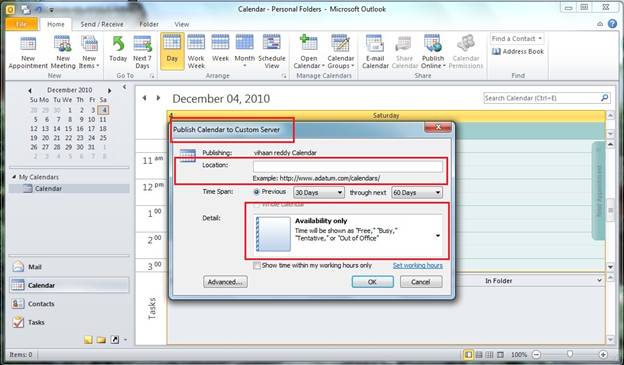
Custom Server window pops up and you can add the appropriate URL in address bar as highlighted below. Select time span and details as required and your calendar would be published to your custom server.
