Steps To Fix ‘cannot Connect To Printer Error 0x0000007e’ Error

Asked By 0 points N/A Posted on -
qa-featured

Hi! I purchased a new printer today. I am trying to connect the printer with my old computer but continuously receiving this ‘cannot connect to printer error 0x0000007e’ message. I tried restarting the computer and the printer, but this error is still present. Share the steps stating the steps to fix this ‘cannot connect to printer error 0x0000007e’ message.

SHARE
Answered By 0 points N/A #323994

Steps To Fix ‘cannot Connect To Printer Error 0x0000007e’ Error

qa-featured

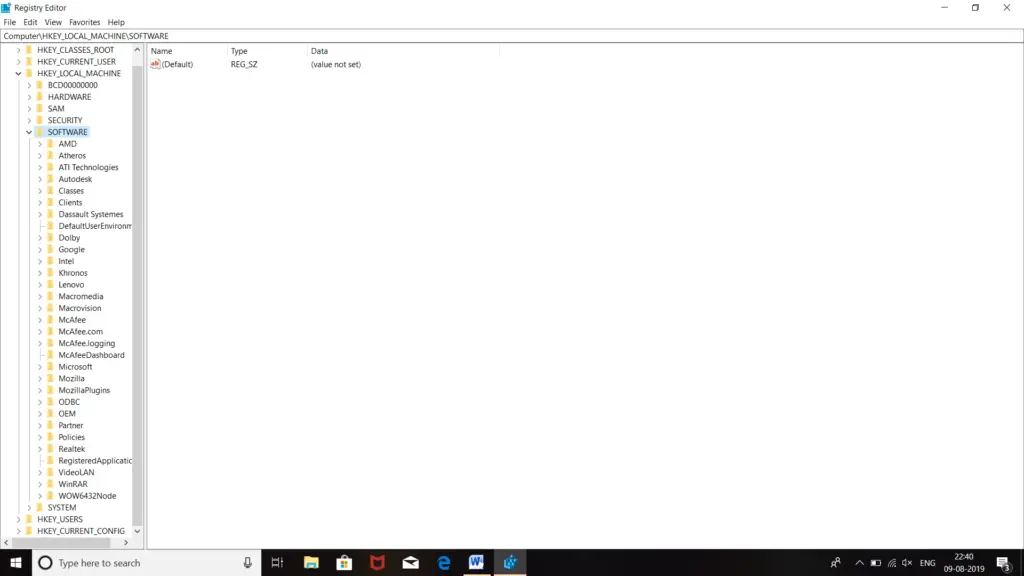
Generally, this ‘cannot connect to printer error 0x0000007e’ error occurs in Windows7 and Windows10 when the printer is connected to any other Windows system. Firstly check if you have downloaded the correct version of the printer driver for your system. You should check whether you have downloaded printer drivers for 32 bits or 64 bits. Sometimes, if we download printer drivers of 64 bits in the PC of 32 bits, this ‘cannot connect to printer error 0x0000007ethis error occurs at the time of installation. This error can also be occurring due to the presence of a corrupted registry key. Follow these steps to fix this error-

  • Type ‘regedit.exe’ in the search bar and press ‘Enter.’
  • Select ‘HEY_LOCAL_MACHINE.’
  • Click on ‘SOFTWARE.’
  • Click on ‘Microsoft.’
  • Go to ‘WindowsNT.’
  • Click on ‘CurrentVersion.’
  • Select ‘Print.’
  • Now, open ‘Printer.’
  • In ‘CopyFiles’ delete the BIDI key.
  • Try to connect the printer again.
Answered By 590495 points N/A #325145

Steps To Fix ‘cannot Connect To Printer Error 0x0000007e’ Error

qa-featured

The full error reads, “Windows cannot connect to the printer. Operation failed with error 0x0000007e”. This error happens on 64-bit clients. You may receive this message when you are using a 64-bit computer or operating system and you want to connect to a shared printer which is shared on a 32-bit machine. This problem doesn’t appear on 32-bit Microsoft Windows.

To fix the problem, you need to create a port for the network printer shared on a 32-bit machine. On your 64-bit Microsoft Windows, click “Start”, “Control Panel” then “Devices and Printers”. On the next screen, click “Add a printer” then select “Add a local printer”. Next, in “Choose a printer port”, select “Create a new port”. Leave “Type of port” as it is then click “Next”.

In “Port Name” dialog, you need to provide the port name in this format:

\\IP Address of the 32 bit PC\Printer name

Replace “IP Address of the 32 bit PC” with the correct IP address of the 32-bit computer where the printer is shared and “Printer name” with the name of the shared printer. For example, if the 32-bit computer is on 192.168.1.185 and the name of the printer is without quotes “HP LaserJet P2050 Series PCL6 (Copy)”, you will have something like:

\\192.168.1.185\HP LaserJet P2050 Series PCL6 (Copy)

Enter this in the “Port Name” dialog then click “OK”. Next, select your printer from the directory. If your exact printer is not listed, select a much closer version like if you have an HP LaserJet P2050 printer but it is not listed, select something similar like HP LaserJet P2200 then continue. Next, enter a name for the new printer.

And that’s it. Print a test page to see if it is working.

Related Questions