Hello everyone. I have two computers, both running on Windows 7. Both are also connected via router. Now, how can I share the files and folders so that I can access them in either computer? Please suggest me on this.
File sharing on windows 7 via router

Hello Margaret,
First you will have to make sure that you have set the computers on the same network doamin and work group by right clicking on my computer and then system properties.
That done, you can now share the computers:
-
In the task bar of your computer, click on the network identity icon.
-
Click open network and sharing center.
-
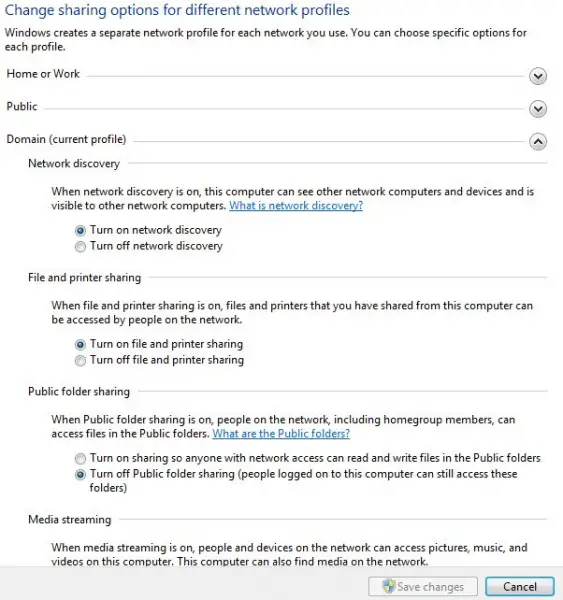
Click on change advanced network sharing options and in the window that will come up change the following:
-
Turn network discovery on.
-
Turn public files and folder sharing on.
-
Disable password protected sharing.
-
Click OK when you are done to save changes.
-

-
Do the same for the other computer that you want to share on the network.
__
Regards
Mahesh Babu
Answered By
Paul Mac
0 points
N/A
#106830
File sharing on windows 7 via router

File Sharing in Windows 7 using WiFi Router :
Step1: Connect the both PCs with same WiFi routers.
Step2: Click on network icon on tool bar and click open networking and sharing center.
Step3: Click on Public Network.
Step4: Select Home Network in the Set Network Location Window.
Step5: Click on Change Home Group Settings .
Step6: In Home Group Settings dialog you can configure numerous sharing options and click on save changes.
Step7: Computers who have joined this Home Network Home Group can view and share computer public files and folders.
Step8: When a Home Group user wants to view or share files need to enter user name and password.
Step9: In Network and Sharing Center click on Change Advanced Sharing Settings.
Step10: In Advanced Sharing Settings enable Turn Off Password Protected Sharing option and click save changes.
Step11: So the user from other end who want to access your computer will not be asked with user name and password.
Step12: Go to Network and Sharing Center and click on WiFi network name to view the computer connected to the same Home Group.
Step13: Double click on the desired computer name to view other public files and folders.


