The world of database management systems is vast and diverse, with numerous options available to suit the unique needs of organizations. Two such prominent systems are Oracle Database and MySQL. While Oracle is renowned for its powerful features and scalability, MySQL has gained popularity for its cost-efficiency, ease of use, and open-source advantages. As organizations continue to evaluate their database requirements and seek optimal solutions, migrating from Oracle to MySQL has become an increasingly common consideration.
In this comprehensive guide, we will explore the process of migrating from Oracle to MySQL, outlining the critical steps and best practices to ensure a seamless transition. By understanding the benefits of each database system, the tools available for migration, and the potential challenges that may arise, you will be well-equipped to make an informed decision and successfully navigate the migration journey. So, let’s embark on this exciting and transformative path from Oracle to MySQL, unlocking new possibilities for your organization’s data management and growth.
Introduction To Oracle Database
Oracle Database is a widely-used relational database management system (RDBMS) developed by Oracle Corporation. It is known for its powerful features, scalability, and robustness, making it a popular choice among large organizations and government entities for managing vast amounts of data. Oracle Database ensures data integrity, supports high availability, and provides advanced security measures, offering a reliable and efficient solution for data storage, retrieval, and management.
The architecture of Oracle Database comprises several components, including memory structures, background processes, and datafiles. It is designed to handle concurrent access, maintain data consistency, and deliver optimal performance. Additionally, Oracle offers different editions tailored to various organizational sizes and requirements, ensuring a comprehensive database management solution for diverse needs.
Introduction To MySQL
MySQL is a popular open-source relational database management system (RDBMS) that is widely used for web applications and other data-driven projects. Developed by MySQL AB and now owned by Oracle Corporation, MySQL is known for its ease of use, cost-efficiency, and flexibility. Its open-source nature allows for a large community of developers to contribute to its growth and provide support, making it an attractive option for small to medium-sized businesses and individual developers.
The MySQL architecture uses a client-server model, with the MySQL server managing the database and clients communicating with the server to access and manipulate data. MySQL is highly customizable, offering various storage engines to cater to different use cases and performance requirements. It is compatible with numerous programming languages and platforms, making it a versatile choice for developers and organizations seeking a reliable and accessible database solution.
How To Migrate Data From Oracle To MySQL
In this section, we will dive into the process of migrating data from Oracle to MySQL, exploring the essential steps and tools to ensure a smooth transition. With a clear understanding of the migration process, you can confidently make the switch and harness the benefits that MySQL offers for your organization’s data management needs.
Prerequisites
Before proceeding with the instructions provided in this tutorial, ensure that you have the following software and components installed and configured on your system:
- Oracle ODBC Driver: This driver allows for seamless integration and communication between your Oracle database and various applications, such as Microsoft Excel. Make sure to download and install a compatible ODBC driver for your Oracle database version.
- Microsoft Excel: This widely-used spreadsheet application will be utilized for importing and exporting data in CSV format. Ensure that you have a compatible version of Excel installed on your system.
- dbForge Studio for MySQL: This powerful MySQL management tool streamlines the process of importing data into a MySQL database from various sources, including CSV files. Download and install dbForge Studio for MySQL on your computer to facilitate the data import process.
Connecting Excel To Oracle
You can connect to an Oracle database from Excel using Get & Transform (Power Query) with an ODBC driver. Ensure that you have installed the appropriate ODBC driver for Oracle before proceeding.
1. In Excel, click on the Data tab, and then click on Get Data in the drop-down menu. Select From Other Sources > From ODBC.
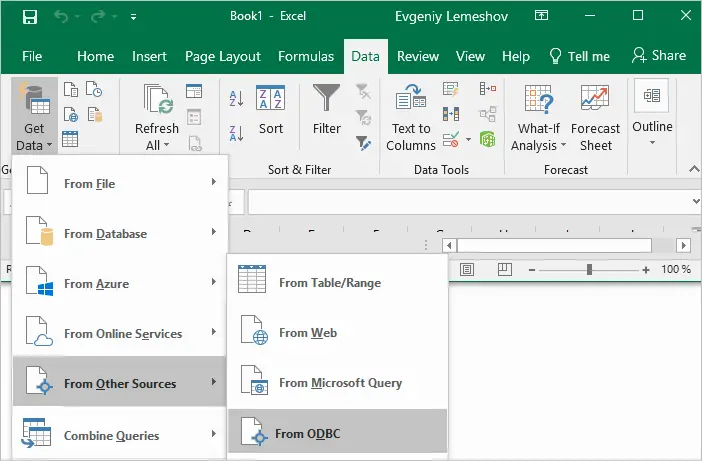
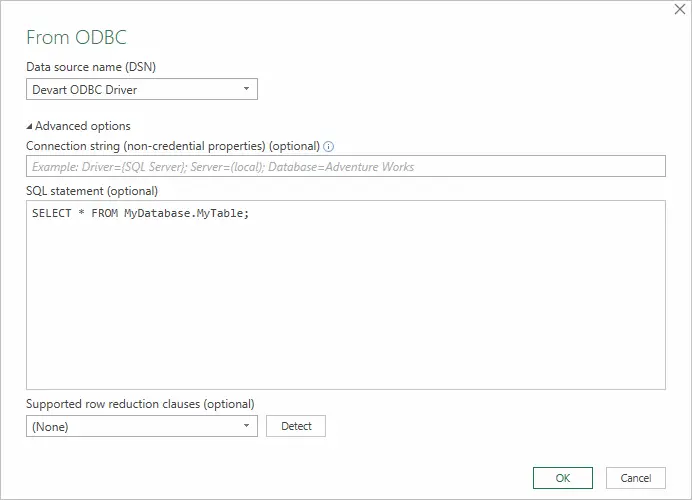
2. In the From ODBC window, select your data source name (DSN). If you haven’t set up your ODBC driver yet, open the Advanced Options dialog box and input the connection string for your data source (excluding credentials, which will be added in the next step). You may also enter an SQL statement to execute upon connecting to the data source. Click OK.
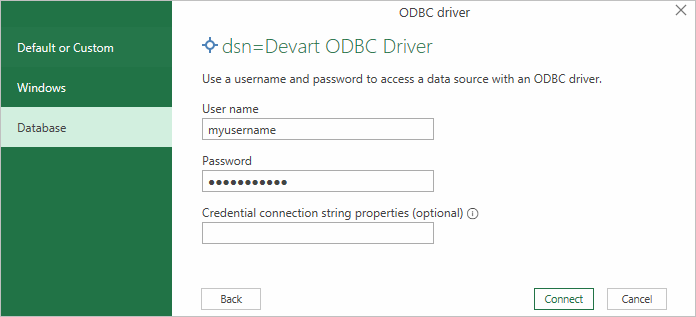
3. If your database requires a username or password, choose Database and input your credentials in the dialog box, then click Connect.
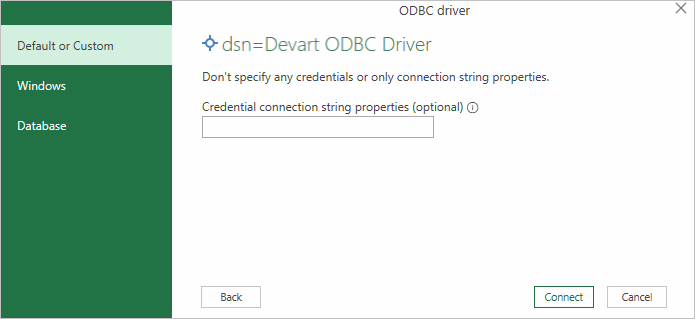
If your database doesn’t need a password or you’ve already provided your credentials in the ODBC data source settings, choose Default or Custom and click Connect.
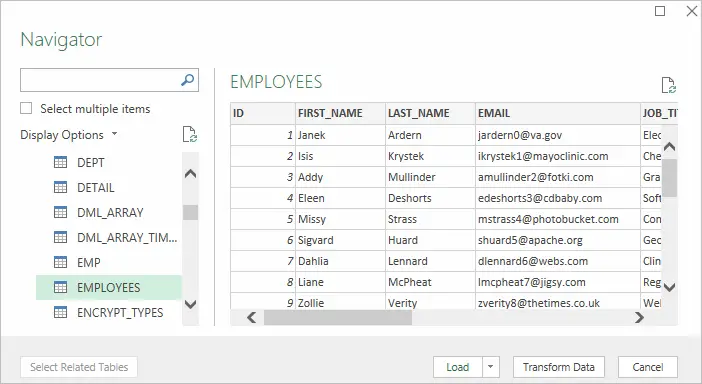
4. In the new window, choose the table from which you want to import data and click Load.
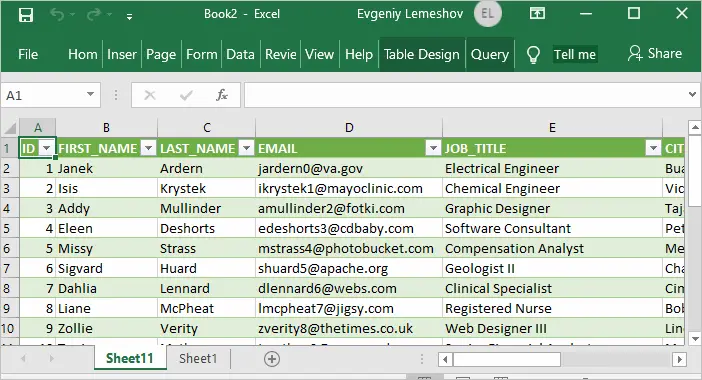
The selected table’s data will now appear in an Excel worksheet, where you can continue to work with it.
Save Excel Data To CSV
To save Excel data as a CSV file, follow these steps:
- Open the Excel workbook containing the data you want to save as a CSV file.
- Click on the “File” tab in the top-left corner of the Excel window.
- Select “Save As” from the menu on the left.
- Choose the folder where you want to save the CSV file.
- In the “Save as type” dropdown menu, select “CSV (Comma delimited) (*.csv)”.
- Enter a file name for your CSV file, and click “Save”.
Your Excel data will now be saved as a CSV file in the specified folder.
Import Data From CSV To MySQL
This topic explains the process of importing data from a CSV file.
- Determine the table to import data into:
In the Database menu, select Import Data. The Data Import wizard appears.
For an existing table:
Right-click a table in the Database Explorer and choose Import Data from the context menu. The Data Import wizard launches with predefined settings: a MySQL connection, a database, and a table for importing data.
Alternatively, go to the Database menu, select Import Data, and choose the desired table on the Destination table wizard page. - Choose the CSV import format and indicate the location of the Source data. Click Next.
- Define a MySQL connection, a database, a schema, and a table for importing data. If you previously selected a table in Database Explorer, the wizard will open with pre-configured connection settings for that table. To create or modify MySQL connections, click the relevant buttons. Click Next.
- Preview the Source data and set additional options for customizing the import:
Choose how many lines to skip during the import, counting from the top. Indicate the line number containing the table header; it will be highlighted in blue in the Preview section. If the header position is not specified, imported columns will be assigned default names like column1, column2, and so on. Define a column delimiter and view the result in the Preview section.
Click Next.
- Specify data formats for the Source data and click Next.
- Map Source columns to Target columns. If importing data into a new table, dbForge Studio will automatically create and map all columns. If importing into an existing table, only columns with matching names will be mapped; others must be mapped manually (if no matching column names are found, they are mapped in order – the 1st Source column with the 1st Target column, etc.).
View Target columns at the top and Source columns at the bottom of the wizard page. Click Source column fields and choose the necessary columns from the drop-down list. (For more information on mapping, refer to the Mapping, Data Import Wizard topic.)
- When importing into a new table, you can modify the Target column properties by double-clicking them in the top grid. Select the Key checkbox for a primary key column and click Next.
- Choose an import mode to determine how dbForge Studio should handle the data import. Click Next.
- Decide how dbForge Studio should manage errors during the import process and whether to generate a log file with import session details.
- Click Import to initiate the import process. dbForge Studio will notify you if the import is successful or unsuccessful. To view the log file, click the Show log file button.
- Click Finish to complete the import process and close the wizard.
Summary
In conclusion, migrating from Oracle to MySQL can be a rewarding decision for organizations seeking cost-effective and flexible database solutions. By following the outlined steps and leveraging tools such as ODBC driver for Oracle, Microsoft Excel, and dbForge Studio for MySQL, you can ensure a smooth and efficient transition between the two database systems. As you navigate the migration process, remember to thoroughly plan, test, and validate the data to minimize potential issues and maintain data integrity. With a successful migration, your organization will be better positioned to enjoy the benefits of MySQL, including its open-source nature, large community support, and compatibility with numerous platforms and programming languages.


