Before going down to business, let’s get to know HandBrake first. HandBrake is one of the many great tools for converting videos from almost any video format into MP4, M4V, and MKV format. Actually, MP4 and M4V are just the same. It is only the extension name that is different but the video data it contains are just the same. I personally use HandBrake specifically when converting HD videos.
I’ve used so many video converters in the past and until now but this one really stands out from the rest. It’s really great in converting HD videos. The quality of the source and output file is almost equal. You would hardly notice a difference. Aside from converting common multimedia files, it can also convert videos from unprotected DVD or Blu-ray disc. It features:
- Select video according to Title or Chapter and set range by time.
- Batch scanning and queuing of encodes.
- Can preserve chapter markers if the source video contains chapters.
- Subtitles supported: SSA, SRT, VobSub, and Closed Captions CEA-608.
- Offers Average Bitrate and Constant Quality video encoding.
- Video filters supported: Detelecine, Deblock, Deinterlacing, Decomb, Denoise, Grayscale, Cropping, and scaling.
- Live preview of video.
And now, here’s how you use it to convert videos. Download HandBrake first if you don’t have it yet. For Windows, it supports Windows Vista, Windows 7, Windows 8.x, and Windows 10 both 32-bit and 64-bit. The latest version no longer supports Windows XP. If you have Windows XP, go to the Old Releases page and download version 0.9.9. This is the last version to support Windows XP. For Mac, it supports OS X 10.6 Snow Leopard until 10.12 Sierra. It is also available for Linux Ubuntu.
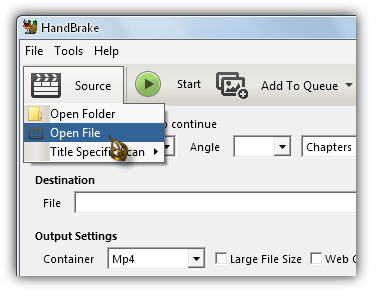
To load a video, in HandBrake, click “Source” then select “Open File”. If you want to load many videos, select “Open Folder” to let HandBrake scan the folder and load all the videos.
Navigate to the location of the video, select the file, and click “Open”. HandBrake should now display the information of the video. The title of the video appears next to “Source” and Title displays the length of the video. In Chapters, you can select the type of range to use like by “Chapters”, “Seconds”, or “Frames”. This allows you to customize the range of the conversion.

If you select Chapters, you can set the start chapter and end chapter. If you select Seconds, you can set the start time and end time. If you select Frames, you can set the start frame and end frame. Duration indicates the total length of the output file.
Before you can start a conversion, you need to specify a name for the output file. Under “Destination”, in File, enter the name of the output file in the text field. If you want to put the output video on a different folder, click “Browse”, navigate to the folder where you want to save it, enter the name of the output file, and click “Save”.
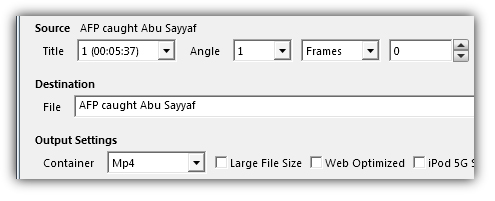
Under “Output Settings”, you can select the file format of the output video in the Container dropdown menu. You can select between “Mp4” and “Mkv” file containers. By default, HandBrake saves in “m4v” file format.

As I explained earlier, MP4 and M4V file containers are just the same. They just differ in the extension name used. But the advantage of using M4V over MP4 is that it supports chapters while MP4 doesn’t. This means if the source video contains chapters like on DVDs, when you save it in M4V container, those chapters will be preserved and will appear in the output file. But if the source video contains chapters and you save it in MP4 container, those chapters will be discarded and will not appear in the output file.
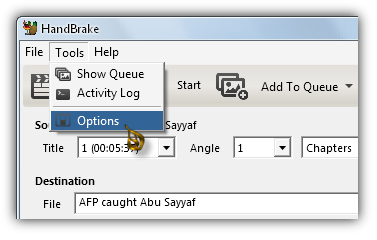
You can change how HandBrake selects the output format for the MP4 container. Click “Tools” and then “Options”.
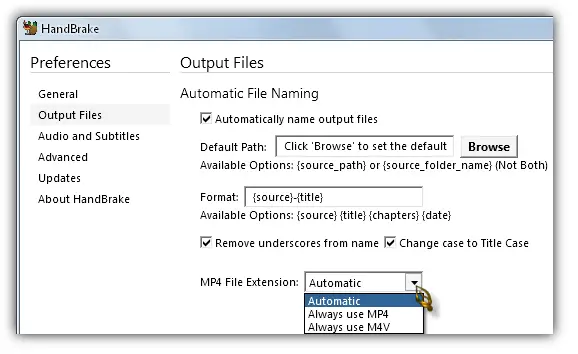
On the next screen under “Preferences” pane, select “Output Files”. In MP4 File Extension dropdown menu, select “Automatic”, “Always use MP4”, or “Always use M4V”. “Automatic” is selected by default.
In the tabs underneath “Output Settings”, you can change different settings for the output video. In the “Picture” tab, you can adjust the screen size of the video. Source displays the original screen size of the video and next to it is the Aspect Ratio. By default, Anamorphic is set to “Loose” which only allows you to change the width of the output video.
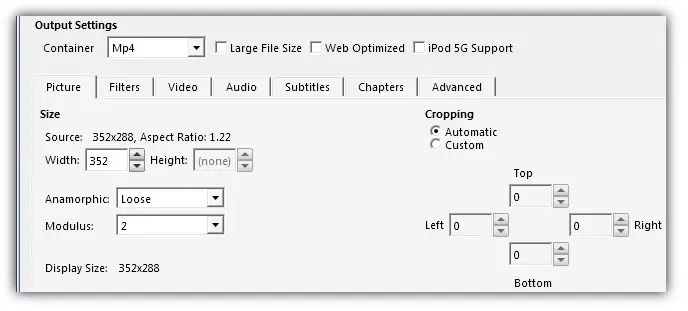
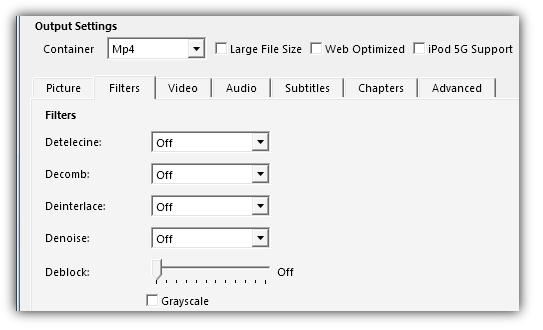
If you also want to change the height of the output video, set Anamorphic to either “None” or “Custom”. Options available are “None”, “Strict”, “Loose”, and “Custom”. The “Picture” tab also allows you to crop the video. The “Filters” tab allows you to apply different filters for your video. Filters available are “Detelecine”, “Decomb”, “Deinterlace”, “Denoise”, and “Deblock” including “Grayscale”.
The “Video” tab is where you select the codec, frame rate, encoding speed, and other options related to video. In Video Codec, you can select between “H.264 (x264)”, “MPEG-4 (FFmpeg)”, and “MPEG-2 (FFmpeg)”. In Framerate (FPS), default is “Same as source”. Available frame rates are 5, 10, 12, 15, 23.976, 24, 25, 29.97, 30, 50, 59.94, and 60. You can already get a good result with 25 fps. 29.97 fps is what I usually use.
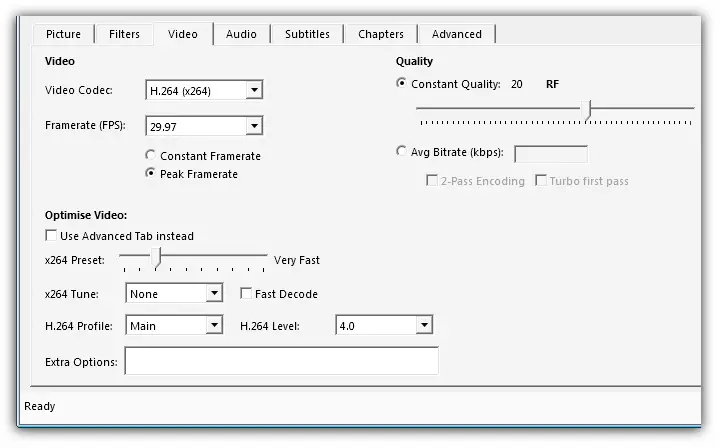
You can also set the behavior of the frame rate with “Constant Framerate” and “Peak Framerate”. Under “Optimise Video”, you can select the preset for the encoding speed in x264 Preset. Default is “Very Fast”. They recommend that you set this option to the slowest possible speed you can bear because slower settings result in better quality or smaller file size.
Under “Quality”, default is “Constant Quality” set with 20 RF. For standard video conversion (DVD), you can use an RF value of around 20 +/- 1. For high definition video conversion (Blu-rays 720p/1080p), you can get away with a slightly higher RF value of 22 +/- 1 without any perceived difference in quality.
In “Audio” tab, you can change the bitrate and other settings for the audio. Bitrate is set to 160 and Mixdown is set to “Dolby Pro Logic II” by default. Click the Bitrate dropdown menu to select a different audio bitrate for your video. Values are 64, 80, 96, 112, 128, 160, 192, 224, 256, 320, and 384.

When you are done with the settings and ready to convert click “Start” to begin the conversion. Depending on the length of the video and the encoding speed you selected, it may take some time for the conversion to complete. And that’s how you convert with HandBrake! Feel free to explore the rest of the settings. To know more about HandBrake, visit the HandBrake Documentation.


