Hub Role In Microsoft Exchange 2007
What is Hub Transport Server?
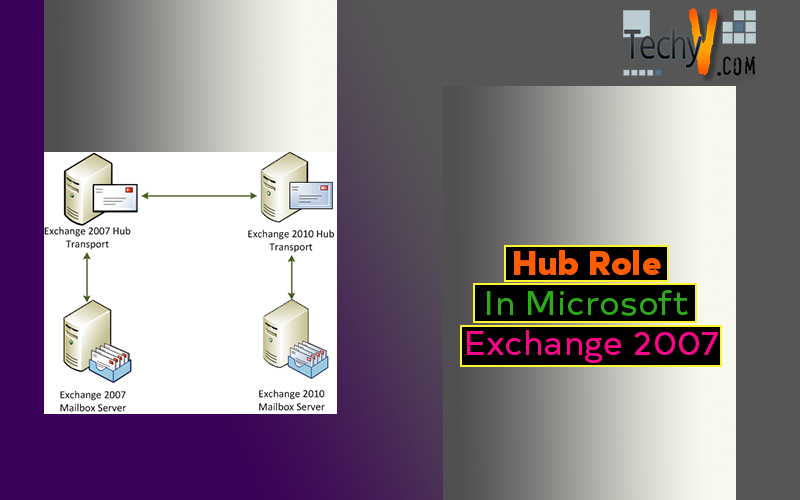
Hub Transport is one of the 5 email server roles introduced in Microsoft Exchange 2007. From the name itself, it basically acts as a hub to emails being delivered to and from the organization.
What Does Hub Transport Server Do?
A Hub Transport Server’s basic function is to route each email to its correct destination.
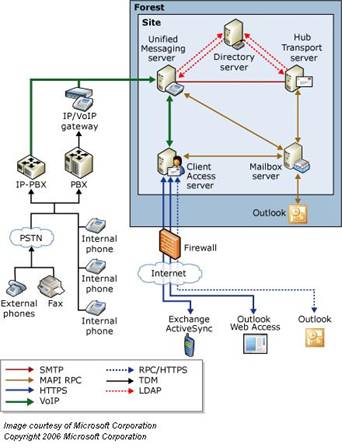
Every internal email is sent to the Hub Transport Server. It is the Hub server that routes email to the outside world or to the mailbox server based on its destination.
Most of the policies are imposed on emails through Hub Transport server including content filtering and mail re-directions etc.
The Hub Transport server role stores all of configuration settings and replicates through Active Directory to other Hub servers in organization.
This information includes:
- Transport Rules
- Journal Rules
- Connector Configurations
Hub server can be configured to use HTTP, HTTPS, MAPI, IMAP4, POP3 protocols.
Deployment Considerations
Depending on hardware availability and utilization requirements, Hub server is installed on a separate physical or virtual machine. However it can be deployed on same physical or virtual machines having Mailbox and Hub server roles if there is a limitation of resources.
Hub Server requires communication to outside world through internet in some cases where EDGE server role is not installed. In that case it is placed in DMZ in a corporate network.
Installation
There are few pre-requisites to be followed for installation of Hub server role.
Who can install a Hub Transport Server?
A user installing a Hub server must be member of the following groups
- Domain Administrators
- Enterprise Administrators
- Local Administrator
What are the Hardware Requirements?
- A Hub Server role requires 64 bit processor architecture.
- It can be installed on any Pentium-IV, Xeon or AMD Athalon based processor.
- Hub requires 2GB of RAM for its own processing
- An additional memory of 3kb per message over head and 1Kb per user over head is required.
- 1.2 GB free space available on installation drive and 200 MB free space on system drive
- File system must be formatted as NTFS on both drives
What are the Software Requirements?
- Minimum requirement for Domain Functional Level is Windows 2000 (Native)
- Operating system must be Windows Server 2003 64bit with SP1 or higher
- Operating system must be fully patched and an antivirus should be installed with latest definition updates before you perform any installation activity.
There are some basic windows components that must be installed on the server before we begin installation of any exchange server role. These components are:
- Internet Information Service (IIS)
- Dot Net Framework 2.0
- MMC 3.0
- Windows Power Shell 1.0
Once all the hardware is configured to use and powered ON with basic OS and antivirus installations and updates etc, we can now proceed with the starting of installation procedure.
Installing the Pre-Requisites
For the installation of Internet Information Services (IIS), follow these steps:
Go to Start Menu > Control Panel and click “Add or Remove Programs”
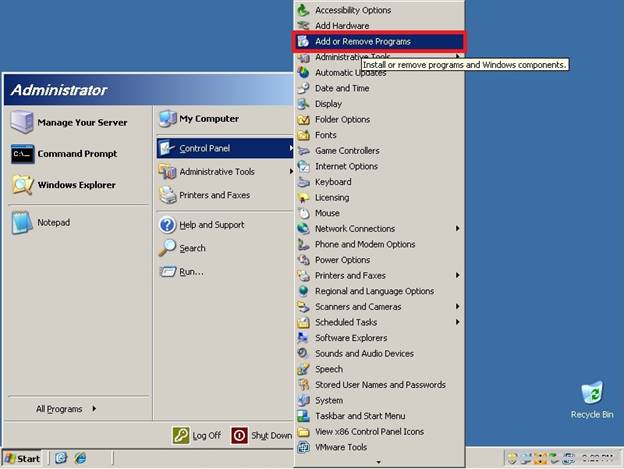
Fig. 01
On the Add or Remove Programs screen click last tab on the left side “Add/Remove Windows Components”
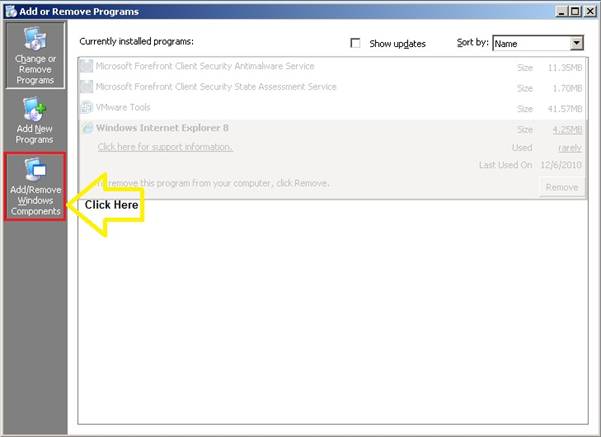
Fig. 02
A wizard will start to assist the installation procedure.
On the Windows Components Wizard screen select “Application Server” and click “Next”
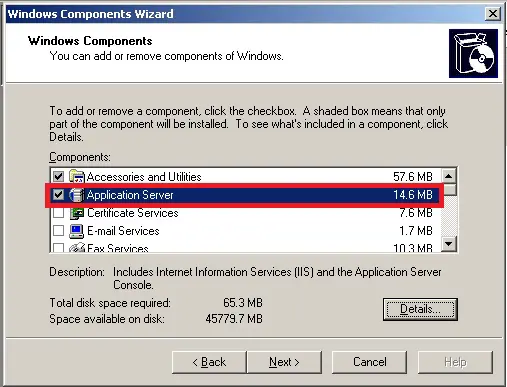
Fig. 03
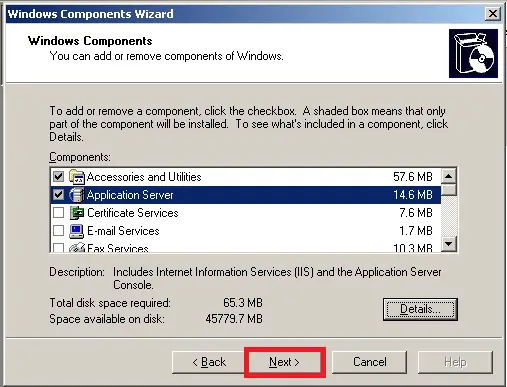
Fig.04
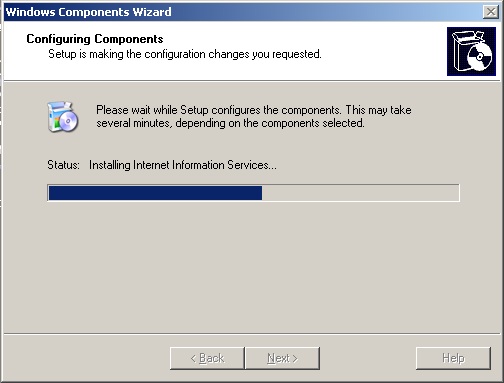
The installation will begin for IIS services.
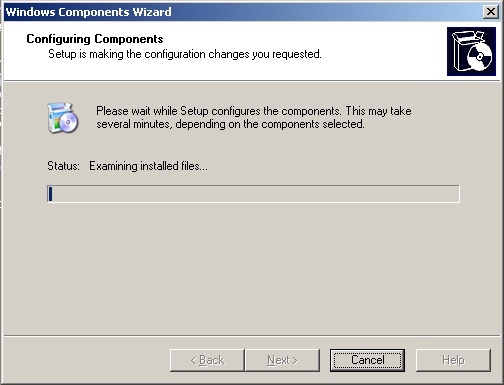
Fig. 05
Incase installer process asks for additional files located on any CD of Windows XP or Windows7, provide correct path of the directory or CD location by clicking browse button shown on your pop up screen
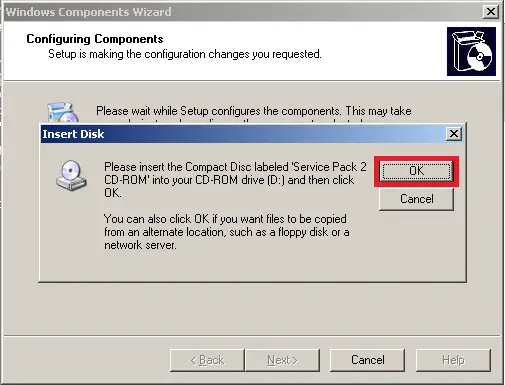
Fig. 06
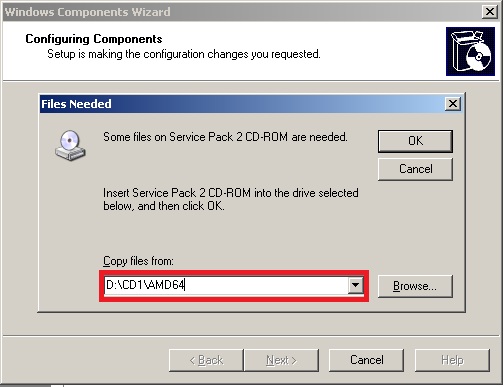
After providing the correct path click “OK” to continue installation
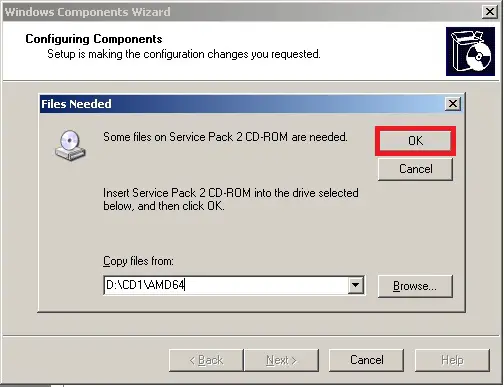
The installation will start for IIS
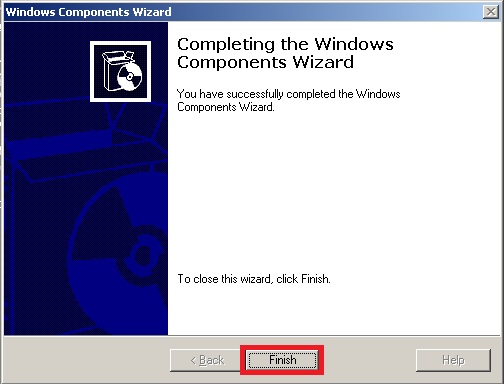
Once installation is complete, click “Finish” to exit
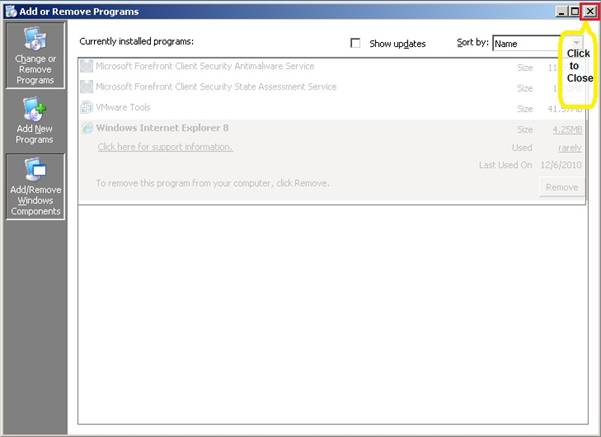
Now close “Add or Remove Programs”
In order to install first we have to get a re-distributable installation package of dot Net Framework 2.0 from Microsoft’s website.
You can download dot NET Framework 2.0 from this URL:
http://www.microsoft.com/en-us/download/details.aspx?id=6523 After downloading the executable file on your desktop, double click on this file to initiate the installation procedure
An installation window will appear asking for user’s consent to install dot Net Framework 2.0.
Click “I have read and ACCEPT the terms of the license agreement”
You can leave the blue highlighted checkbox blank if you want since this is optional.
Then click “Install”
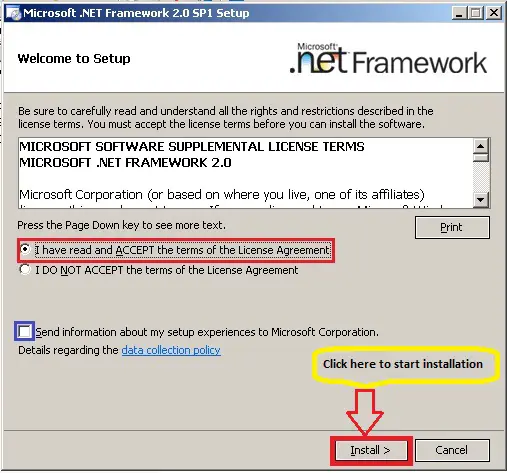
Fig.13
The Installation will start for dot NET framework 2.0
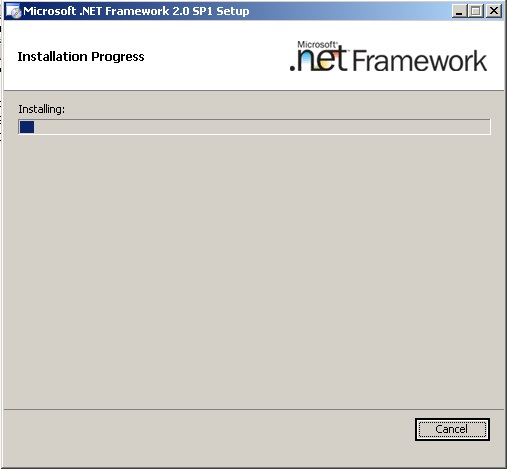
Fig.14
After the Installation is complete, click “Exit” button to complete the installation process
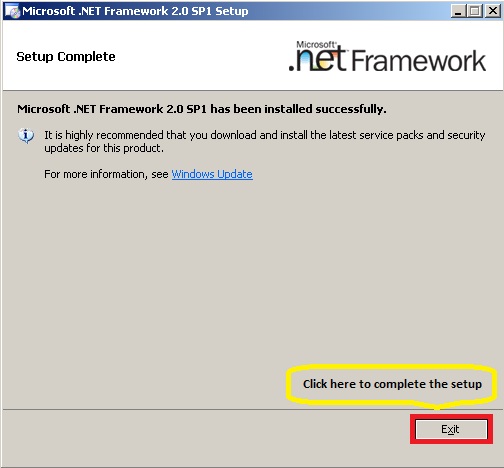
Fig.15
Microsoft Management Console (MMC) 3.0 generally comes pre-installed with X64bit systems however it can be downloaded from this URL if required:
http://www.microsoft.com/en-us/download/details.aspx?id=12709 Windows Power Shell 1.0 can be downloaded from this URL:
http://www.microsoft.com/en-us/download/details.aspx?id=11892 After downloading the executable file, double click on the file to run the setup process
On the first screen of installation wizard, click “Next” to start installation of Windows Power Shell 1.0
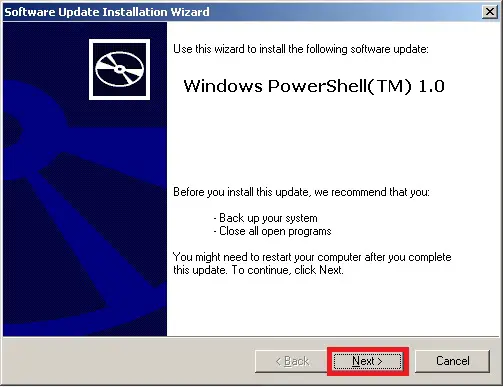
Fig. 16
On the next screen select “I Agree” radio button and click “Next”
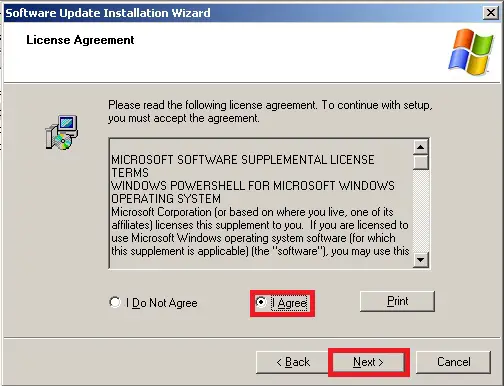
Fig. 17
The Installation will start
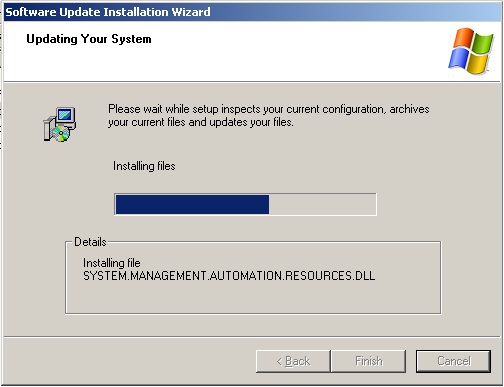
Fig.18
Once installation is complete, click “Finish”
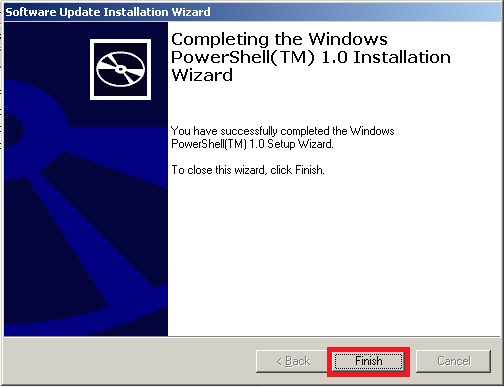
Fig.19
After installing all pre-requisites, restart the server for changes to take effect
Installation of Exchange Server 2007 (hub Transport Role)
Go to the installation source in DVD or where you have copied it after downloading.
Select “SETUP.EXE” which is generally found on the root of installation folder.
Double click this executable file to initiate the setup process.
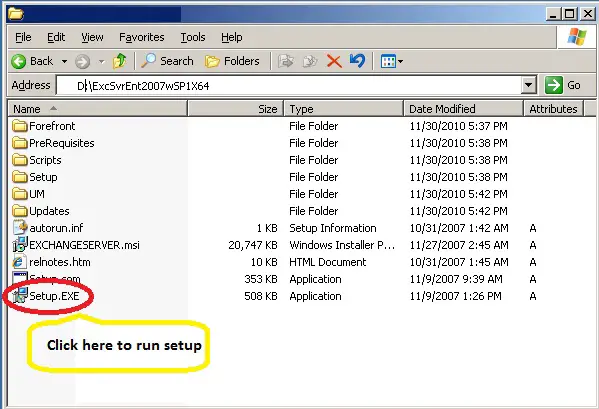
Fig.00
Exchange Server 2007 window will open up.
Here you can see that initial 3 steps are grayed because we have already installed pre-requisites and exchange setup has detected this too. If any of the first 3 options are not grey please review your installation steps and repeat the installation procedure for not installed component.
Now move to the first available option i.e. Step 4: Install Microsoft Exchange 2007 SP1 click this option to begin installation.
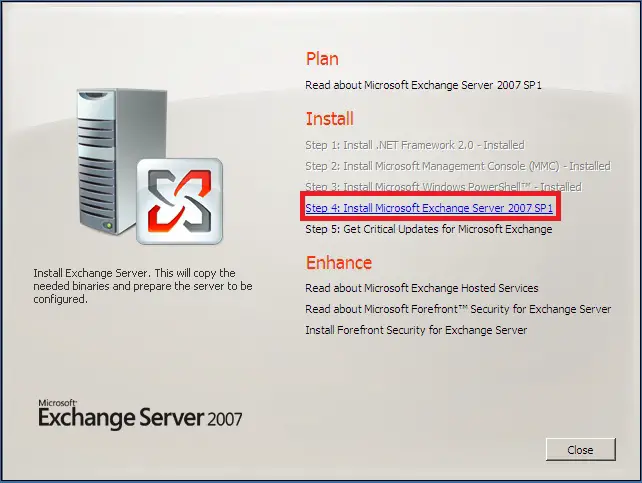
Fig. 20
On the introduction screen, setup will give you a brief description of the product.
Click “Next” to proceed.
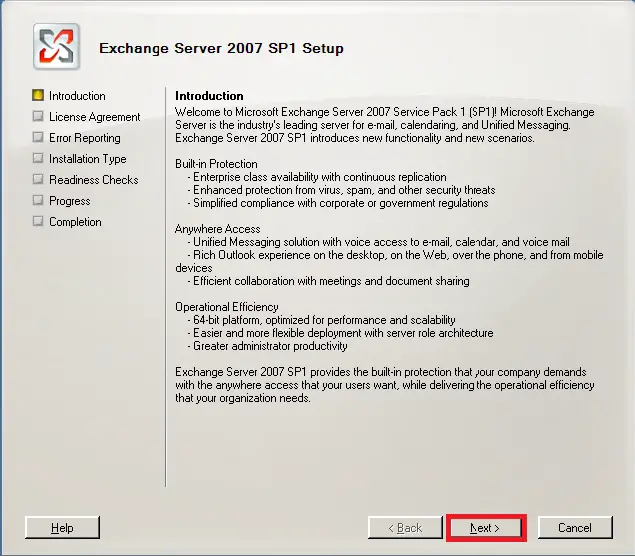
Fig. 21
On the license agreement screen you can read the license agreement, once satisfied with the documentation you can now click “I accept the terms in the license agreement” and click “Next” to proceed
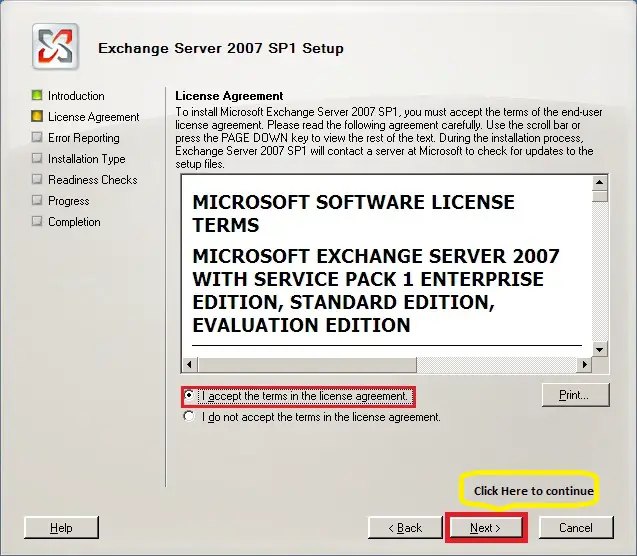
Fig. 22
Next screen will show Error Reporting feature for exchange. This feature can be disabled with no effect on installation however to get a feedback from user end, Microsoft recommends that you click “Yes” to proceed.
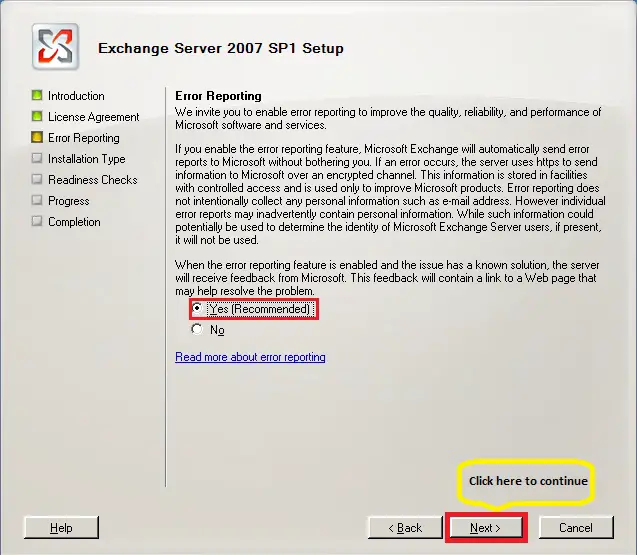
Fig. 23
On the “Installation Type” screen you have two options. Either you can go for typical installation which can install multiple roles on same box or you can select an inpidual role for this specific machine.
As scope of this document is to install Hub Server only so we will click on second option
“Custom Exchange Server Installation”
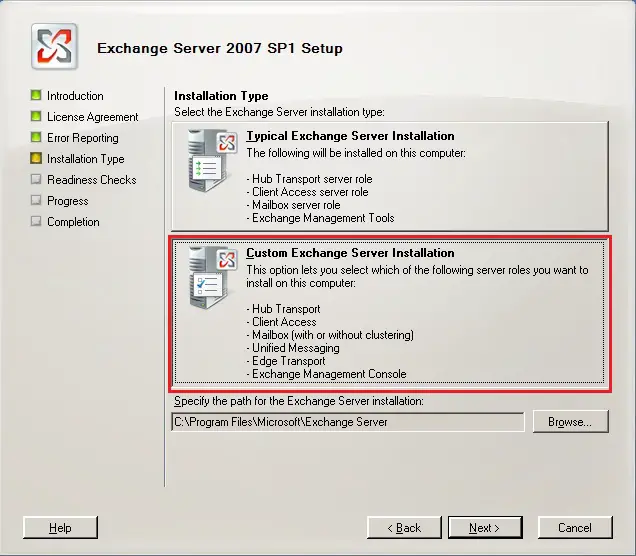
Fig. 24
After choosing the installation type click on “Browse” button to mention the installation path where you plan to put all the installation. In this example we are choosing a folder created for Hub server installation on C drive.
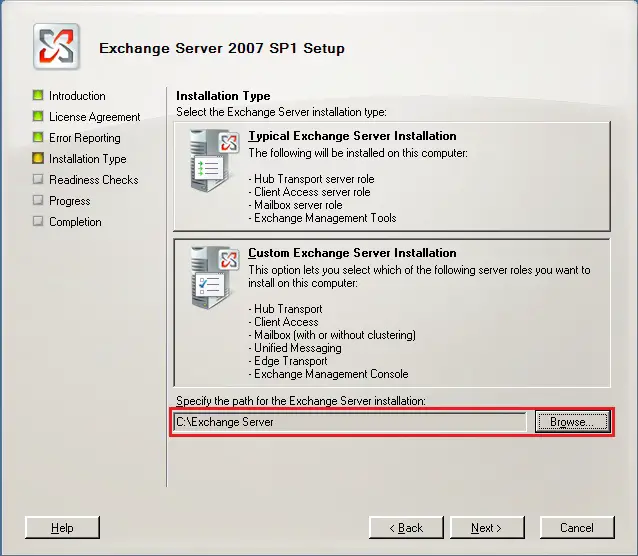
Fig. 25
Click “Next”
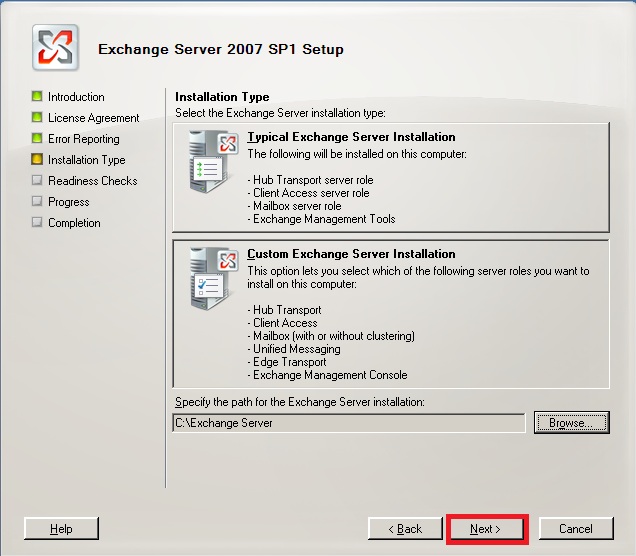
Fig. 26
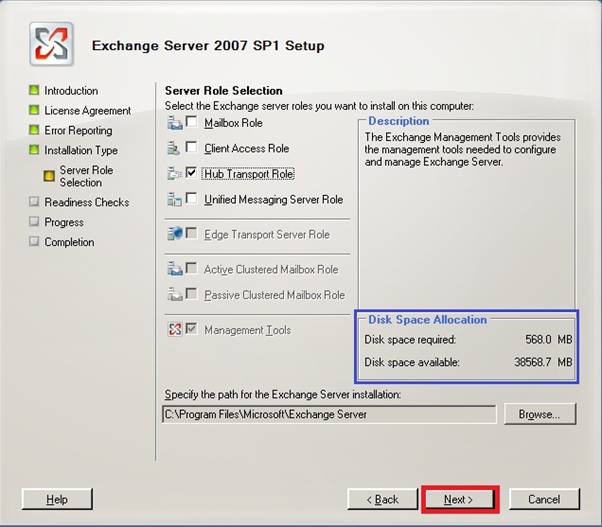
Server Role Selection screen will appear. Here you have choices to select any one or more server roles.
Select only “Hub Transport Role”
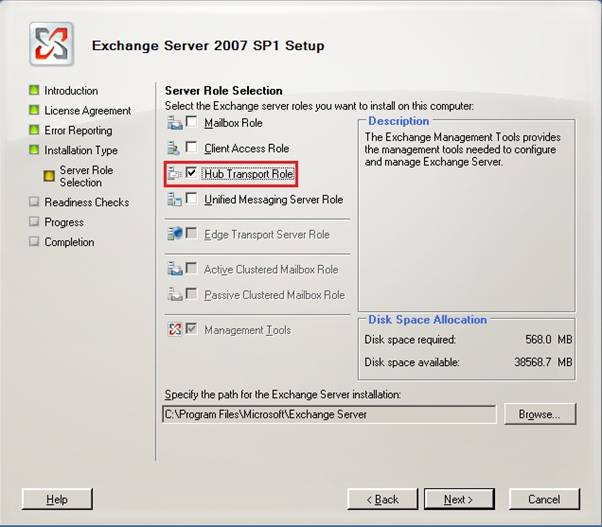
Provide correct path to installation by clicking “Browse” button
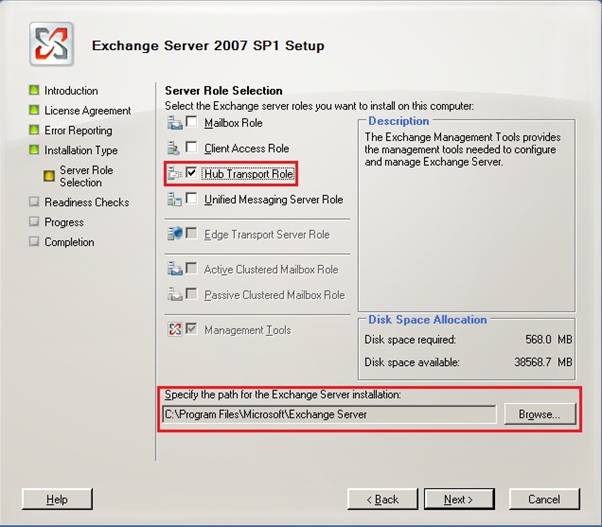
After making the selection and before preceding any further make sure that space allocations are as per your expectations.
Click “Next”
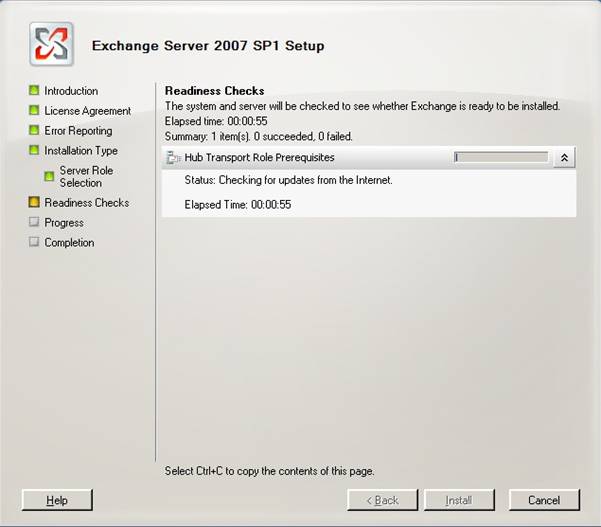
Installation process will start by calculating pre-assessments
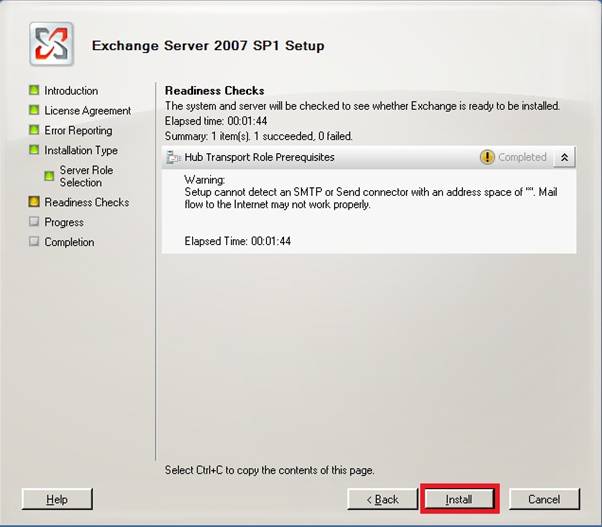
Setup may complete with a warning if this is the very first HUB role in your organization.
Click “Install”
Installation process will start
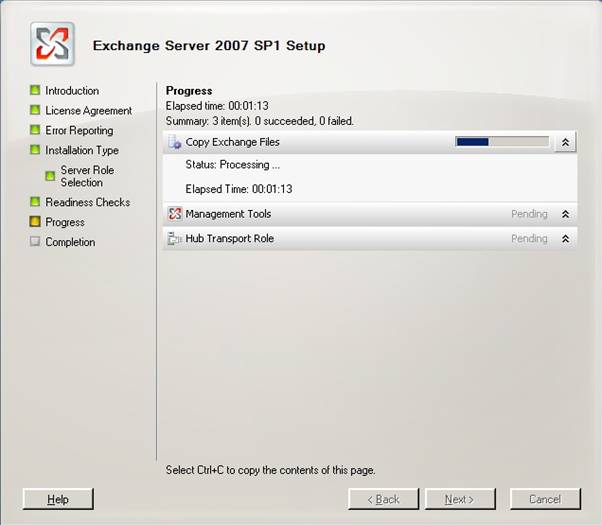
Installation process will take some time by performing various steps
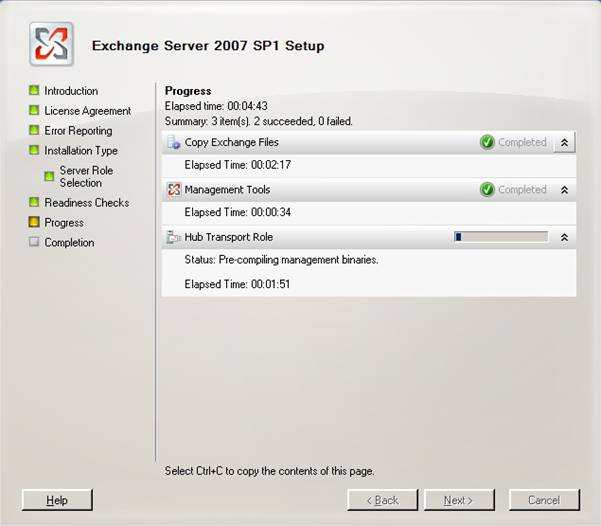
Click “Finish”
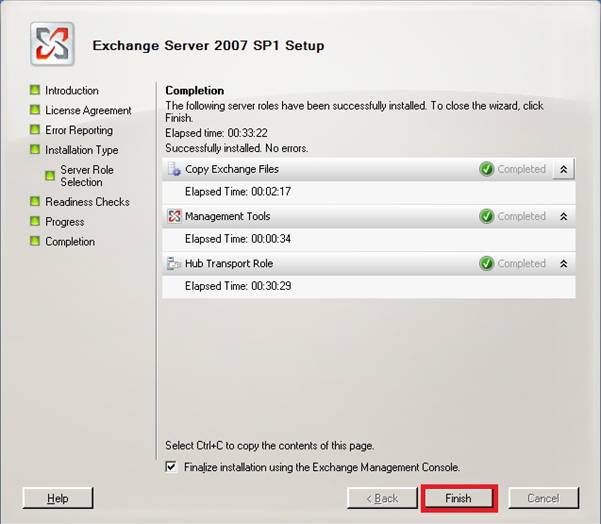
A pop up window will appear recommending system reboot.
Click “Ok”

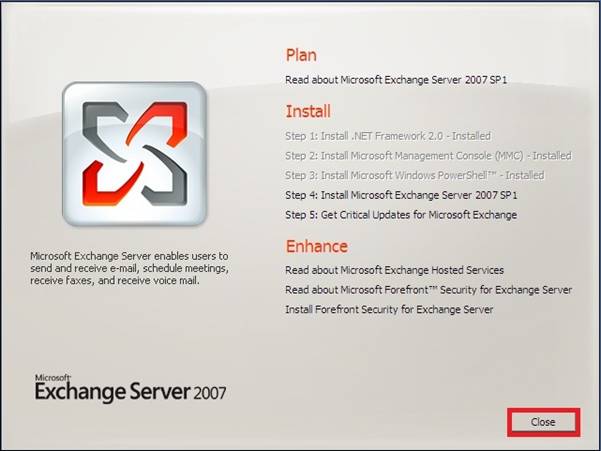
Click “Close” to exit installation wizard
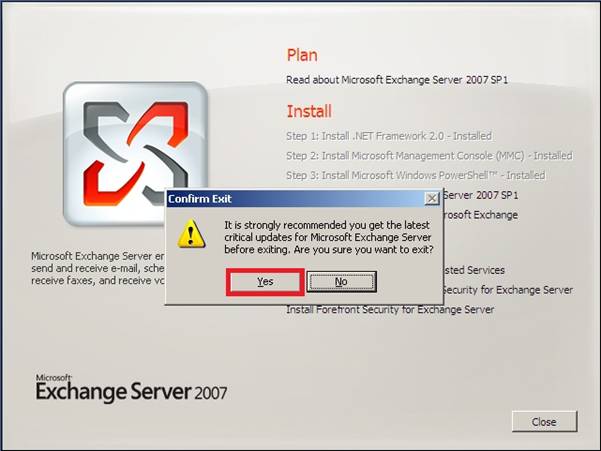
Click “Yes” to accept exit confirmation dialogue box
After closing the installation, restart server.
After re-login go to
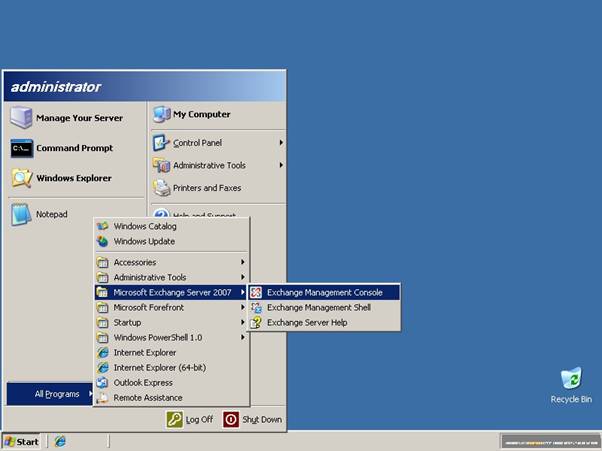
Start > All Programs > Microsoft Exchange Server 2007 > Exchange Management Console
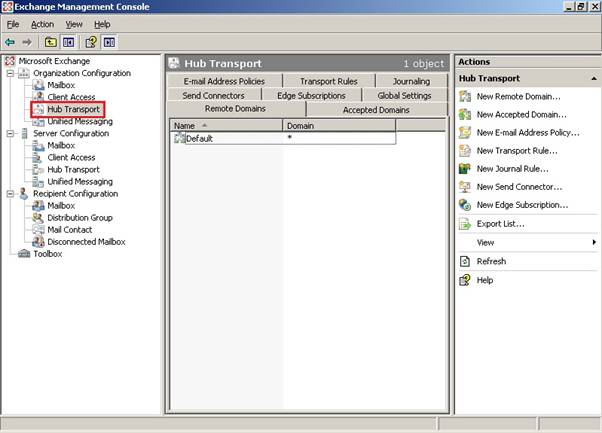
Click Hub Transport under “Organization Configuration”
You can observe entry for default domain which is automatically configured upon Hub installation.
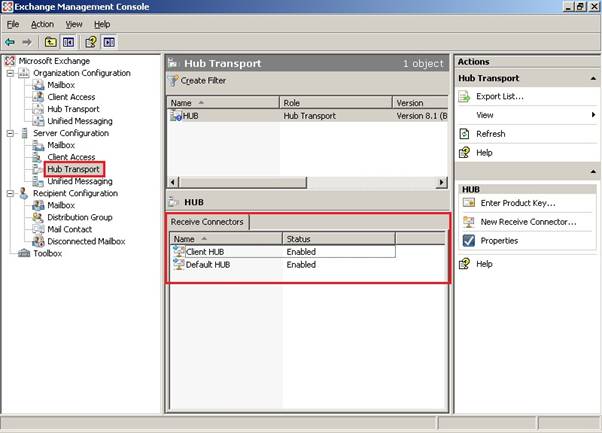
In the Hub transport tab under “Server Configuration” click to see “Receive Connectors”
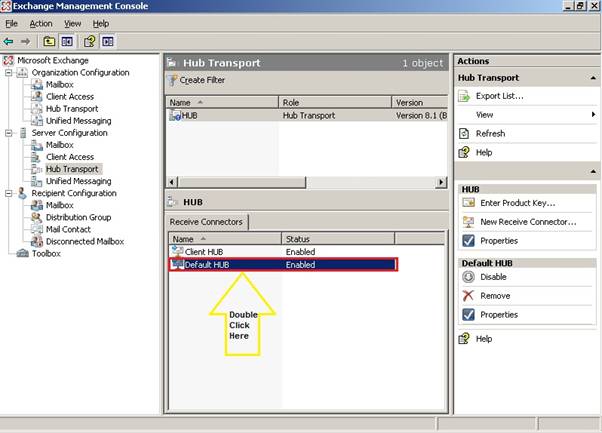
In order to configure, double click “Default HUB”
The properties for Default HUB connector will open up.
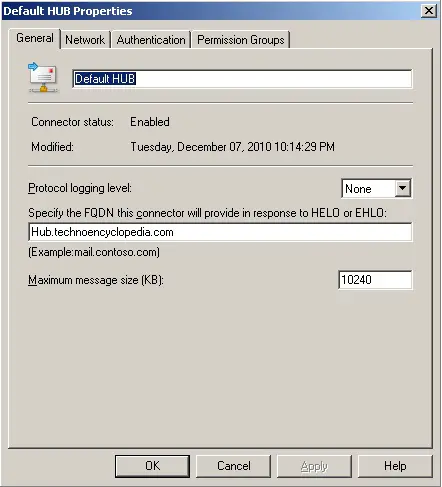
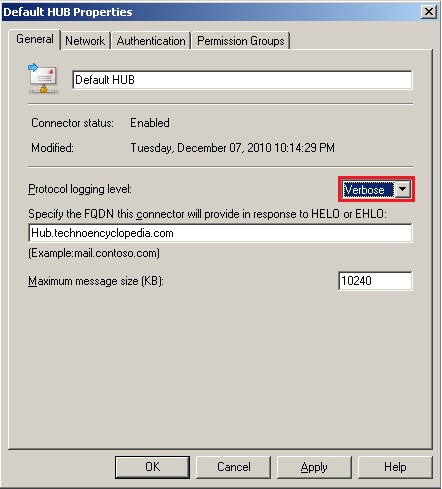
Change “Protocol Level” logging to “Verbose” from the scroll down menu
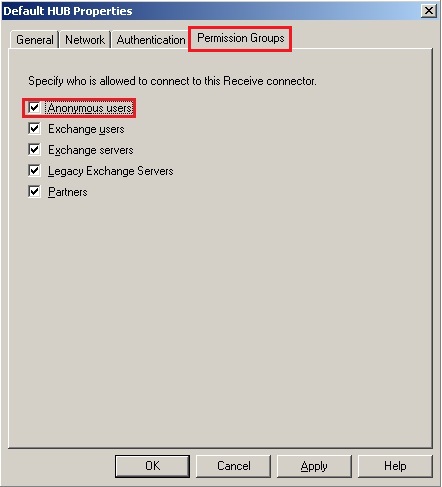
Go to “Permission Groups” tab and click the check box to enable “Anonymous Users”
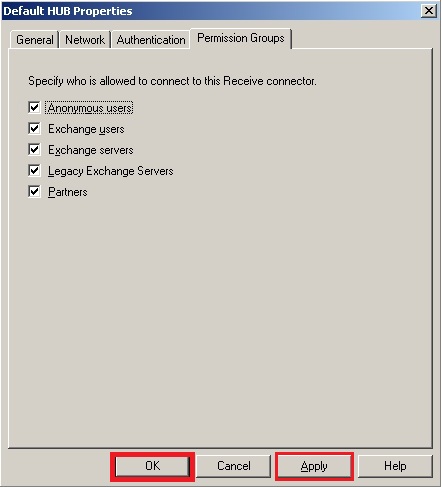
Now click “Apply”
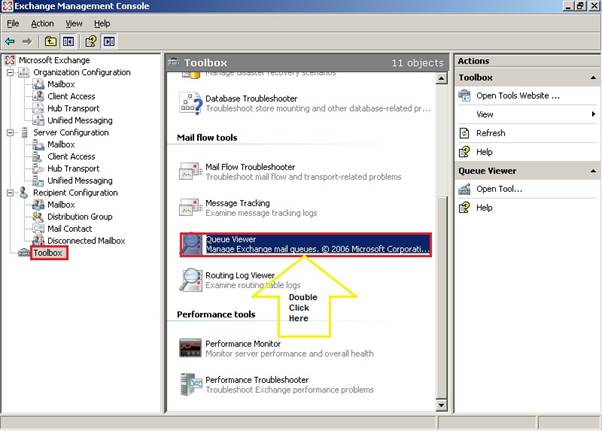
From the “Exchange Management Console” go to “Tools” tab
Double click on “Queue Viewer”
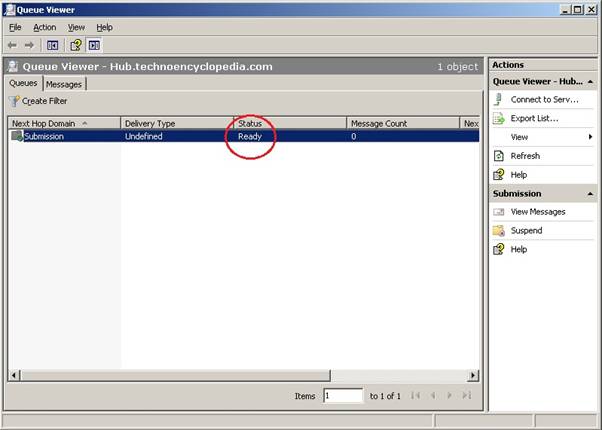
The “Ready” status of “Submission” queue will ensure correct installation and proper functioning of Hub Transport Server.
Conclusion
Hub transport server role has been installed and configured for Exchange 2007 organization. Its functionality can be confirmed through the connectors configured by default and mail submission queues.


