Installing ISA Server on a Windows 2000 Server
This topic is about:
- Installing ISA Server on a Windows Server 2000 with Active Directory
- Backing Up & Configuration of ISA Server
- Promoting ISA Server
- Performing the Installation
- Migrating from Microsoft Proxy Server
Introduction
ISA Server provides a single network access point to the Internet for your network, or it can be implemented as one of the several pieces of your network security infrastructure. Before installing ISA Server, you need to perform a thorough review of your infrastructure. Once ISA Server is in place, you can start working on installing ISA Server. We will discuss how to prepare for the installation process.
You Plan to Install & Permissions Required:
| Planning Required
|
Permissions Required |
| Standalone ISA Server | Local Administrators Group (Domain Administrators are automatically placed in this group) |
| An array member | ForDomain Administrator |
| An enterprise array | For Enterprise Admin |
| ISA schema update | ForSchema Admin |
ISA Server Setup Dialog Box

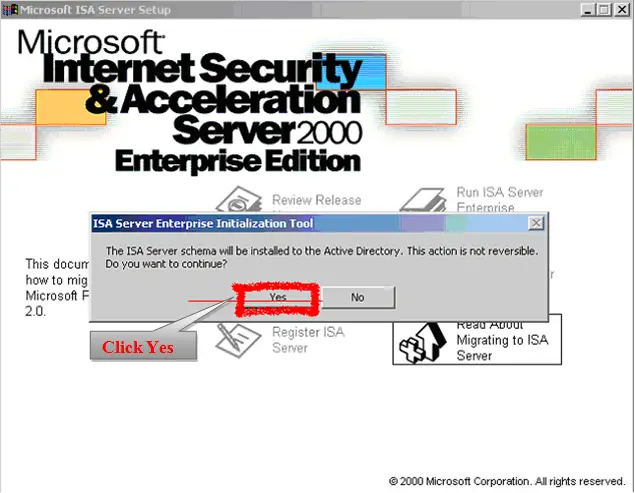
ISA Sever Installation after Active Directory, through this ISA Server schema will be installed to the Active Directory, this action is not reversible, if you click yes.
ISA Server Schema After Active Directory

If you are installing ISA Server 2000 to the Active Directory, you should define your policy, which policy would you like to install, it could be enabling publishing rules, or Force packet filtering on the array.
Define Policy with different Check Box

Active Directory import & installing with ISA Server Classes
Install ISA Server Classes & Prosperities

After ISA Server Enterprise initialization Tool had successfully imported the ISA Server Schema into Active Directory, if there is more than a single domain controller in your domain (Techno), wait for Active Directory replication to complete before you configure ISA Server as an array member.
Import the ISA Server Schema

Welcome to the Microsoft ISA Server (Enterprise Edition Installation program). This setup cannot install system files or update shared files that are in use, before continuing, close any open application.
Setup Welcome Screen for ISA Server 2000

Internet Security & Acceleration Server 2000 End-User-License Agreement
ISA Server 2000 End-User License Agreement

To choose the installation you want, click one of the buttons, like (Typical Installation, Customer Installation, Full Installation), and also you can define the path where you want to install.
- Typical Installation Install all the components on the boot partition. This option does not include the “add-on” products. The add-ons can be installed later if you choose not to install them at this time.
- Full Installation The full installation includes all core program files and the add-on products. It installs these files to the boot partition.
- Custom Installation The custom installation allows you to choose which optional components to install.
- Change Folder The Change Folder button allows you to change the location of the core program files. If you do not want to install the program to the Program Files folder on the boot partition.
Click this button and change the location of the core program files. For this walkthrough, click the Custom Installation button. When you select the custom installation, you get the dialog box shown, which allows you to choose the components to install.
There are three options:
- ISA Services
- Add-in Services
- Administration Tools
ISA Server Location with Typical Installation

This screen describes the Server Method like (If you click “NO” then this will be the Stand-alone Server or if you click “Yes” then it will be Array Member Server)
The Custom Installation Dialog Box

Add-on Services Change Option Dialog Box

The Administrative Tools Options Dialog Box

Deciding to Have Array Server or Stand-alone Server

- Firewall Mode Choose this option if you want to install the server as a firewall only, and does not want to use the Web proxy server. Keep in mind that if you do not install the Web Proxy Service, you will not be able to take advantage of either forward or reverse Web caching.
- Cache Mode Choose this option if you want to use only “Web” protocols. Cache mode supports only HTTP, HTTPS, FTP, and Gopher. If you want to use other protocols such as SMTP for email or NNTP for newsgroups, you need to install either firewall mode or integrated mode. It is also recommended that you do not install a cache-mode-only server on the edge of your network, because the firewall features are especially important at the edge of the network.
- Integrated Mode Choose this mode if you want to take advantage of all the features of ISA Server. You will be able to support all Winsock applications and take advantage of the Web proxy server’s Web caching feature.
Selecting the Server Installation Mode

At this point, the ISA Server installation program will stop the IIS WWW service (W3SVC). However, the end of installation will restart the service. It is important to understand the implications of running IIS on the same computer as ISA Server. On a multihued machine, ISA Server uses TCP port 80 on the external interface to listen for incoming Web requests for servers that have been published using the Web Publishing Wizard. If you have a Web site or sites that are using port 80 on the ISA server’s external interface, they will no longer respond to requests. You need to either change the port number for those Web sites or use the Web Publishing Wizard to publish them via the internal interface on an alternate port number. ISA Server listens for Web proxy server requests on port 8080 on the internal interface. This is a departure from the way Web proxy clients accessed the Proxy Server 2.0 Web Proxy Service, which they were able to access by connecting to port 80.
Warning Dialog Box About stopping IIS Services

You can now configure the Web cache settings .You are presented with a list of NTFS drives that can support the Web cache. You mustplace the cache on an NTFS drive. FAT partitions or volumes don’t appear on the list. The default setting is to create a 100 MB Web cache file on the partition that has the most free disk space. After you enter the size of the cache, you must click the Set button. Refer to for this walkthrough; we will configure a 100 MB cache on the C: drive. To move to the next step, click the OK button.
Configuring Web Cache Size

The LAT configuration dialog box appears and provides you a chance to configure the LAT during this setup. If you choose not to configure the LAT at this time or if you change your mind regarding the configuration of the LAT, you can change the settings via the ISA Management console after the installation is complete. There are two ways that you can approach configuring the LAT. You can manually enter the start and end addresses in the Edit frame on the left side of the dialog box, or you can use the Table button:
When manually entering the information, you must include the entire range of your network IDs that are part of your internal network.
- Note that we have entered an illegal address for the start address for the LAT. This is OK and will not impair the functionality of the LAT.
If you choose to use the Construct Table button, the ISA Server will try to create the LAT for you based on the network ID of your internal interface(s). In addition to the network ID of your internal interface, it will also add the three private network ranges:
Configuring the Local Address Table

192.168.0.0……………..172.16.255.155
- If you choose to let ISA Server construct the table for you, if you have a network with multiple logical IP segments, you must be sure to check it over very carefully, (IDs in your LAT). Otherwise, requests for those internal network clients will be subjected to the rules created for requests for external network requests.
- Always make sure that your ISA server can route to all your internal networks properly. The way to accomplish this task is to configure routing table entries that accurately reflect the configuration of your internal network.
- We have created an entry for our internal network ID, which falls within one of the private network address ranges. Click OK to continue to the next step.
Configuring the Local Address Table

- Add the following private range, and also Add address based on the Window 2000 Routing Table, in this select the address range that are associated with the following.
- LAT should include all the address in your internal network
Define LAT Table & Card/IP address

The local address table (LAT) was constructed based on the Windows 2000 routing table, may include external addresses or execute internal address.
LAT Table Setup Message

Enter IP Address ranges that span the internal network address space.
Edit Internal IP Ranges

Setup in Progress on Specific Location

Launch ISA Management Tool

ISA Server Completed Success Screen

Set Configuration (for TECHNO) ISA Management Consoles with TECHNO

Articles No 2
Backing Up a Configuration and Promoting a Standalone Server to an Array Member
After updating Active Directory to support your array, you can begin the process of promoting your standalone ISA server. Before promoting the server, confirm that you have connectivity with a domain controller in your Windows 2000 domain. You might also want to back up your configuration if you haven’t done it so.
It’s a good idea to back up your configuration when making changes of this kind. In fact, you should back up your standalone server or array configuration prior to making any changes to rules or filters. By backing up, you can easily roll back to a previous configuration that has worked for you. It is much easier, and much less error prone, to restore a backed-up configuration than trying to remember all the rules and configuration settings you made and hope that you enter them correctly a second time.
Set Configuration for TECHNO

Accessing the Back Up Command
To back up an array or standalone configuration, perform the following steps:
- Open the ISA Management console and right-click the name of your server or array Click the Back Up command.

- In the Backup Array dialog box, type the path where you can store the configuration backup file. Be sure to include the name of the file to fully qualify the path. Then click OK.
Store Backup Configure Location

Backup Array Comments
- If the configuration backs up successfully, you will see a dialog box confirming that fact as seen below.
- Note the warning in this dialog box. Although you have saved configuration settings specific to this array, it is not a complete backup of all system settings as they relate to ISA Server.

After Successfully Backing-Up Process Screen
- For the purposes of disaster recovery, you should use the Windows Backup program or another backup program of your choice to back up the entire system, including the system state data.

Microsoft ISA Server Location Back-Up File
- You can confirm the location of your backup files by opening Windows Explorer, files in the root of the D: drive. Note that these are the names we chose for the backup files. The system does not provide a default name.

TECHNO Properties for Stand-Alone Server
- Before we begin the promotion sequence, right-click the name of the server and click Properties. The Properties show that the server is a standalone server in integrated mode.
- Note the tabs available when the server is a standalone server

Promoting a Standalone Server to an Array Member.
ISA Management Promoting Process Screen
- After clicking the Promote command, we get a dialog box that warns us that we can’t go back to standalone server mode once the promotion to an array is completed. Click Yes to continue the promotion.

Promoting Server to become an Array

Use Default ISA Server enterprise Policy Setting
Before the promotion begins, you need to decide on the enterprise policy settings for the array. The default setting is Use Default Enterprise Policy Settings; choose Use Custom Enterprise Policy Settings and Also Allow Array Policy. The Force Packet Filtering on the Array option is also a default selection; select Allow Publishing Rules to Be Created on the Array as well. Then click OK.

Set Customer Enterprise Policy Settings
When the promotion begins, several things happen during the promotion, and you’ll be informed of these events in the Promoting Array dialog box. The first step is Converting Standalone Server to an Array. The subsequent steps are:
- Storing configuration in the Active Directory
- Stopping all services
- Committing changes
- Restarting all services
- Refreshing array list

ISA Server Promoting Server with Active Directory Policy

After Configuring Successfully Promoted Screen

After Configure Promoting Arrays Server

Main Screen After Backing-Up & Promoting

After Configuring Array Server; Checking the root Properties

Proxy Server Back-up :Path/Location

Replacing the new to version

Migrate the Proxy Server Policy into ISA Server Policy

Location where IIS Virtual Server is stopped Working


