Microsoft Outlook rules explained
Microsoft Outlook manages personal information of a person. It is available as a separate application as well as included in Microsoft Office. It is an application which helps a person manages his email. Apart from providing email management, outlook also offers a task manager, calendar, journal, note-taking and web browser.
Earlier, managing emails was quite difficult especially for businessmen where they had to deal with email from a number of clients. Sorting out the important ones from the list was a tedious task and took up a lot of time. However, with the introduction of Microsoft Outlook, things became easier. Filtering emails is now easier and can be done automatically by setting some rules in Outlook. Outlook provides you with a set of predefined rules and also allows you to create your own according to your preferences.
If you are someone whose email client is Microsoft Outlook, but not benefitting from the Rules, you are simply wasting time. And with the number of spam mails entering our inbox, it has become necessary to keep them at bay. The increasing spam emails brings about frustration in a person and he may waste a lot of time in searching for the required email. Outlook’s rules however help you to sort out the important mails from the junk ones.
Sometimes, you get ton of email requests. Therefore, it becomes necessary to sort out the important addresses which is quite time consuming. However, outlook comes to your rescue here. If the rules are set accordingly, outlook will notify you of the email from the important person.
Setting up rules and alerts in Outlook is not difficult at all. A rules wizard in outlook will guide you through the steps. All you need to do is decide on the appropriate choices as you pass through each step of the wizard.
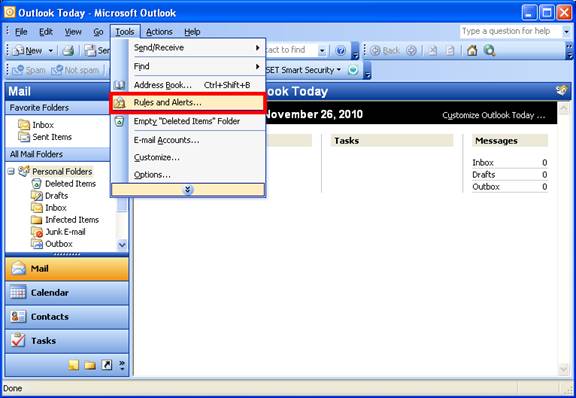
First open Microsoft outlook 2003. Click on the Tools option and then on Rules and Alerts to open up a dialog box.
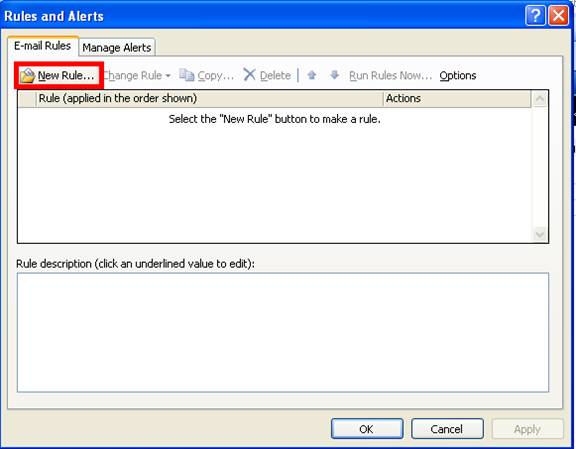
Under the Email rules tab, click on New Rule.
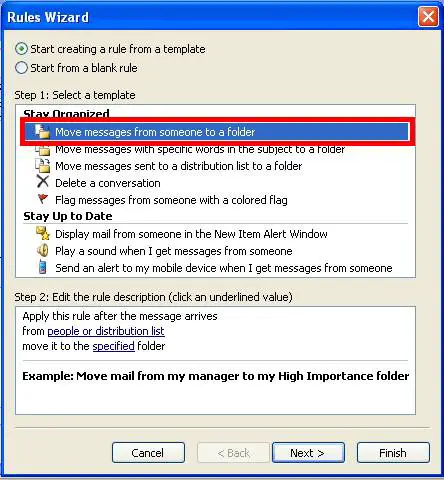
A list of predefined templates will appear before you to make your task easier; however you can modify it as per your needs. You can also create your custom set of rules. The following picture shows you a predefined set of rules in Microsoft Outlook 2003.
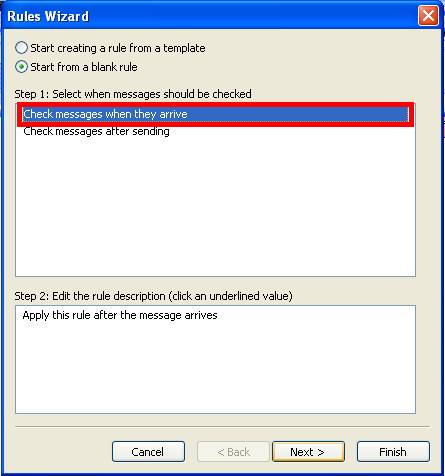
What if you want your very own personalized rule? You can go ahead with creating a blank rule. First of all, you must decide if the rule which you are creating is meant for sending or receiving emails.
Considering that you will with subject line notification, you would choose the option to have the subject line to be checked for special words as shown in the image below.
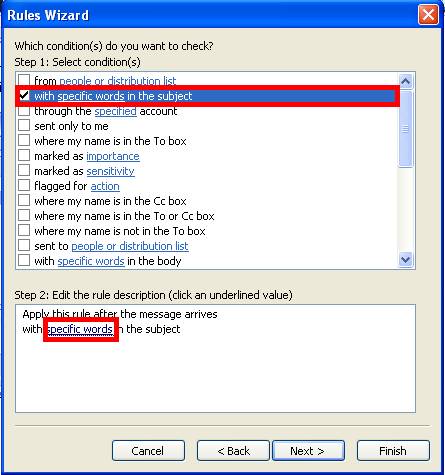
While you make selections from the top window which displays the options, the rule built for the selections are shown in the lower half of the dialog box. Ensure that you click on the hyperlinks of the words and specify your options correctly.
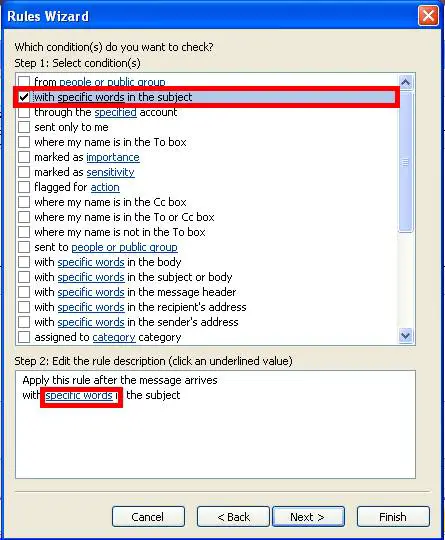
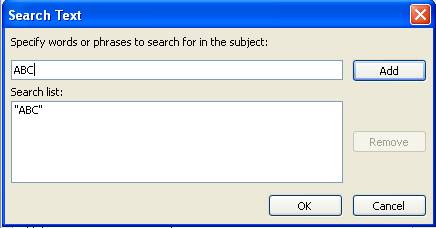
You need to click on “specific words” when you are using the words for subject as special recognition. A search dialog box will appear where you can add whatever words you want.
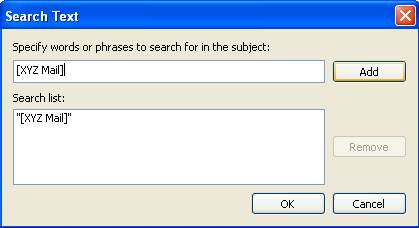
Move to the next screen. You will be able to set the details regarding the action to be taken when an email arrives with the specified subject.
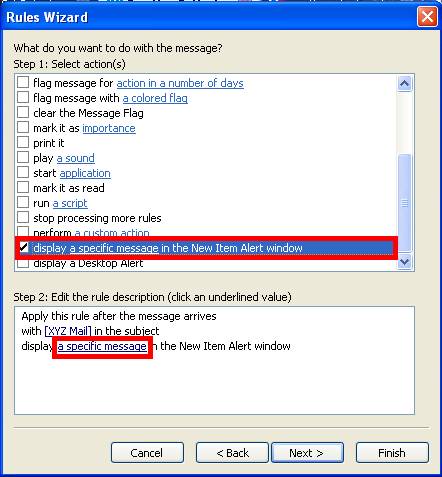
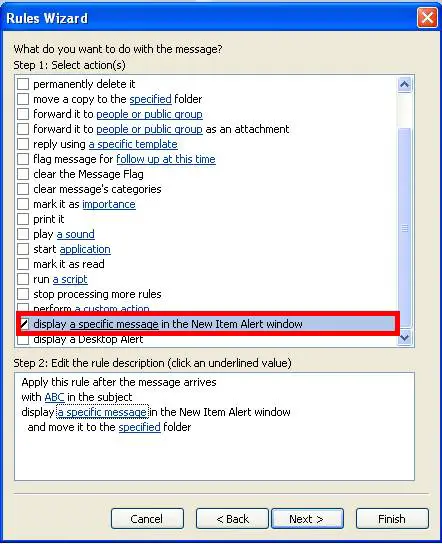
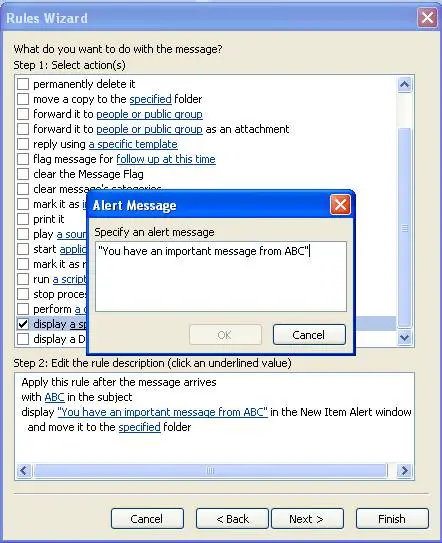
Again, you must ensure that you have moved to the lower window and clicked the hyperlink for the message in order that you create your custom message. In case you want the email to be moved to a special folder or some other area then make sure to check that option too.
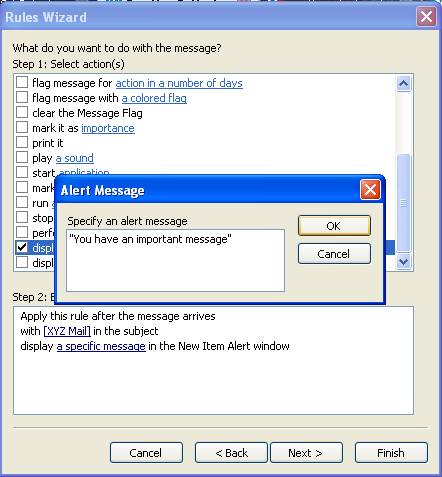
Once you are done with the selection and customization, you can move ahead to the exceptions window. If you want any situations to be included, check the respective options and customize them.
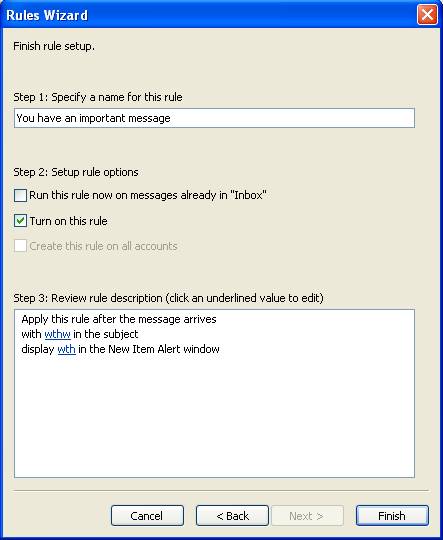
Lastly, you will be prompted to set a default name for the rule; however you can change according to your preference.
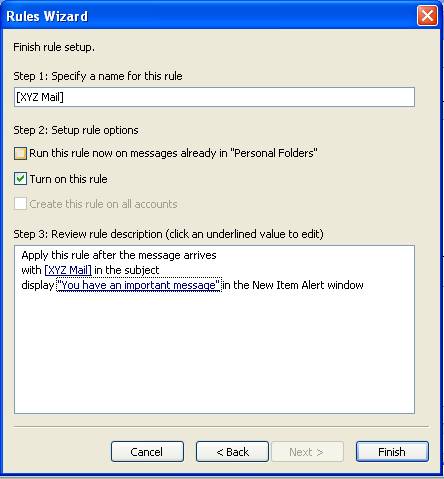
That’s it! You are almost done. Click on Finish and your rule is set. From now on, your mail will be filtered according to your preferences thus taking off the extra work of sorting out the mails.
Microsoft Outlook 2007 has got a similar set of rules but with the addition of a few more rules. The set of rules can be viewed in the image below.
A list of predefined templates will appear before you to make your task easier; however you can modify it as per your needs. You can also create your custom set of rules. The following picture shows you a predefined set of rules in Microsoft Outlook 2007.
Open MS outlook and Click on the Tools option and then on Rules and Alerts to open up a dialog box.
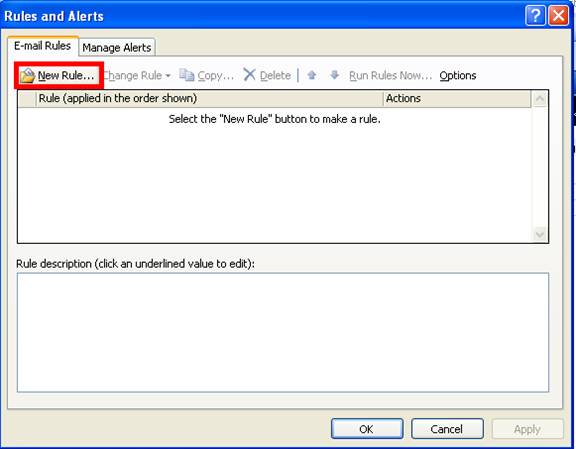
Under the Email rules tab, click on New Rule.
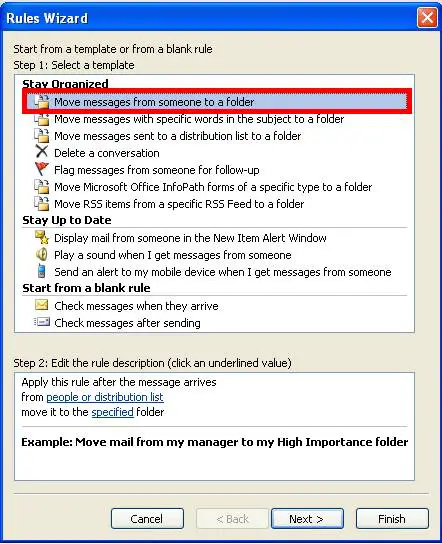
You can choose a predefined rule and set your preferences from the list provided.
You can create a blank rule. First of all, you must decide if the rule which you are creating is meant for sending or receiving emails.
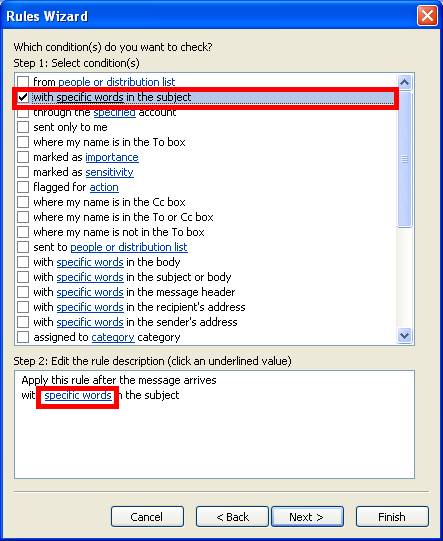
Some screens are of Office 2010
You will be able to set the details regarding the action to be taken when an email arrives with the specified subject.You need to click on “specific words” when you are using the words for subject as special recognition. A search dialog box will appear where you can add whatever words you want.
Move to the next screen. You will be able to set the details regarding the action to be taken when an email arrives with the specified subject.
Again, you must ensure that you have moved to the lower window and clicked the hyperlink for the message in order that you create your custom message. In case you want the email to be moved to a special folder or some other area then make sure to check that option too.
Once you are done with the selection and customization, you can move ahead to the exceptions window. If you want any situations to be included, check the respective options and customize them.
Lastly, you will be prompted to set a default name for the rule; however you can change according to your preference.
Outlook 2007 didn’t gain much improvement from its previous version. However, Outlook 2010 has been packed with some additional features with an awesome GUI and a new stylish toolbar. It has got some radical features which were never seen before in the Microsoft email client.
If you have just started using outlook 2010, chances are there that you might search for options and other features. However, if you want to set the rules for your mailbox, you can follow the steps below.
Creating a rule in Outlook 2010 is very easy just like creating a rule in the previous versions was.
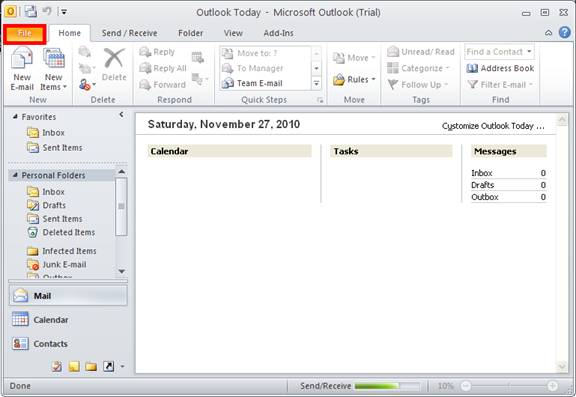
Open Microsoft Outlook 2010. To open Rules click on Home Tab.
Select Rules and Alerts and then click on Manage Rules & Alerts.
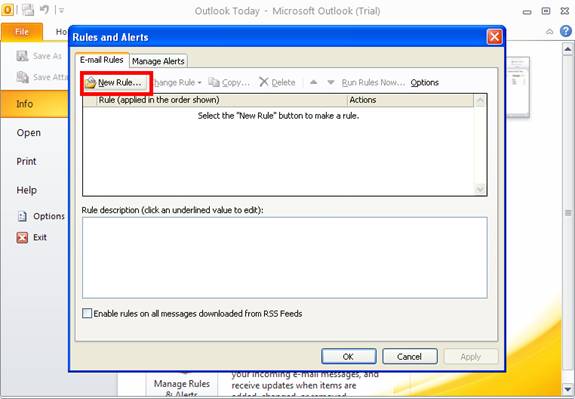
Click on New Rule.
You can choose rules from predefined actions and select one of the templates that you want.
If you want to create a rule from scratch according to your preferences, you can follow the instructions below:
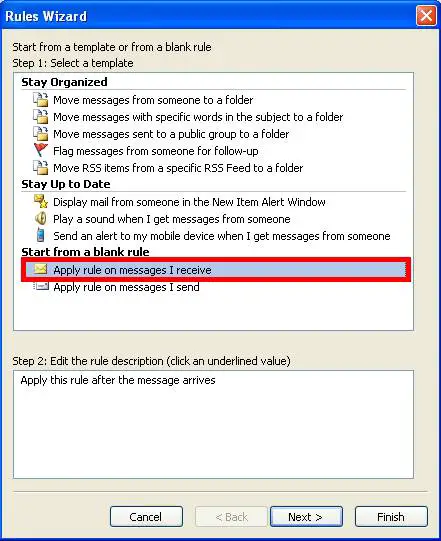
“Start from a blank rule” select one of the two options that is Apply rule on messages I receive or Apply rule on messages I send. Then click Next.
Add whatever word you want.
Thereafter, select the action to be performed when the mail with the specific keyword arrives.
Specify the message to be displayed upon the arrival of the email.
Select exceptions if any and finally click on Finish.
If you want the rules to be set on messages residing in one of your folders, check the Run this rule now on messages already in the folder on the final page of the Rules Wizard where it will show the name of the target folder.
There are a few additional rules in Microsoft Outlook 2010. Those include the Ignore and Clean Up commands. The Ignore button on the ribbon moves all conversation and future replies to that conversation directly to the deleted items folder. The Clean Up button moves the old and redundant message in the conversation to the deleted items folder, however it keeps the most recent message.
If you want the rules to be applied to all your inboxs and email accounts, check Create this rules on all accounts on the last page of the Wizard.


