Transitioning from Exchange Server 2003 to 2007 (SP3) Part 2
In the second part of this article, I am going to provide a detailed explanation on how to install the Exchange Server 2007 Service Pack 3 if you have an existing exchange server 2003 organization. With Windows Server 2008 R2 as an operating system, I need to install the Exchange server 2007 SP3 to ensure system compatibility. If you want to install Exchange 2007 SP1/SP2, then you need to have Windows Server 2008 SP2 operating system because the R2 could only support the Exchange 2007 SP3.
The screenshot shown below denotes that the Server is already equipped with Windows Server 2008 R2 Enterprise edition. I have named this server “TECHEXCHG2007.techno.com”.
NOTE: You can opt for the standard edition, but if you want to configure the high availability on mailbox servers, then you would need the Enterprise edition of this operating system.

The following step is to install the IIS (Internet Information service) on Windows Server 2008. Aside from IIS, you need to install other prerequisites for the exchange server 2007 which listed in the following link:
https://technet.microsoft.com/en-us/library/aa996719(EXCHG.80).aspx
The prerequisites differ according to the version of the operating system being used and the service pack level. This is also dependent on the version of the exchange Server 2007 service pack you are going to install. So the best practice to setup the exchange server 2007 would be to check the Microsoft TechNet site and refer to the appropriate prerequisites.
Microsoft also provides another option to install the prerequisites during installation. If you don’t know exactly what the roles are, the features and hot fixes need to be applied. For the exchange installation, insert the exchange media and immediately start the installation in GUI mode. Troubleshoot accordingly using the components/hot fixes applicable if an error appears during the readiness check. Simply follow the comprehensive steps to guide you with the installation:
To install IIS:
Go to Start > All Programs > Administrative Tools > Server Manager

Open the Server Manager. Go to Roles and Click Add Roles

Click Next on the “Before you begin page” It’s recommended to verify the suggestion listed in the page.

Select IIS in the listed roles and click next

Click next on the IIS Introduction page. If you need more information about IIS click the links.

Apart from the default selected role services, select the other services which are required for Exchange server 2007. If you don’t know the required services, just continue with the IIS installation. If we missed any role services, the same will be listed during exchange readiness check, then click ‘Next’ to continue.

Review the services selected and click install to begin the installation of IIS 7.5

The ‘Initializing installation’ should appear, indicating that the installation process has begun. If successfully installed, the blue bar should fill up from end to end without any error message or warning. The ‘Installation succeeded’ message on the right section indicates exactly that, so you may now click ‘Close’ to proceed to the next step.


Installation of IIS is under progress. Wait for a moment till the installation complete.

The ‘Installation succeeded’ message on the right section indicates exactly that, so you may now click ‘Close’ to proceed to the next step.

Now the server manager shows IIS is installed.

Now let’s add the necessary features found under the Server Manager section. To do this, simply click ‘Add Features’.

Make sure to select the following features: Desktop Experience, Quality Windows Audio Video Experience (For UM)

Also select the appropriate Remote Server Administration Tools (ADDS, DNS – We require, other are optional); RPC over HTTP Proxy (FOR CAS Role); Telnet Client; and Windows Power shell. I have left a few features which will prompt during the Exchange installation readiness check wizard.

Click next on the IIS Introduction page

Select the Role services required for the exchange

Review and confirm all the selected and required components, then choose ‘Install’.

Wait a few minutes until the installation of the features is completed.

The screen shows that installation is in progress.

Check if there are no errors/warnings before you click ‘Close’, and then restart your computer to finish the process.

Click yes to restart the server. Wait until the server reboots.

After rebooting, insert the Exchange 2007 SP3 media and go to ‘Setup Page’. If Auto Run is enabled, the Setup Page will automatically open, otherwise, open the Media application and double click the setup.exe file. In this scenario, I have copied the exchange 2007 SP3 installation contents to my local system in Drive C.

On the setup page, make sure that the following prerequisites are chosen: .NET framework 2.0, MMC 3.0, power shell, Windows installer 4.5 are installed, and then click on ‘Install Microsoft Exchange server 2007 SP3’, then click ‘Next’.

Click next
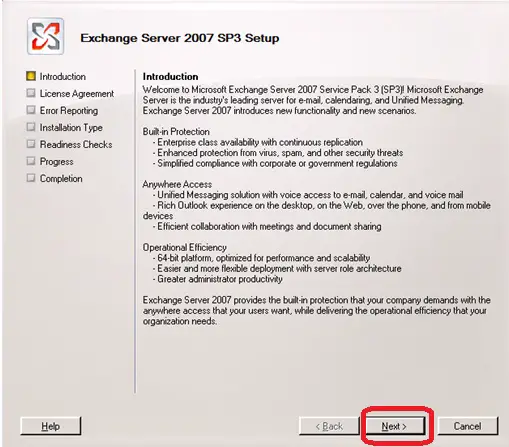
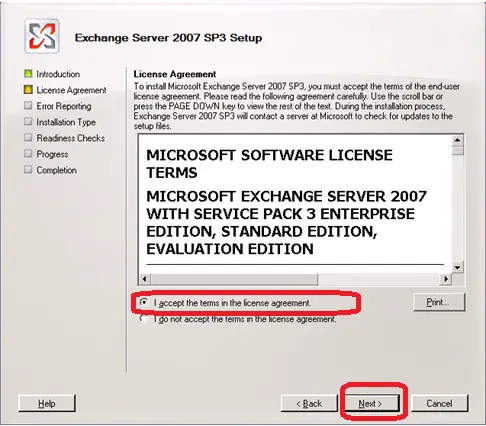
Read the MS agreement carefully and accept the agreement to continue. Click ‘Next’.
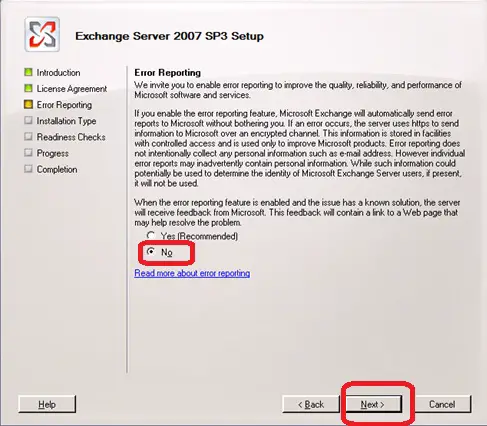
You may click ‘Yes’ to send any error report to Microsoft. In this case, ‘No’ has been selected since this is a test environment and I don’t want to send any error reports to Microsoft
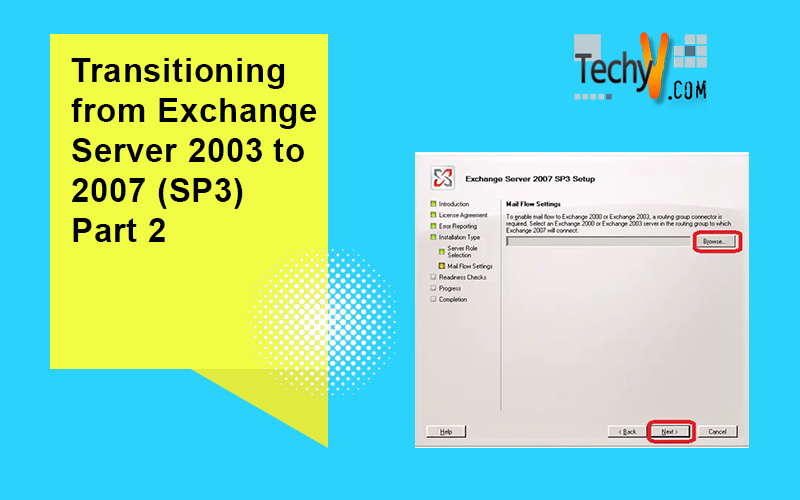
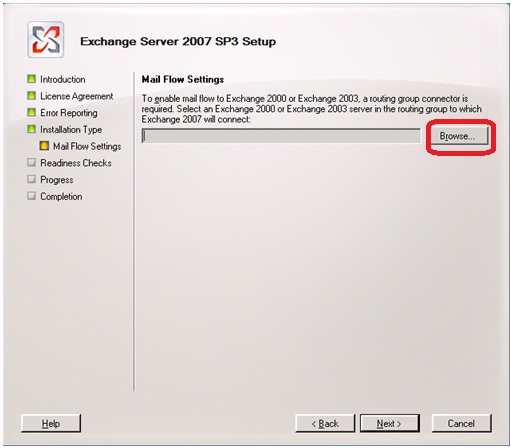
Click the ‘Browse’ button in order to choose the routing group connector to enable the mail flow between the existing exchange 2003 and exchange 2007 server.
Select the exchange server 2003 and click ‘Ok’. In this case, we only have one exchange 2003 server named TECH.

Wait for a moment and readiness checks will be in progress.

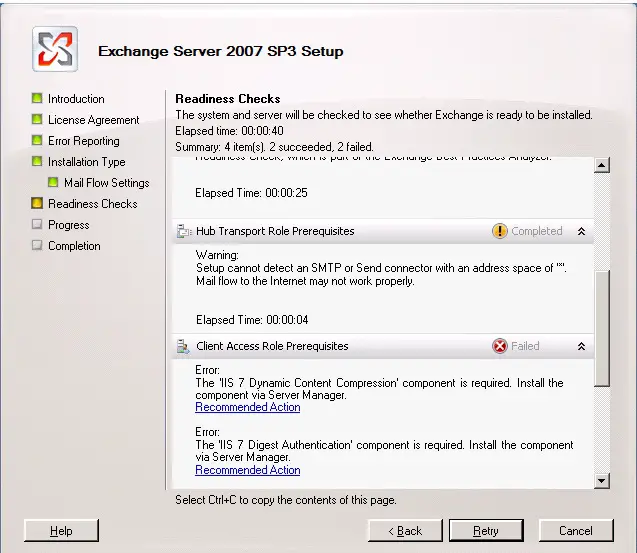
After the Readiness Check, the errors with their corresponding recommended action are shown below
At present the exchange 2003 server is in mixed mode and the mode must be raised to native mode.
The domain and forest functional level should be Windows 2000 native or above.

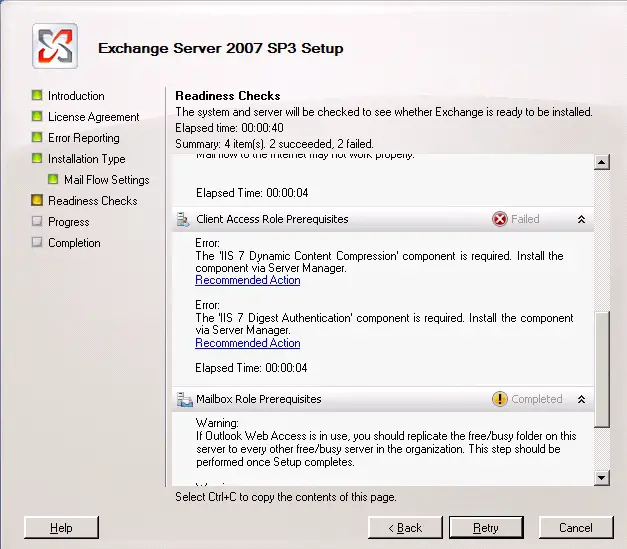
The hub transport server met all prerequisites and there is one warning states that the SMTP send connector not found. Skip the warning since we can create the SMTP send connector after exchange installation.As I told before we need to install all required features and role services. We have not installed 2 role services with IIS. The error states that the two role services “Dynamic content compression” and “Digest Authentication” is not installed yet. So we need to install both the role services.
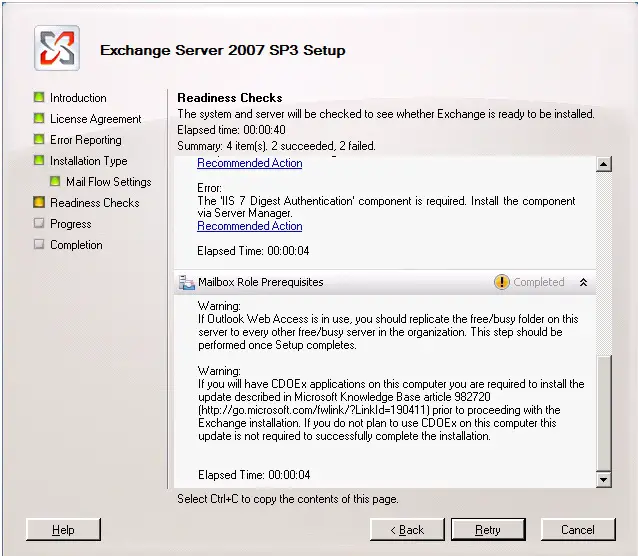
Mailbox role met all required prerequisites and the warning which states that free/busy information need to be replicated between the exchange servers after installation.
If you have any CDOEx applications, we need to install the KB 982720, but there is no need to do so in this case.
Perform the following tasks listed below:
Raise the domain functional level from 2000 mixed to 2000 native or higher. In this case, we don’t have any Windows Server 2000. So I am going to raise the functional level to “windows server 2003”
Raise the forest functional level to Windows Server 2003.
Install the IIS role services which we missed earlier.
Prepare the Active directory, domain, and Schema for the exchange 2007 Setup.
The first step says to raise the domain functional level. To do this, log in to domain controller: Click Start > Programs > Administrative tools > Active Directory Domains and Trusts.

Expand active directory domains and trusts and select the domain techno.com

Right click the domain techno.com and select the option “Raise domain Functional Level”

The current domain functional level is “Windows 2000 mixed” and you can raise the functional level to either “Windows 2000 native” or “Windows Server 2003”. In our scenario since we don’t have backward domain controllers I am going to raise the functional level as “Windows Server 2003”

Select the “Windows Server 2003” functional level and click Raise. Please note that once you click ‘Raise’, you cannot reverse the changes. Click OK.


Once you click OK, the functional level will then be raised and guarantees that it has been successfully completed. Click OK.

Once you click OK the functional level is raised and ensures it’s completed successfully. Click OK.

Now check and confirm the domain functional level is raised to Windows Server 2003 and click close

Now we need to raise the forest functional level. Right click the Active Directory Domains and Trusts and select “Raise Forest Functional Level”

The screenshot below shows the Current forest functional level is Windows 2000 and you can raise it to Windows Server 2003.

Respond to the prompt by clicking ‘Ok’ and click ‘Ok’ again once it shows that it has been successfully completed.

Ensure the forest functional level is successfully raised. Click OK.

Ensure that the current forest functional level is now set to Windows Server 2003.

Now it’s time to raise the Exchange functionality level from mixed mode to Native mode, and since we don’t have any Exchange 5.5 servers in our network, we can raise the level without any issues. To raise the exchange server functional level, open the system manger. Start > Programs > Microsoft Exchange > System Manager.

In the System manager console, Right click the Exchange organization (Techno Exchange) and select properties.

In Techno properties page, check that the Operation mode is currently on mixed mode. To raise the operation mode, click “Change mode”

Confirm that you are going to raise the operation mode to Native mode by clicking yes.

Now confirm the operation mode is changed to Native mode.

Next step is to prepare the Active directory, Schema and domain for Exchange 2007 setup.
Open the command prompt

Navigate to the Exchange 2007 SP3 installation folder in media (or to wherever drive you initially copied the setup files to. In this case, it’s in Drive C)

First we need to prepare the existing exchange 2003 servers permissions that should work with Exchange 2007 Servers. To do this, execute the command “setup /preparelegacyexchangepermissions”. You should have appropriate rights to execute the command and in our case we are logged in as administrator who is a member of Schema admin, Enterprise admin, Exchange admin by default.

Wait for a moment till the command execution completes.
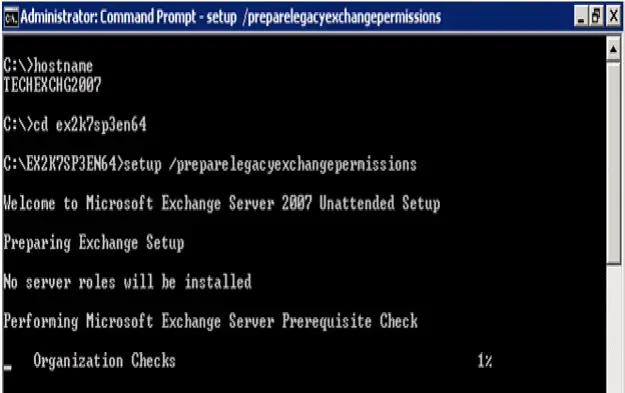
Ensure that the command execution has been successfully completed without any errors/warnings.

The next step is run setup /prepareAD command


Now the organization prerequisite check is completed & next is organization preparation. Wait for a moment.

Ensure the organization preparation is successfully completed.

The next step is to run the setup/prepareschema
Note: You need to have a schema admin rights to perform this task.

Verify the schema preparation process.

Ensure the schema preparation process is successfully completed.

The last step is to install the required IIS role services “dynamic content compression” and “Digest Authentication” which we didn’t get to do beforehand. To install the role services, open the server manager. Go to Start > Programs > Administrative tools > server Manager.

Select the role services. Scroll down the page until you see and select “Digest Authentication“ & “Dynamic Content Compression”, then click Next.


Review the summary and click install.

Wait for the installation to complete.

Ensure that installation complete without any error or warning. Click Close.

Run the Exchange setup wizard and start install Microsoft Exchange server 2007 SP3

Click next on introduction page.

Accept the agreement and click next.

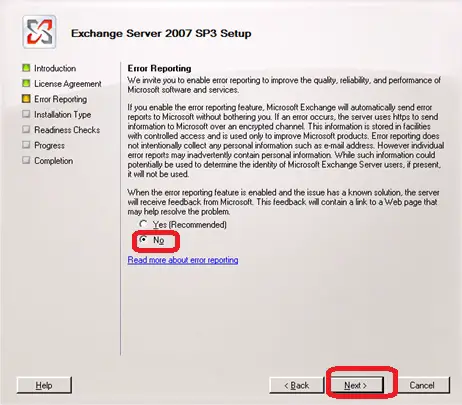
Select No on error reporting page and click next.
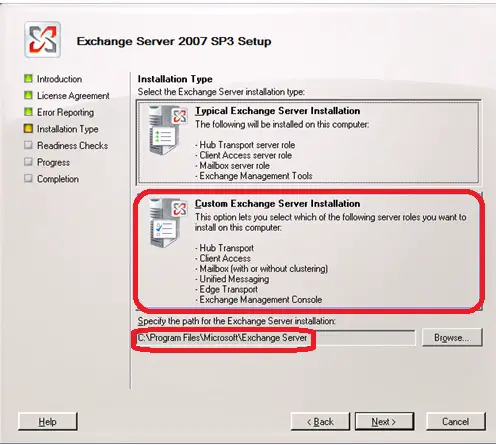
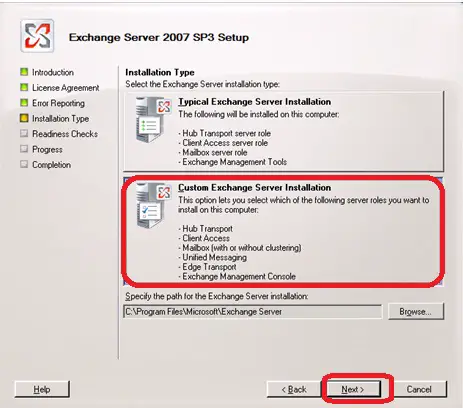
Select the custom installation option since we are going install UM role along with CAS, HTS and MBS. Click next.
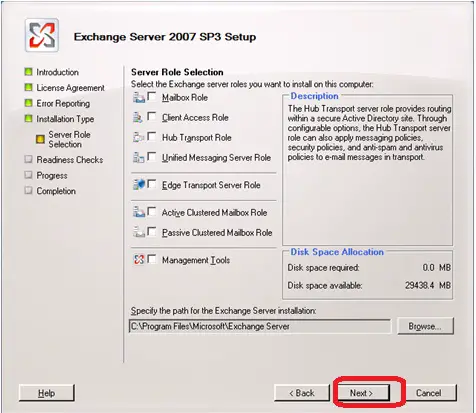
The page shows available role options on exchange server 2007.
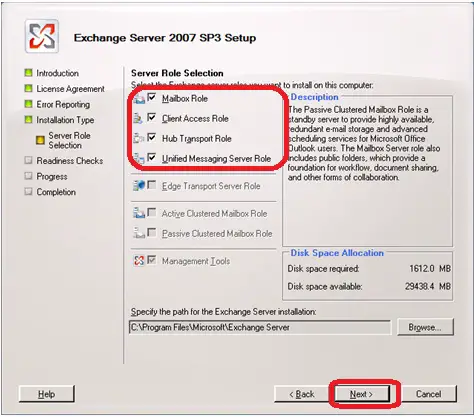
Select all 4 server roles (mailbox, Client Access, Hub Transport, Unified messaging) and click next. As soon you select the server roles, the Edge and Cluster option disabled because Edge server should be in separate workgroup machine and the Cluster mailbox shouldn’t be combined with other roles.
Select the mail flow settings and click browse.
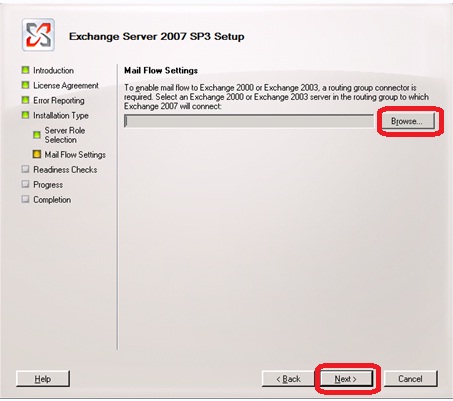
Select the exchange 2003 server as we did before.

Select the server and click next.
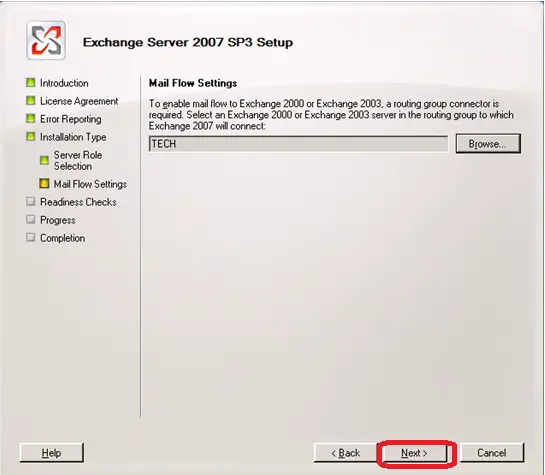
Wait until the readiness check is completed.

Check for errors. If there is none, Click Install to start the Exchange 2007 Installation. You can ignore the below warnings since it will not affect the installation.
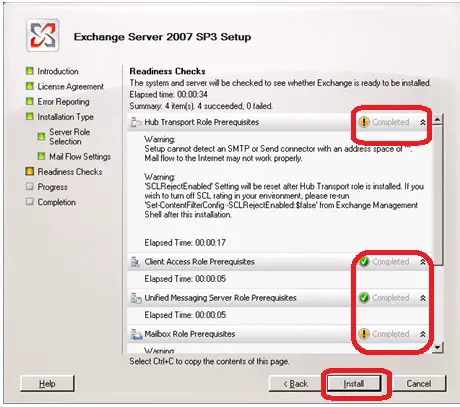

Wait till the installation is completed.

Ensure there are no errors during installation.
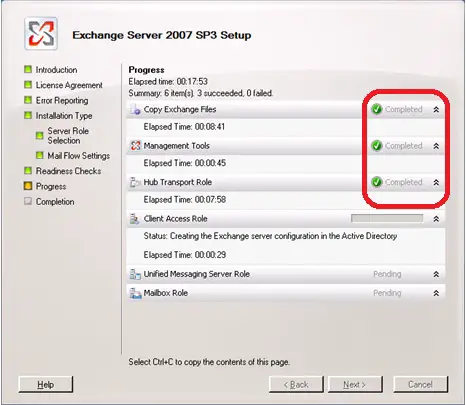
Ensure that there are no errors during installation and then click finish to complete the installation.
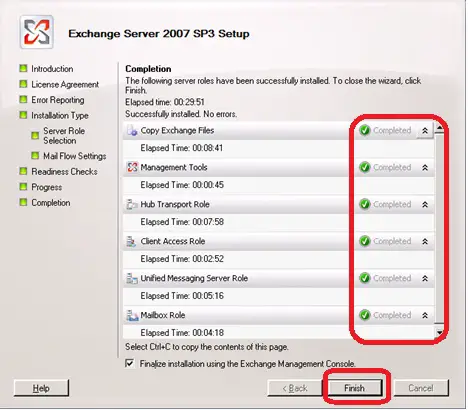
It will now prompt you to reboot the server, click ‘Ok’ to confirm.

After reboot it’s a best practice to install the latest critical updates by click the option “ Get Critical Updates for Microsoft Exchange”

By default, the exchange server will expire in 120 days. By then, you will need to enter a valid product key to activate the exchange server. You can enter the product key by clicking the option “Enter the Exchange Server product Key” once you have it.

Finalize the process by completing all the listed steps like entering the product key and configuring the offline address book, Antivirus, anti spam, and SSL on Client Access server. It is also a best practice to run the best practice analyzer to check the Exchange server status.

Also configure the accepted domain, Send connector, Email subscription, Configure internet mail flow, UM configuration and if you need protection from Virus and spam install the edge transport server role on the work group machine and place the edge server in DMZ.

You can manage the Exchange 2007 server through either the graphical console (Exchange Management Console – EMC) and command line (Exchange management shell – EMS) To open the EMC go to Start > All Programs > Microsoft Exchange Server 2007 > Exchange Management Console

To open the EMS go to Start > All Programs > Microsoft Exchange Server 2007 > Exchange Management Shell

The Exchange Management Shell EMS is below

The Exchange management console (EMC) is shown below. Expand the Microsoft Exchange and Go to Recipient configuration. Under Recipient configuration go to mailbox and the existing mailboxes should display there. The server name which holds the mailboxes is TECH (Exchange 2003 server)

Go to mailbox and confirm the Exchange 2007 Server name is displayed there. by Two storage groups are created there by default; one database is for the mailbox and the second one is for the public folder.

Check the default offline Address book and ensure that the generation server is listed as TECH (Exchange 2003 server).

Also check that the distribution list which we created in the exchange 2003 server is listed here.

Now we are going to create a new mailbox user in the exchange 2007 server. Right click the Mailbox and select new mailbox.

Select the user mailbox.
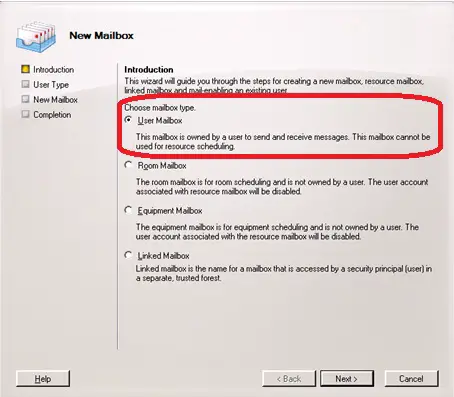
You can create mailbox for an existing AD users or you can create a new user and enable mailbox. Click new user and click next.
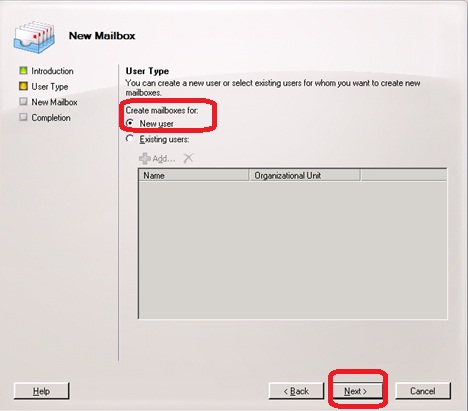
Select the appropriate Organization unit and fill in the user details. It’s a best practice to check the option “User must change password at next logon” in production environment when you create a new user.

Give the alias name and select mailbox database where the mailbox is to be created. Click next.
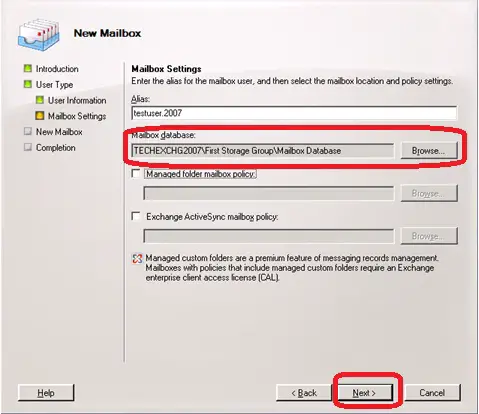
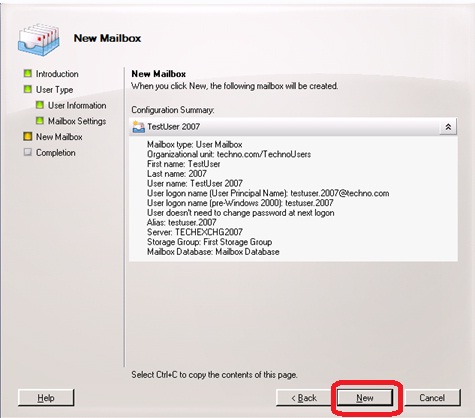
Review all the details and click new
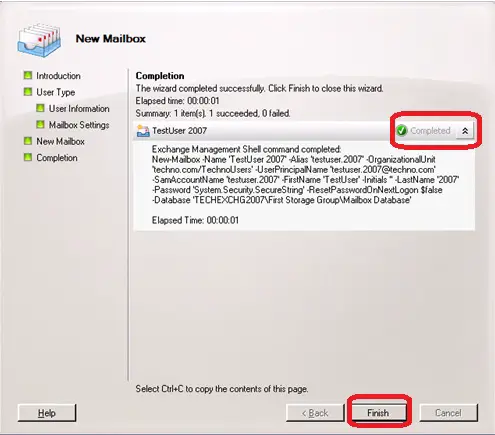
Ensure the user created successfully. Click finish.
Login to the exchange 2007 server by using the URL https://fma.com. Since we have used any third party certificate for OWA ignore the below warning message and click on “Continue to the website (not recommended)

Try to login as user administrator

Check the error message. Since the user administrator’s mailbox is still in exchange 2003, it is not accessible; therefore, we are going to login as user testuser2007 just like what we created on Exchange 2007.

Login as Testuser 2007.

Accept the warning regarding the certificate. Click yes.

Select the language and set time zone. Click ok to access the mail box.

Test user 2007 mailbox is now accessible. Ensure that the exchange server 2007 is functioning properly. We also need to confirm the transport server’s functionality by not only being able to compose an email, but also to receive and send messages in this particular mailbox. Click new to compose email.

Compose an email and send.

Ensure that the recipient receives the email that was sent to confirm that all the exchange servers are functioning properly.

This marks the end of the part 2 of the article. In summary, we have prepared the servers for exchange 2007 SP3 installation and successfully completed the exchange server installation. In addition, we have also ensured that the email transport is functioning properly by being able to send and receive emails. In the next part, we will demonstrate how to migrate from Exchange server 2003 to Exchange 2007.


