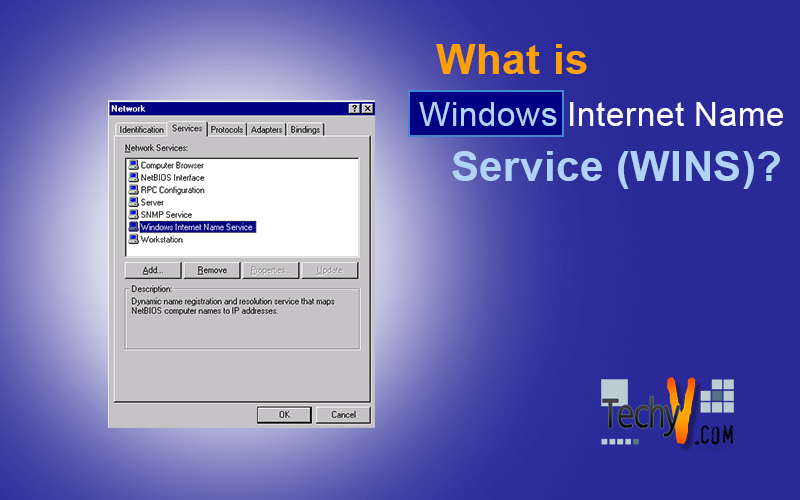
What is Windows Internet Name Service (WINS)?
The Windows Internet Service (WINS) works the same as DNS to resolve computer NetBIOS name into IP addresses. While DNS is a universally accepted methodology, WINS is designed for Windows server to add some extra functionality with DNS. WINS is designed to provide NetBIOS name resolution information in a TCP/IP network. All Windows OS flavor support DNS names in addition to NetBIOS names and WINS support clients that use NetBIOS.
How WINS works?
- Client computer sends a request for a name resolution to the WINS server. If the WINS server has its information stored in the database, it will resolve the name to IP and send it back to the client. This causes reduction in broadcast traffic as the client will not broadcast for information to the network.
- If the name resolution is not available, WINS sends a broadcast to resolve the name; and once it is resolved, WINS keeps an updated record of the information in its database.
- The client computer configures itself to the WINS server, and when the client machine is booted, the NetBIOS name and its related IP addresses get registered with the WINS server.
- WINS stores the client information on the database and renews the client’s registration at a specified interval.
Components of a WINS Server
- WINS Server: WINS server stores the client’s names and IP addresses’ registration information request on its database. When clients request NetBIOS name query, WINS provide their IP addresses.
- WINS Database: Keep the NetBIOS name to IP address mapping information. Within the database tool, you can maintain, view, do a backup, and restore job of the WINS server DB information. The database can be configured with a push replication partner or a pull replication partner. On a push replication partner process, the local server DB information gets replicated to other partner servers. And on a pull process, the DB information gets retrieved from the remote partner server to local server.
- WINS Clients: Clients register their NetBIOS names on the WINS server. The registered names are then used with various network services such as workstation services, messenger services etc.
- WINS Proxies: A WINS client computer can be configured as a WINS server (as a proxy) to work like a server in case other clients are not able to contact the WINS server.
Installation of WINS Server on Windows Server 2008
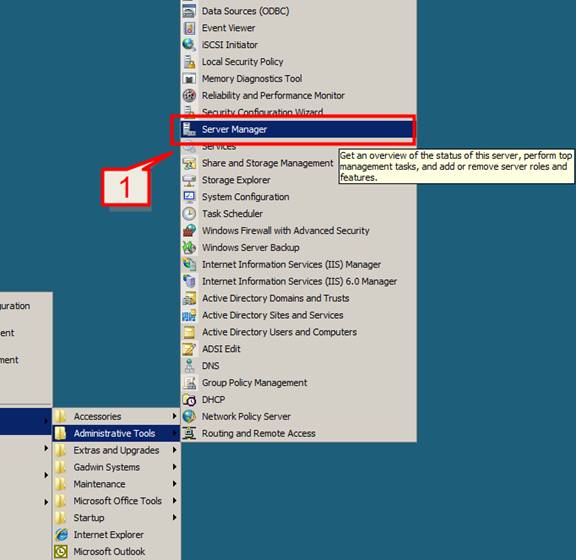
#1. Open Start -> Programs -> Administrative Tools -> Server Manager
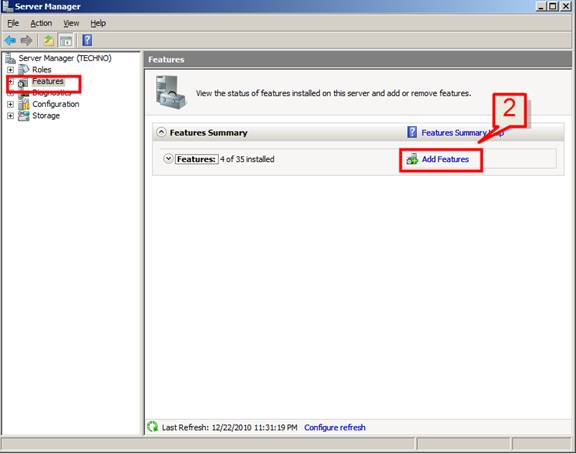
#2. On the left pane of the server name in Server Manager, select Features and on the right pane click on Add Features.
#3. On the Select Features dialog box, scroll down and put a check mark on WINS Server.
Click next.
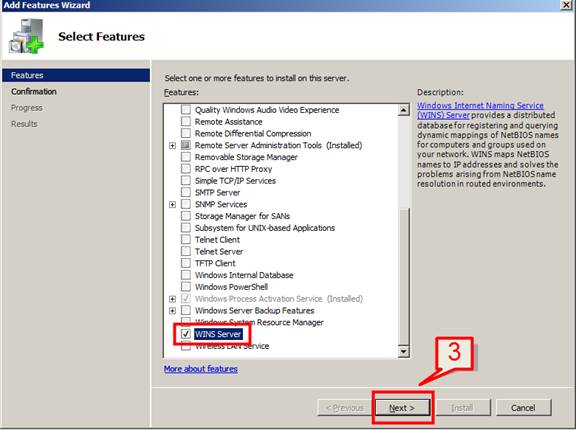
#4. Click Install to start installation of WINS server on the Confirm selection window.
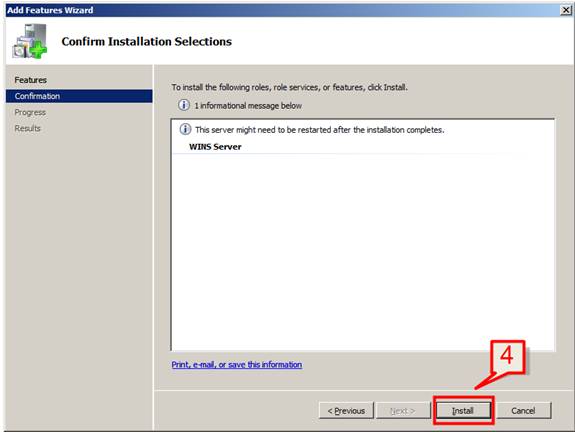
#5. Windows will now start installing WINS Server.
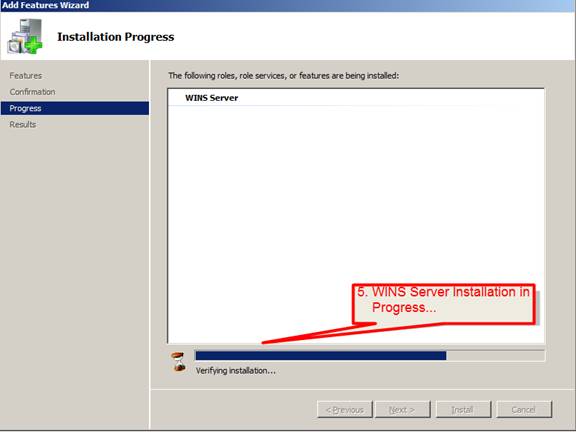
#6. Once installation is done, click Close on the next window.
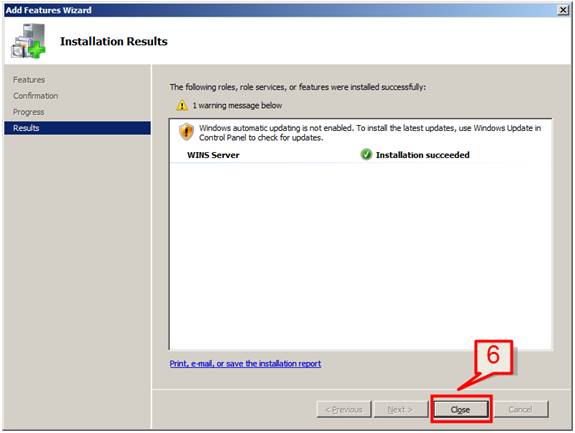
Verify Integrity of WINS installation.
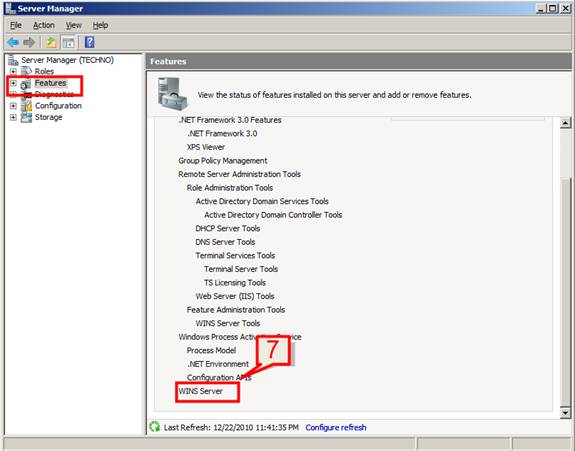
#7. After installation, WINS Server will now be listed as an installed component on the Features pane.
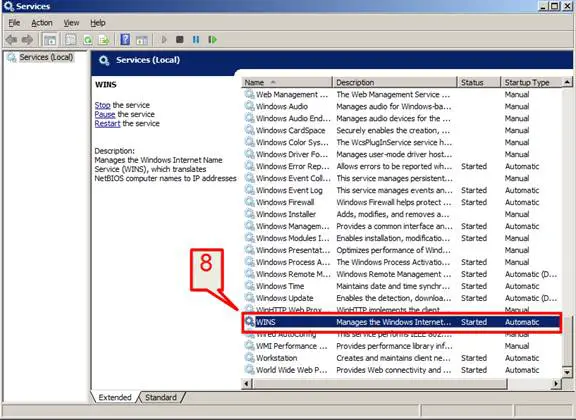
#8. Go to Start -> Programs -> Administrative Tools -> Services. WINS service is now added as a service and is started.
Configure WINS Server
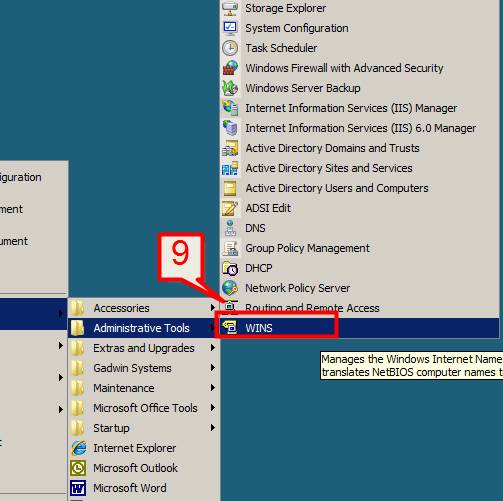
#9. Open Start -> Programs -> Administrative Tools -> WINS
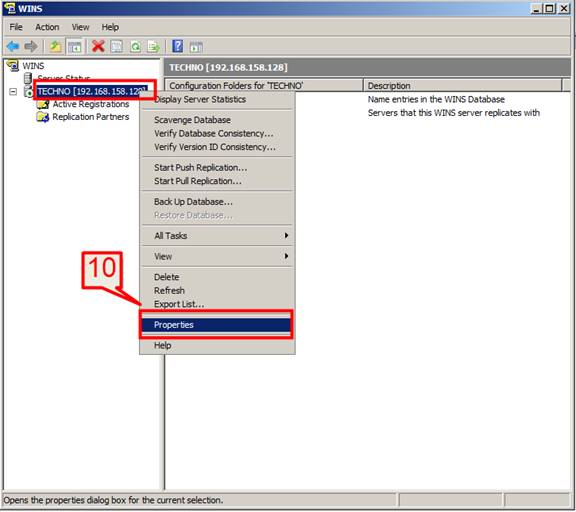
#10. Select the WINS Server, right-click and select Properties.
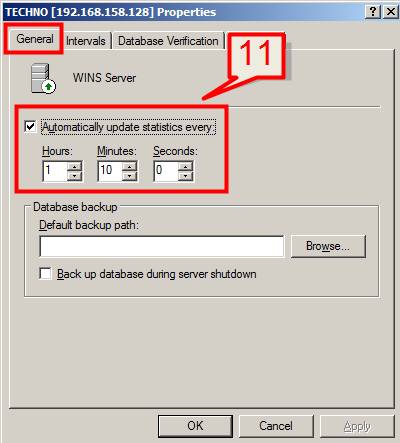
#11. To configure how frequently WINS updates its database statistics, select the General tab and provide the interval timely information on the automatic update statistics every section.
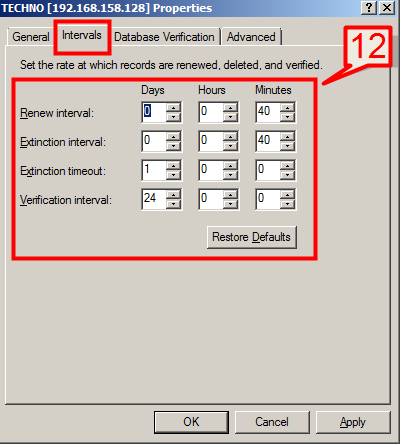
#12. On the Interval tab, provide timely information as how frequently WINS renews, deletes, and verifies the WINS client information.
Note: Renew interval specifies how frequently the client re-registers its name on the WINS server.
Extinction interval is the time between a database entry release and extinct time.
Extinction timeout is the interval between when an entry is extinct and when its information is removed from the DB. Verification interval is the interval after which WINS will checks for no active entry in its database.
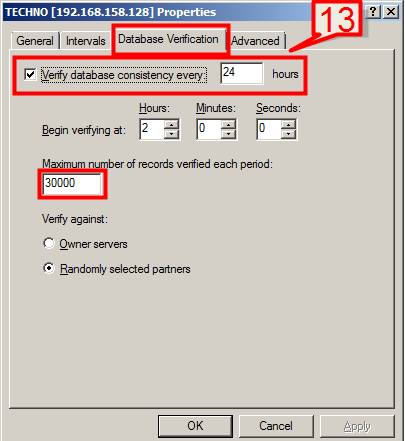
#13. Database verification tab allows you to provide how frequently database consistency is checked. You can also specify the maximum number of records that WINS verifies.
Put a check mark on the ” verify database consistency every” section and provide a time (in hours).
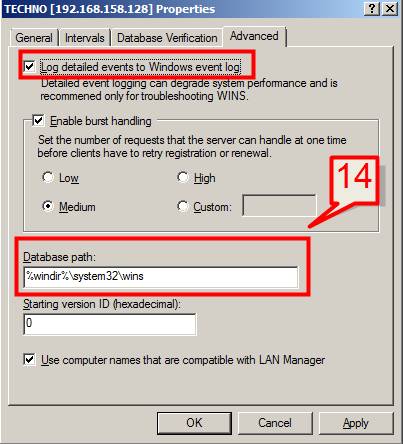
#14. Advanced Tab enables you to write WINS log information on the windows event log and provide you a path where the log information will be stored.
Put a check on “log detailed events to Windows event log” and on the database path section, provide a path to the logs or select the default.
#15. Select OK to apply the changes.
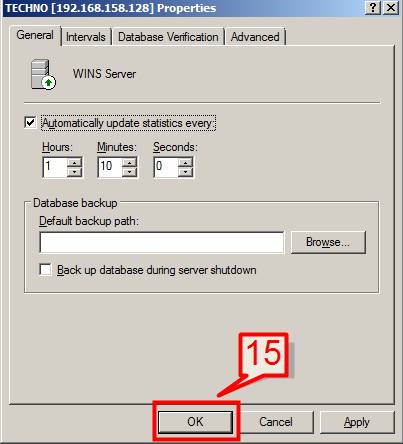
Configure a Static Mapping
#16. On the WINS server pane, select Active Registration, right-click, and select New Static Mapping
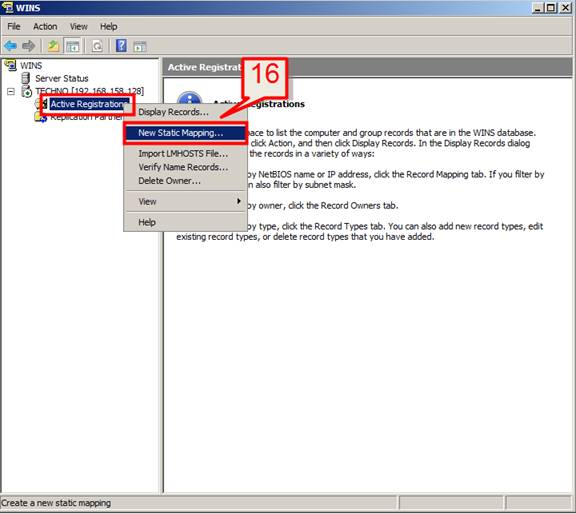
#17. Provide the computer name of a non WINS client, NetBIOS scope detail, provide the type (could be a unique name or group or other) and, the IP address of the client, and click OK.
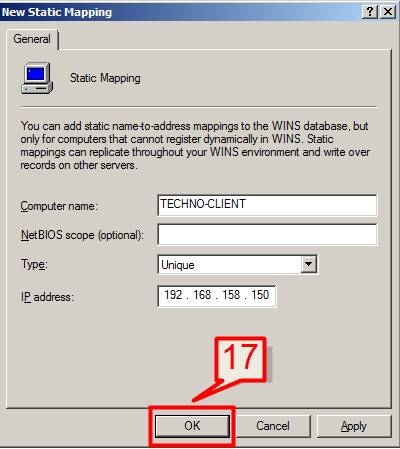
Configure a replication partner of the Local WINS server
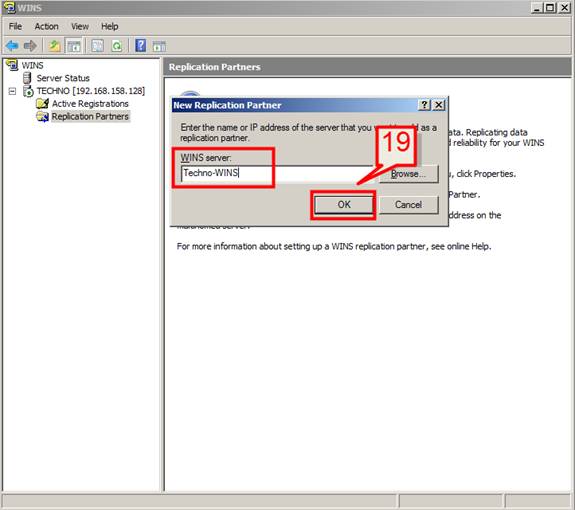
#18. On WINS server pane, select Replication Partners, right click and select New Replication Partner
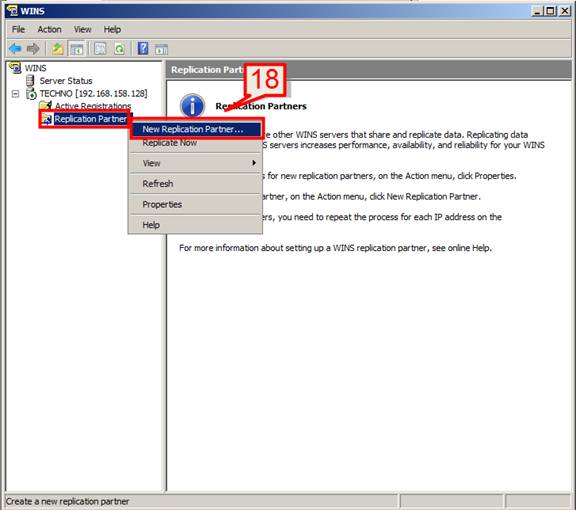
#19. Provide a name or an IP address of the replication partner server and click OK.
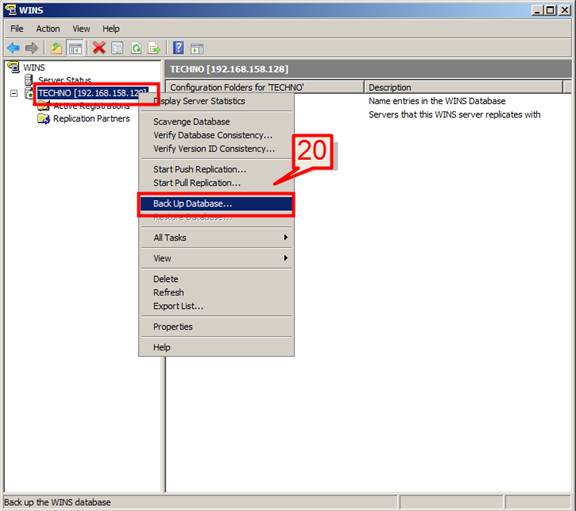
#20. To take a backup of the WINS server, select the WINS server, right click and select Backup Database.
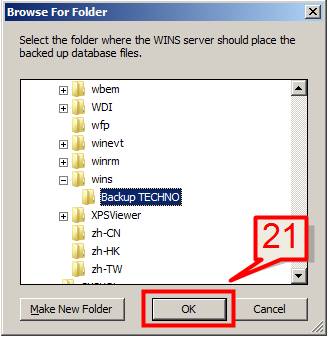
#21. Browse for a folder path where you want to take the back-up and select OK.
Note: We can also preconfigure the backup path on the server properties General tab section.
Configure TCP/IP property for WINS
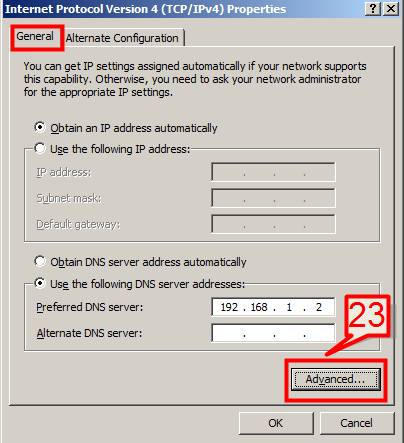
#22. We can assign WINS server information on DHCP clients. To configure WINS, go to the Local Area Connection TCP/IP -> Right click -> Select Properties -> Select the TCP/IP based connection for the client and click on properties.
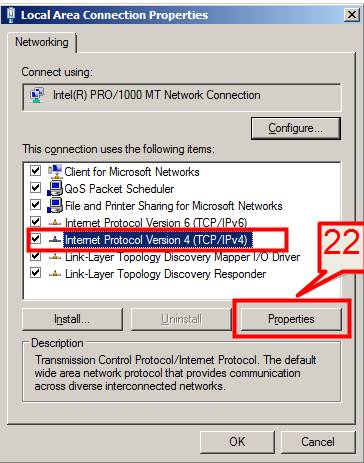
#23. On the General tab, click Advanced.
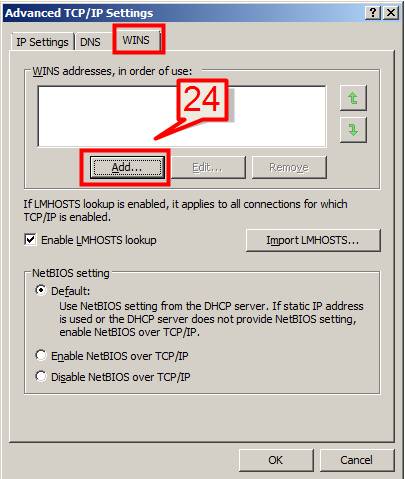
#24. Select WINS tab and click on Add.
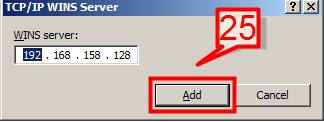
#25. On the TCP/IP WINS server dialog page, provide the lists of WINS server IP address(es) that the client will query.
Click Add.
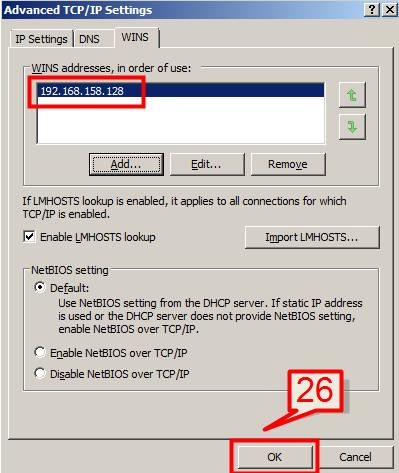
#26. List(s) of WINS server will get listed on WINS property page; click OK.
#27. Alternatively, configure the DHCP client to use a primary and secondary WINS server to query.
Go to the Local Area Connection TCP/IP -> Right click -> Select Property -> Select the TCP/IP based connection for the client and click on Properties.
Select the Alternate Configuration tab.
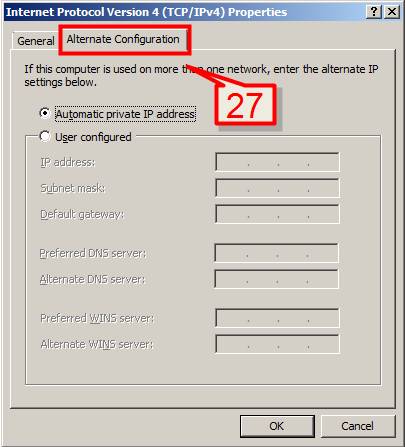
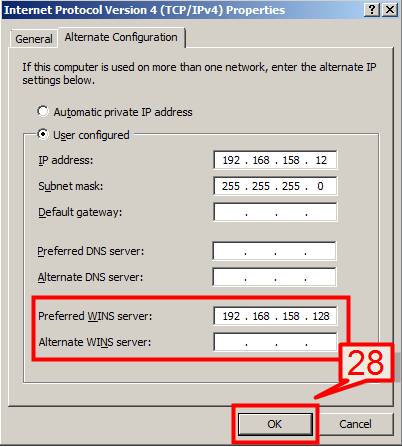
#28. Select “User configured” and provide a preferred WINS and alternate WINS server information along with the IP address, subnet mask, default gateway, and preferred DNS server information and click OK.
