Asked By
Madona
1370 points
N/A
Posted on - 06/04/2011

Hi,
I am always use windows xp to work in my computer. Recently I decided to use Windows Server 2003, so I have back up my all hard disk all data from windows xp. When I use windows xp I use Gmail in my outlook express. Some of friend tells that Microsoft out look is better for mail. So when I installed Windows Server 2003 I installed Microsoft office 2003, now I need to configure my Gmail in ms outlook, I want to collect my mail from when I use windows xp and use outlook express.
Can’t collect mail from outlook express

It is simple to configure your g-mail account in Microsoft outlook, just do these steps and you will be done:
Go to outlook express:
TOOLS–> Email Accounts –> Add New Email account –> Next
Select IMAP and click next
Here you have to provide your username, Password and in IMAP type "imap.gmail.com"
In SMTP type "smtp.gmail.com" As shown here:

Now Click next and it will be closed BUT you have to go there again and now you have to set some other things such that
Go to MORE SETTINGS –> OUTGOING SERVER and check the box: "MY outgoing server ……………."
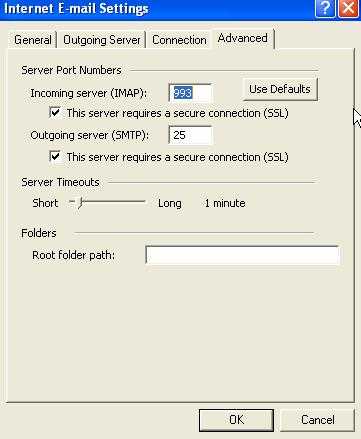
Next go to Advanced and set IMAP (port) to 993 and SMTP to 25. Also check the 2 boxes given there. it will look like this:

Now you can check mail by clicking send/receive.
And that's it.
Can’t collect mail from outlook express

Before you can add an email account and start sending and receiving email messages with Microsoft Outlook Express, you have to get the correct configuration of your email account for either POP or IMAP. Also, before you can use Gmail on Microsoft Outlook Express, you have to enable first IMAP or POP in your account before you can use an email client.
To enable IMAP or POP in your email account, open your web browser and log in to your Gmail account. Next, click the gear icon on the upper right corner of the screen then select “Settings”. In “Settings” screen, go to “Forwarding and POP/IMAP” tab then enable the appropriate settings. If you want to use IMAP, in “IMAP Access”, select “Enable IMAP” then click “Save Changes” at the bottom.
If you want to use POP, in “POP Download”, select “Enable POP for all mail” then click “Save Changes”. After this, you have to get the correct configurations for either IMAP or POP whichever you select.
For IMAP settings:
- Incoming Mail (IMAP) Server – imap.gmail.com
- Requires SSL: Yes
- Port: 993
- Outgoing Mail (SMTP) Server – smtp.gmail.com
- Requires SSL: Yes
- Requires TLS: Yes (if available)
- Requires Authentication: Yes
- Port for SSL: 465
- Port for TLS/STARTTLS: 587
For POP settings:
- Incoming Mail (POP) Server – pop.gmail.com
- Requires SSL: Yes
- Port: 995
- Outgoing Mail (SMTP) Server – smtp.gmail.com
- Requires SSL: Yes
- Requires TLS: Yes (if available)
- Requires Authentication: Yes
- Port for TLS/STARTTLS: 587
- Server timeouts – Greater than 1 minute (5 is recommended)
Now, in Microsoft Outlook Express, go to “Tools” then “Accounts”. In “Internet Accounts” window, go to “Mail” tab then click “Add” and select “Mail”. In “Internet Connection Wizard” window, in “Display name”, enter your full name or the name you want to appear in your email messages then click “Next”. On the next screen, in “E-mail address”, enter your Gmail email address then click “Next”.
On the next screen, select a server from the dropdown list (POP3, IMAP, or HTTP). If you want to setup a POP account, select POP3. If you want an IMAP account, select “IMAP”. After this, enter the details of the server from the list I created above then click “Next”. On the next screen, in “Account name”, enter your Gmail email address then your Gmail password in “Password”.
Click “Next” then “Finish”. After this, select “imap.gmail.com” item in “Mail” tab then click “Properties”. Next, go to “Servers” tab then under “Outgoing Mail Server” section, check “My server requires authentication” then click “Settings”. On the next screen, make sure “Use same settings as my incoming mail server” is selected then click “OK”. Next, go to “Advanced” tab then set the correct port numbers and protocols.
When you are finished, click “OK” and that’s it. Test your new account by sending a new email message. If you receive an error, check the configurations above.


