How to insert new rows and columns in Excel
Before performing any of these solutions, please back-up and perform these suggestions on an extra copy of your actual file, just in case.
1. Most probable cause: the Excel worksheet you are working on has data or formatting in the last row or last column.
a. Check if all Rows are filled up. Press Ctrl-Down repeatedly until you reach the last row. If you have entered actual visible data in row 65536 (last row for Excel 2003) or row 1048576 (last row for Excel 2007 & Excel 2010), then you reached the limit of Excel and the option would be to move some older rows of data entries into another worksheet. If you are using Excel 2003, you may upgrade to Excel 2007 or 2010 which has more rows available.
b. Check if all Columns are filled up. Press Ctrl-Right repeatedly until you reach the last column. If you have entered actual visible data in column IV (last column for Excel 2003) or column XFD (last column for Excel 2007 & Excel 2010), then you reached the limit of Excel and the option would be to move some older columns of data entries into another worksheet. If you are using Excel 2003, you may upgrade to Excel 2007 or 2010 which has more columns available.
c. If your last expected data is not in the last row or last column of your worksheet, you may have invisible data, formula or formatting in the blank areas. Check first if you have “invisible data” like hidden rows or extended borders.
c.1. Go to the last column & row which Excel detects as having data, formula or formatting by pressing Ctrl-End. Press Right key (->) to move 1 column to the right. Press Ctrl-Up to see if this is really the start of your columns without data. If this is not your last expected column of data, scroll to find the rightmost column with real data and press Right key once. Click on the column header/letter to select this column. Press Ctrl-Shift-Right to select all blank columns. Click Edit > Clear > All, to remove even the formatting (Do not use delete because it will not remove formatting).
c.2. Go to the last column & row which Excel detects as containing data, formula or formatting by pressing Ctrl-End again. Press Down key to move 1 row down. Press Ctrl-Left to see if this is really the start of your rows without data. If this is not your last expected row of data, scroll to find the last row with real data and press Down key once. Click on the row header/number to select this row. Press Ctrl-Shift-Down to select all blank rows. Click Edit > Clear > All.
c.3. Inspect your last column and row with data if they are intact. Press Ctrl-Home to return to cell A1. Save your file and close it. Then re-open the file and try inserting a row or column.
Did this help? If not, try step d below.
d. Perform this solution on a new extra copy of your actual file. If step c above did not help, caused missing entries or it ruined some formulas, try these more rigorous checks of “invisible data” before performing step c.1, c.2 and c.3.
d. 1. Check if you have hidden rows or columns. Press Ctrl-A to select everything. Right-Click any part of the worksheet and click Unhide.
d. 2. Check for incompatible features. Click File > Check for Issues > Check Compatibility to see any incompatibilities. You might have installed filters that were invalidated. Check your filters.
d. 3. Usually, when a cell is deleted, the formatting remains. Select areas that have borders but do not contain useful data. Click Edit > Clear > All. Or you might have a page border that encompasses your whole worksheet. Remove the page border.
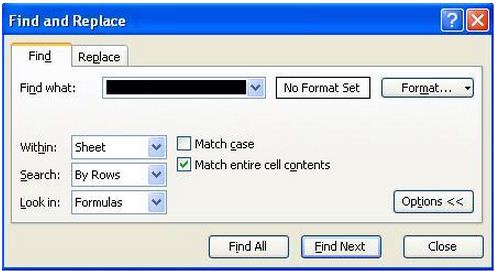
d. 4. An accidental press of the spacebar may also put non-visible data into a cell. Find it by pressing Ctrl-F, type space, Options >>>, check Match entire cell contents and click Find All. Remove all unintended spaces found in your worksheet.
d. 5 A formula that returns a null (“”) also results to a cell which may appear blank. Find all instances of formulas with null (“”) in them and revise it to contain something visible like “–" or something.
d. 6 There might be stray comments, press F5, click Special > Comments > OK to find comments. To delete the stray comment, right-click the cell containing the comment, and then click Delete Comment. Repeat to delete all unneeded comments.
d .7 There might also be stray or resized graphical objects (including clipart, charts and buttons), press F5, click Special > Objects > OK. Delete or move any stray object found. Repeat to delete all unnecessary objects.
d. 8 In Excel 2007, there is a known bug that hides some objects. To turn it off, click Microsoft Office Button > Excel Options > Advanced tab > scroll to Display options for this workbook > For objects, show, > All. If it was set to Nothing (hide objects), then that is a source of your problem.
After all these rigorous checks for “invisible data” perform step c.1, c.2 and c.3 outlined above.
2. Try starting your Microsoft Office Programs in Safe mode. Not the Windows Safe Mode, just the Safe Mode of Excel. Click the Windows Start button > Run. In the run dialog box, type excel.exe /s (do include the slash s) so that Microsoft Excel will run in safe mode. Open your file and try inserting rows or columns. If it does, Press Ctrl-Home to go to cell A1 and save your file. Retry opening it again in Normal (Non-Safe Mode) Excel.
3. Your file might be corrupted. This suggestion will take a long time. Close Excel first. Open My Computer or Computer, right-Click the disk that contains your documents (most probably C:) and click Properties > Tools > Check Now. Checkmark all the options then click Start. If it needs to schedule disk checking at Restart, just click Yes.
4. The Microsoft Office Programs might be damaged. This option will irreversibly clear any customized setting you might have set in all Office Programs so take care. Inside Excel, click Help > Detect and Repair > Start.