How to install free Adobe Disney font style in PX?

Asked By 0 points N/A Posted on -
qa-featured

I have Windows XP installed and was wondering if someone will guide me to install free Adobe Disney font style on my PC.

Any kind of help would be appreciated as I’m new to PCs.

SHARE
Best Answer by Taylor Laura
Answered By 5 points N/A #164243

How to install free Adobe Disney font style in PX?

qa-featured

Do you mean Walt Disney font? You can download the font here

When you have downloaded that, follow these steps to successfully install the font to your PC:

1. Open the file's location

2. Open the Control Panel. Then choose Appearance and Personalization.

3. Click fonts. Then copy the downloaded file here.

You should now have the font installed to your computer.

I hope this helped you.


Best Answer
Best Answer
Answered By 15 points N/A #164244

How to install free Adobe Disney font style in PX?

qa-featured

Hi Donna,

Quickest way to install a new font (in your case Disney) in  your computer is to drag the font's file/s (OpenType, TrueType) from its folder location to the Fonts file folder in the Control Panel.

Click Start and Control Panel.

Then click on Appearance and Themes to find the Fonts folder of your computer..

If your font is in a ".zip" file, try to extract it first.  

Then open the file folder after it has been extracted. Look for a file or file types that says "OpenType" or "TrueType".

Here you can drag the files from the current location to the Fonts folder.  

Then you can test it using notepad to see if it is working.

Good luck!

Answered By 590495 points N/A #292028

How to install free Adobe Disney font style in PX?

qa-featured

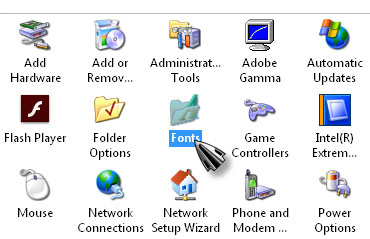
Adding or installing new fonts on your Windows XP is very easy. If you already downloaded the new fonts you want to add on your computer, click “Start”, “Control Panel” then click “Switch to Classic View” to display all the items. Double-click “Fonts”.

Fonts in Control Panel

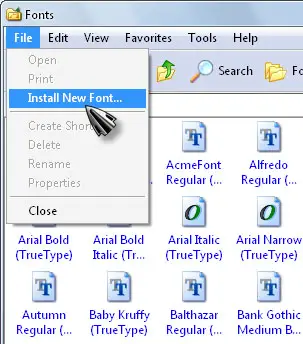
In the “Fonts” window, click “File” and then “Install New Font”.

Install new font

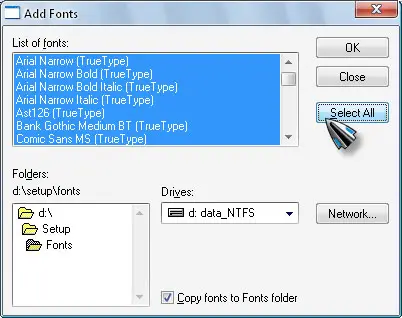
In “Add Fonts” window, under “Drives”, select the drive where the new fonts are located. Under “Folders”, navigate to the folder where the new fonts are stored. Double-click to enter a folder. Once all fonts appear under “List of fonts”, click “Select All” to select all the fonts in the folder and then click “OK” to begin installing the new fonts. And that’s it.

Select and install the fonts

If the fonts you downloaded are in ZIP files, you need to unpack them first before you can install them. If you want to download more Disney fonts, try visiting Free Disney Fonts. They have like 45 free Disney fonts you can download.

Related Questions