How to repartition hard disk in window 7


Process of partitioning hard disk without software:
1. Click on Start Menu, right click on Computer, select Manage and then Computer Management display will appear.
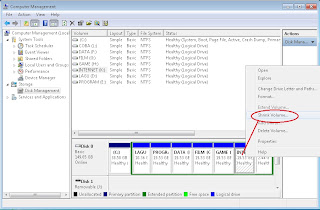
2. On Computer Management display, select storage, then select Disk Management. On the right side windows you will see your disk detail (as in this case, you will see the drive (C:) )

3. Select (c:), right click and then select shrink volume. Querying shrinks space will be appearing, wait until the process finish.
4. Shrink C: will appear. Decide the partition volume as you required. (i.e: 200000), type in the volume amount and then click shrink, let the process finish, C: will shrink to 200Mb and new partition volume will appear.
5. The new volume is not yet formatted or free space and can’t be used. Format the new volume by select the volume and right click, then select new simple volume.
6. A new simple volume wizard will appear, click next. On specify volume size set for 200MB, click next. Assign the following drive letter: D and then click next.
7. Format Partition windows will appear. Select file system: NTFS, Volume label: type any name you required, click on perform a quick format and then click next.
8. Completing the new simple volume wizard windows will appear, take a quick look on the details, if it’s as your required then click finish. If not you can change it by click Back.
9. Your new partitioning is finished and ready to use.
10. Repeat steps 5 to 9 for making another new partition volume.
As for Bit locker you can refer to this link “BitLocker Drive Encryption Step-by-Step Guide for Windows 7”
