Hello,
Why am I getting this error? Is this the problem with bad batch of discs or anything else? I have checked my DVD burner’s cable everything is working fine then why does appear this error? I want your assistance. Any help would be greatly appreciated.
Thanks.

ImgBurn
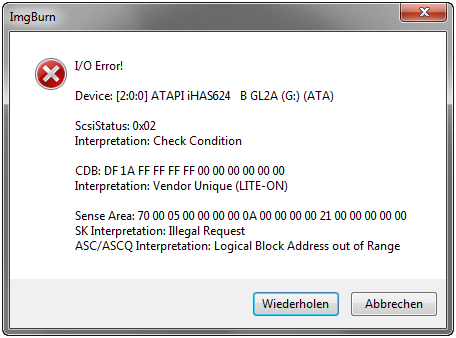
I/O Error!
Device: [2:0:0] ATAPI iHAS624 B GL2A (G:) (ATA)
ScsiStatus: 0x02
Interpretation: Check Condition
CDB: DF1AFF FF FF FF000000000000
Interpretation: Vendor Unique (LITE-ON)
SenseArea:700005000000000A00000000210000000000
SK Interpretation: Illegal Request
ASC/ASCQ Interpretation: Logical Block Address out of Range
ImgBurn I/O error: Could not burn DVD

Hi,
Try lowering the buffer size in the program settings and use 4x or 2.4x speed for burning. Also disable the Imageburn verification option if at all you did enabled. If you still facing problems, disconnect all the cables of drive and reconnect it(Let the PC cool).
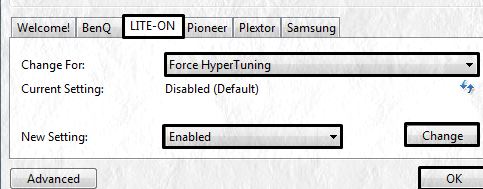
Its seems yours drive is Lite-on, change these Advanced settings:

Make sure you close unwanted background processes (from task manager) in windows, like anti- virus software, iTUNES and other non system processes. Find the Imgburn process right-click and set high priority.
You can try Wondershare's Video Converter Ultimate an alternate tool. Always make sure you are using good media and update the Imageburn to latest version.
ImgBurn I/O error: Could not burn DVD

That is an I/O error or input/output error. If you are getting it when burning something with ImgBurn, you need to check the internal connections of your optical drive. If you are burning with a laptop, you probably need to bring your computer to a computer shop or repair center to remove and reconnect the optical drive.
For desktop, shut down the computer and open the CPU case. Now, locate the cables on your optical drive or DVD writer and disconnect them. After this, connect the data cable back to the drive. For the power supply, connect a different power supply cable. When you are finished, turn on the computer then try burning again.
If this doesn’t work, shut down the computer again then disconnect the other end of the data cable from the motherboard and connect it back. If you have a SATA drive, transfer the SATA cable to another SATA port. After this, turn on the CPU then press Del, Delete, F2, or whichever key is used to go to the BIOS.
In the BIOS, go to the drive management section and make sure the optical drive is detected. If it doesn’t appear, check the cables again. Also, try pressing the eject button on your optical drive to verify if the drive has power. If the tray ejects then it has power. In this case, you need to check the data cable.
For IDE drives, try using a different ribbon cable or replace the ribbon cable with a new one. For SATA drives, try transferring the SATA cable to all available SATA ports or replace the SATA cable with a new one if the problem continues.


