Asked By
Hathy Brain
0 points
N/A
Posted on - 10/28/2013

Hi All,
Outlook 2013 mails are not showing up when configured with IMAP
I am using Office 2013 from last 1 week.
I configured with POP and not changed to IMAP and now today i have lost mails from my view
Anyways to retrieve them to be shown via IMAP
I just configured another email id and in that they are all fine.
I have no filters enabled as i checked that.
Regards
Hathy
Answered By
points
N/A
#123920
Outlook 2013 mails are not showing up when configured with IMAP

Hello Hathy Brain,
To solve your problem follow the troubleshooting process which is related to Outlook. Try the steps below:
Steps 1:
Eliminate the filters applied for the folder and then verify the results.
Also type the command “Outlook /cleanviews”( without quotes) to reset views and check the result as well be sure the Outlook is closed.
-
To do that Press Windows key + R.
-
Then copy & past or type the command “Outlook /cleanviews”( without quotes) in the “Open box” , next click press “Enter”.
Step 2:
If the above technique fail, in that situation you need to create a new email profile for Outlook and the check the result. To create a new email for help visit this page. If the problem fixes in the new profile, you can set the new profile as default and continue working with it. To continue
-
First of all go to the “Control Panel”.
-
Mail icon, show profile.
-
Then highlight the new profile, next press on “always use this profile” option.
-
And “click OK”
That’s all. I hope above process helps.
Outlook 2013 mails are not showing up when configured with IMAP

Hi Hathy,
The error is because of incorrect mail settings.
To resolve the error:
1) Click 'File' > 'Add Account'
2) In the address field, enter an email address and password, Click 'continue'
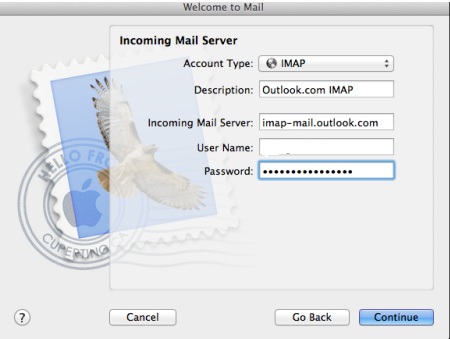
3) Set the account type as 'IMAP', enter incoming mail server as 'imap-mail.outlook.com'
4) Enter the email id and password, click 'Continue'

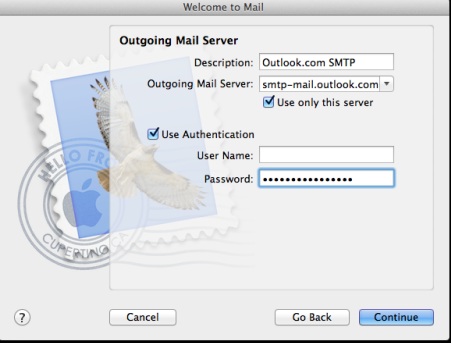
5) In the outgoing mail server, enter 'smtp-mail.outlook.com', select 'Use authentication' checkbox
6) Click 'Continue'

7) In 'Account Summary' page, uncheck the box 'Take account online', Click 'Create'
8) In the 'Accounts' window, insert the new email address
9) Save all the changes


