Asked By
Username
320 points
N/A
Posted on - 06/25/2011
Hi,
I have just installed adobe master collection. I have created a new Photoshop file and was drawing images on it, but suddenly the program seems to crash and gives me the error, “scratch disk is full”. I have tried to close and open the program again, but I get the same error. How can I fix this?
Thank you.
Photoshop Scratch disk full error
Adobe Photoshop Scratch Disk
When you are working with Adobe Photoshop in any version, the application will create a temporary file for your working history which is the so called Scratch. Scratch disk is the physical disk space where the temporary file or the scratch file was saved on your hard disk drive. Usually the scratch file is saved in your temporary files folder. Creating this scratch file enables you to undo your previous action in the current Photoshop project.
Thumbnails in your Layer properties also allocate space in your scratch disk. Large thumbnails will allocate larger space than the small thumbnails. To save space on your scratch disk, you may change the way how thumbnails are displayed in your layer properties. Instead of setting it to Large Thumbnails change it to Small thumbnails or you may remove the thumbnails by setting it to No Thumbnails. Here’s how to change your thumbnail settings:
-
If your Layers window is not visible on the sidebar window, Click Window on the Menu Bar then select Layer or just press F7 on your keyboard.
-
On your layer window, select one by one all the layers open then right click on the thumbnail icon then select No Thumbnail on the pop-up menu. Not: you may select all layers by holding the control key then click on the layers. Clicking twice will make the layer un-selected.
You may also limit you Adobe Photoshop history cache to save more space in your Scratch Disk. But we have the cons of limiting the history cache; you can only get back to your history for a limited count of history. By default your history is set to 20. Here’s how to change your History limit.
-
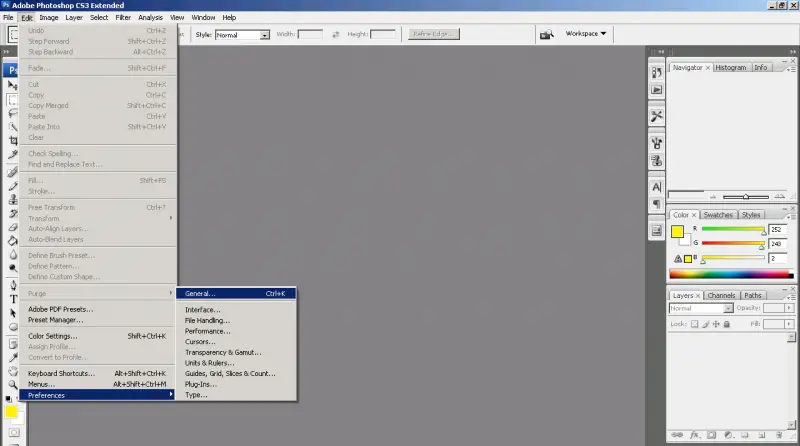
Click Edit to move your mouse pointer to Preferences, the Preferences sub menu will then automatically show then select General. Or just press CTR+K in your Adobe Photoshop Desktop. Preferences Dialog box appears
-
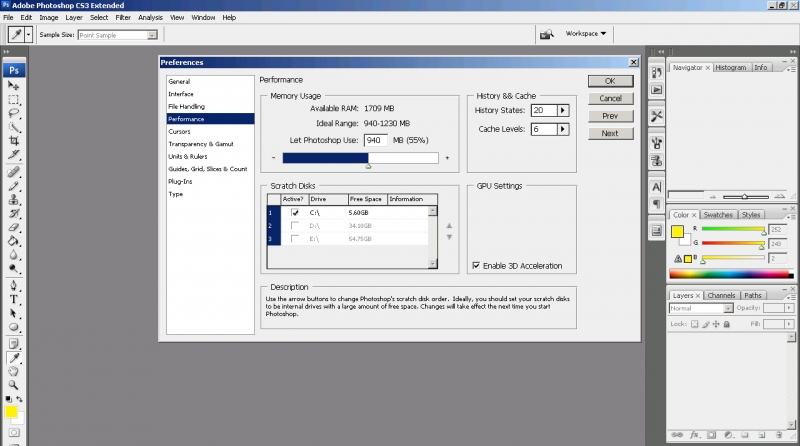
On the list box on the left side of the dialog box, select Performance. On the History & Cache frame, lower down the history states to 10 or whatever lower numbers that suites to your scratch disk.
-
Click Ok to apply the settings.
If your hard disk drive has low space available, you may clean your temporary files are removed all un-necessary documents or files on your hard disk drive. Uninstall those applications that you are not using or the games which is not productive in your collections.
If you have extra hard disk drive, you can use your secondary hard disk drive as your scratch disk to allocate more space in your scratch disk. To include your secondary hard disk drive or even a partition on your primary hard disk drive that has large space available, just follow the following steps.
-
Click Edit to move your mouse pointer to Preferences, the Preferences sub menu will then automatically show then select General. Or just press CTR+K in your Adobe Photoshop Desktop. Preferences Dialog box appears.
-
On the list box on the left side of the dialog box, select Performance. On the Scratch Disks frame, tick or mark a check to the drive correspond to your secondary hard disk drive or the secondary partition of your hard disk drive.
-
Click Ok to apply the settings.
And the ultimate solution if all options above is not working or not possible. Do not create or open a larger resolution of the image in your Photoshop. And, for every event or changes you made, purge all your activity history. For this, follow the following steps:
-
Click Edit on the Menu Bar.
-
Select Purge;
-
Click All.
Photoshop Scratch disk full error
Hi!
First you should understand what the scratch disk is – it is a virtual memory technology used by Photoshop when your system doesn’t have enough RAM to perform an operation. By default it is the drive where your operating system is installed (most commonly drive C on Windows), but it can be any drive or drive partition with free memory. It is generally a good idea to have your scratch disk on your fastest drive.
Also Photoshop guidelines state that you shouldn’t use the drive of the operating system, the drive where your edited files are stored or any removable or network drives. Here is how to assign your scratch disk to the drive you want:
• A common problem when Photoshop crashes is that it leaves large temporary files on your system that may further impede your work. Photoshop temp files are usually named ~PST****.tmp for Windows or Temp***** for Mac where the ****** represent numbers. Try running a search for them via Start > Search > All Files and Folders à~PST. You can safely delete them when the program is not running and maybe that will fix your problem.
• What you can also try if the problem persists, is cleaning up free space on the drive where your scratch disk is assigned. Just take the time to see which files you still need and which aren’t of any use to you anymore that you can delete. Try running the program again.
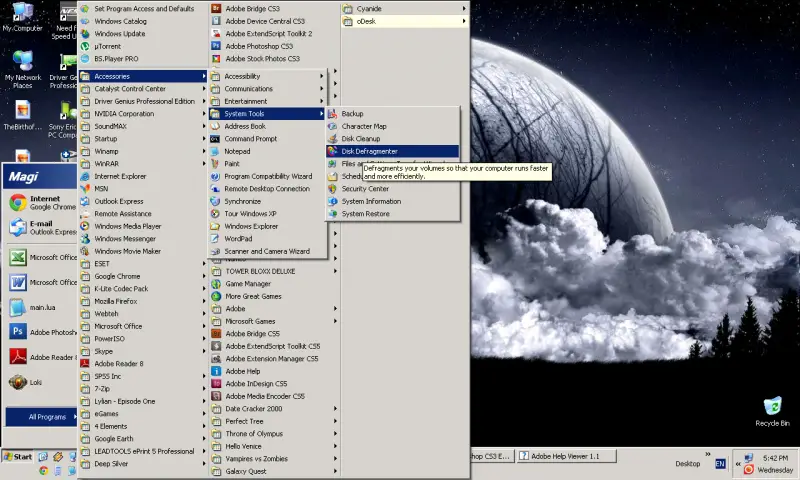
• If you check your drive to see how much free space you have left and it shows there is a lot, the problem may be that you haven’t defragmented your drive in a while. Photoshop needs contiguous, unfragmented free space on the scratch disk drive to run smoothly. The disk defragmenter is located here:
• If that still doesn’t work you should try lowering the resolution of the image you are working on since large images tend to take up more memory and may overload your scratch disk. This can be done by selecting Image then Image Size.
• If you still experience the problem, it may be that the RAM Photoshop has been allowed to use is too little or too much. Usually a percentage of between 50% and 60% are normal and it may be higher (70-75%) on high-performance machines. This can be viewed again in the window where you assign your scratch disk drive.
Hope I have helped!