My computer is pretty old now, about 4 years old, and every time the OS gets corrupted or when it is infected with viruses, I just reinstall the OS again. Some say I should reformat completely before installing another OS, but I have lots of important documents, and pictures on my hard disk and transferring them to the 2nd partition is pointless because of space issues.
Every time windows installation is done, I can see a selection of different OS that have been collected in my PC.
There are 4 of them now.
How can I remove the other ones?
Is it possible?
Removing old OS selection lists during boot
Removing Items on the operating system startup menu
Due to multiple installation of Operating System in your hard drive multiple list of operating systems to be selected at prompt during your operating system start-up. You can find these listings on your boot.ini file which is located in your system root directory. We had two 3 ways to edit the boot.ini.
-
Edit under the system properties
-
Edit using the bootcfg at the command prompt
-
Through the use of any text editor
A typical boot.ini contains the following lines:
[Boot loader]
timeout=30
default=multi(0)disk(0)rdisk(0)partition(1)WINDOWS
[Operating systems]
multi(0)disk(0)rdisk(0)partition(1)WINDOWS=”Microsoft Windows XP Professional” /noexecute=optin /fastdetect
A dual or multi-boot boot.ini configuration contains the following lines:
[Boot loader]
timeout=30
default=multi(0)disk(0)rdisk(0)partition(1)WINDOWS
[Operating systems]
multi(0)disk(0)rdisk(0)partition(1)WINDOWS=”Microsoft Windows XP Professional” /noexecute=optin /fastdetect
multi(0)disk(0)rdisk(0)partition(2)WINDOWS=”Microsoft Windows XP Professional” /noexecute=optin /fastdetect
This is the sample view of your dual boot operating system selection screen (black screen):
Please select the operating system to start:
Microsoft Windows XP Professional
Use the up and down arrow keys to move the highlight o your choice.
Press Enter to choose.
Seconds until highlighted choice will be started automatically: 30
For troubleshooting and advance startup options for Windows, press F8.
Edit Under the System Properties
-
Click Start button the click Control Panel;
-
Double click the System under Control Panel Window, System Properties appears;
-
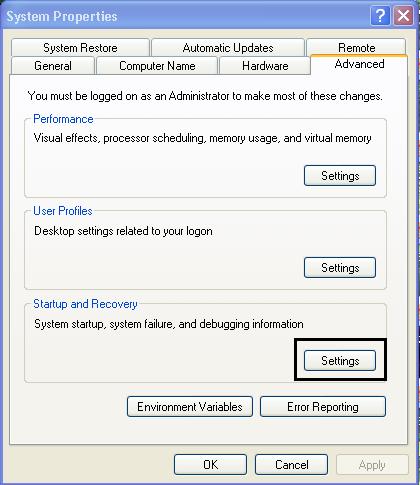
Click or Select the Advanced tab;
-
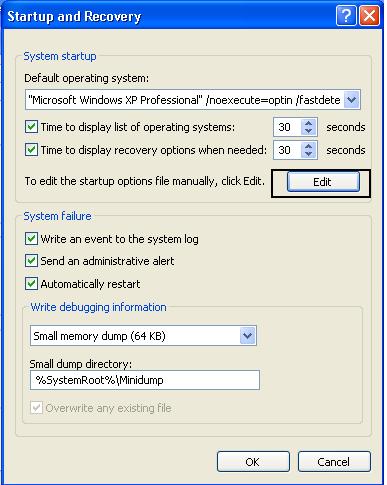
Under the Startup and Recovery frame, click the Settings button then Startup and Recovery Dialog box appears;
-
On the System startup frame click the Edit button;
-
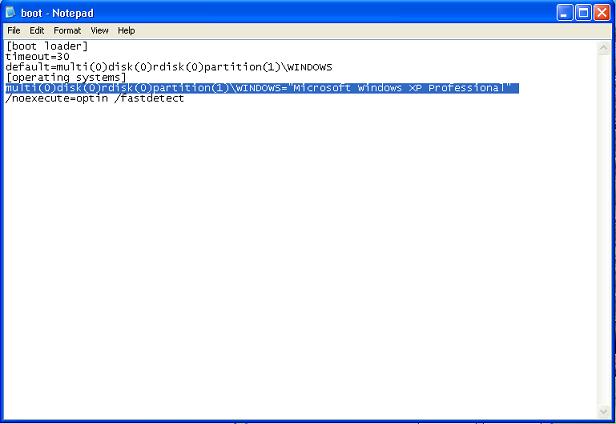
boot.ini well then loaded to notepad;
-
Under the line [operating systems], remove the line that does not match with the path to the default variable just above the [operating systems] line.
-
Save changes then reboot your computer.
Note: before editing of anything backup your boot.ini first. Just save us your boot.ini to any file you want. Like for instance save the file as boot.ini.old.
Deleting Entries using the bootcfg command
-
Open your command prompt by clicking Start button, the Run;
-
On the Run dialog box type cmd.exe;
-
On the command prompt type bootcfg /? So that you will know the syntax of using the command. (This step is optional).
-
Now, let’s say we want to delete the second option on our selection just type:
-
C:>bootcfg /delete /id 2 [press enter]
-
Reboot your computer to check for the changes or check the changes under the system properties as discussed above.
Modifying the boot.ini using a text editor
You can modify the boot.ini using notepad or the edit text editor in the command prompt.
Option A. Notepad
-
Open your notepad (you can also open the notepad using the run command, on the run dialog box just type notepad then click ok);
-
Click File the Open, then type boot.ini on the File name field of the open dialog box then click open.
-
Delete the line corresponding to the menu appeared on the start-up menu that you want to delete.
-
Save the file then restart to see the effect.
Option B – Command Prompt Edit
-
Click Start button then run, on the run dialog box type cmd.exe the click ok.
-
On the command prompt type:
-
C:>edit boot.ini [press enter]
-
The editor showed up with the boot.ini opened.
-
Delete the line corresponding to the menu appeared on the start-up menu that you want to delete.
-
Save changes by pressing Alt+F then select Save by using the arrow key down or just press the highlighted letter that corresponds to save.
-
Exit your editor by pressing Alt+F, X.
-
Type exit at the command prompt then reboot your computer to see the effect.
Removing old OS selection lists during boot
To remove the old OS, right-click on My Computer and click Properties. Select the Advanced tab and click Settings under Startup and Recovery option.
You will be prompted with the screen below. Click Edit to edit the startup options file manually.
This Notepad boot file will open.
Simply delete the Operating system that you do not want anymore and then save the file.
Removing old OS selection lists during boot
Hello dear,
It is very easy to remove unwanted operating systems from the logon list. Just right click on the My Computer icon, and choose Advanced, then choose Settings, in front of Startup and Recovery options. Then, you will see this window.
Then, just click on the edit button, shown in the picture, and it will open a text file, boot.ini.
Just delete all of the operating systems that you want to delete, and then press CTRL+S to save the settings.
Thanks.