I mostly use my college, Wi-Fi which works perfectly on my laptop. But when I tried to connect a LAN to access internet, it could not be connected. I Reinstalled the Ethernet driver, but still the problem persist.
Please help me, as my college, Wi-Fi is very slow as compared to the LAN. The LAN wire is working properly.
Unable to connect to internet via LAN
If this is your first time trying to connect to the college LAN network, then you must understand that you must contact the network administrator, so that he can sign you up for a space on the network.
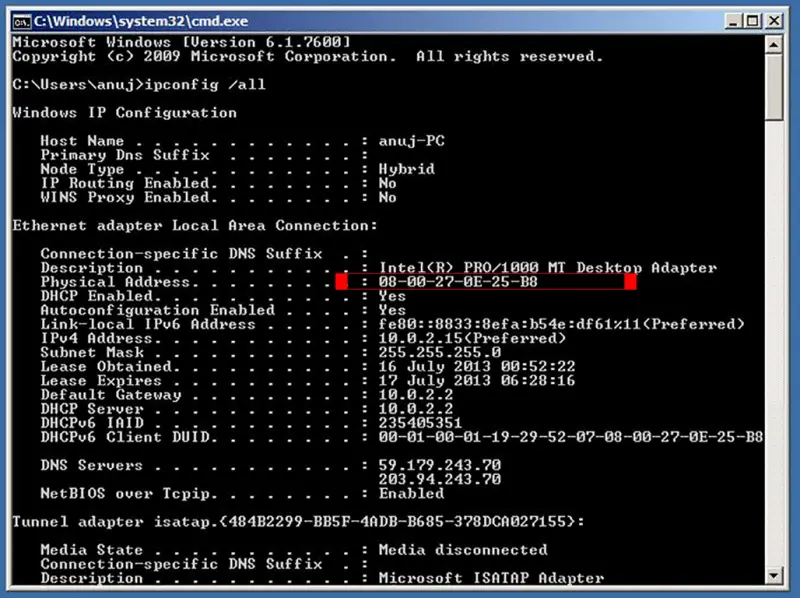
You are going to need your MAC address for this, because not anyone can connect to a private LAN network, especially on college campus. A MAC address is a personal ID of the onboard LAN network card.
The network administrator will use this information to register you to the college network and identify you whenever you connect.
You must proceed with these following steps:
1. Open up the Start Menu and then type in cmd to open the Command Prompt.
2. Inside the Command Prompt enter the following command : ipconfig /all
3. Press Enter and list full of information will appear inside the Command Prompt.
4. This is what you need to select:
5. That is your MAC address. Give it to the network administrator he will give you access to the LAN network in about 3 hours or so.
Unable to connect to internet via LAN
If you want to try to connect your laptop to the internet via local area network, you need to plug the network cable to your laptop’s network port then the other end of the cable should be plugged in to the Wi-Fi router. This should allow you to connect to the internet via the Wi-Fi router.
If you can’t connect via cable but you have connection via Wi-Fi, try setting your network card to DHCP so an IP address can be assigned automatically when you connect. To set your LAN card or Ethernet adapter to DHCP, click “Start”, “Control Panel”, “Network and Sharing Center” then select “Change adapter settings” on the left pane.
On the next screen, right-click your connection then select “Properties”. In “Local Area Connection Properties” dialog, select “Internet Protocol Version 4 (TCP/IPv4)” then click “Properties”. On the properties dialog, in “General” tab, select “Obtain an IP address automatically” and then “Obtain DNS server address automatically”. Click “OK” then restart the computer.